


Academy 1/72 WWII Ground Vehicle Set 3 Build Review
By Bill Kreuger
| Date of Review | September 2005 | Manufacturer | Academy |
|---|---|---|---|
| Subject | WWII Ground Vehicle Set 3 | Scale | 1/72 |
| Kit Number | 13401 | Primary Media | 126 parts (117 in tan styrene, 9 in clear styrene) |
| Pros | Another nice "dual purpose" kit from Academy; bomb trolley a handy item; state-of-the-art kit will be appreciated | Cons | May be viewed as "too aircraft" by armor modelers or "too armor" by aircraft modelers |
| Skill Level | Basic | MSRP (USD) | $13.00 |
Background
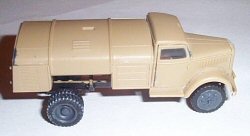
The Opel “Blitz” was the standard truck used by the German Army during the course of World War 2. It was developed in the mid-1930’s when the German government instigated a program of economic modernization. Opel had already become a major manufacturer of automobiles and trucks in Germany; one of their more successful designs being the Opel Blitz “S” whose production was begun in 1936. When competition for military cargo trucks was held, the Opel design won and the factory received a large order for this new standard Wehrmacht vehicle. Between 1937 and 1944 almost 140,000 of these trucks were built and used. Most were built as cargo vehicles, but also used in different utilities, including as fuel trucks. They were also license built by Mercedes-Benz beginning in about 1942.
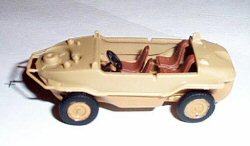
The Schwimmwagen was designed by Dr. Ferdinand Porsche and was used by German land forces during World War 2. It was based, mechanically, on the Kubelwagen, and produced by the Volkswagen factory in Wolfsburg, Germany. It was capable of both 2 wheel and 4 wheel drive and was also able to travel through water. It had a rear mounted screw propeller which was easily raised or lowered above or below the rear engine deck. It could travel at speeds up to 80 km/hour on land and 10 km/hour in water. These vehicles were mass produced beginning in about 1942, with over 14,000 of them built during the War.
The Kit
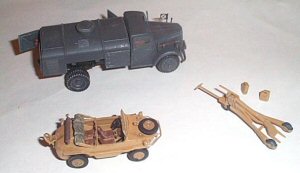
This is one of several new offerings by Academy featuring sets of “Ground Vehicles” used by both the Allies and Axis during World War 2 in small scale. This is set number 3 of the series. It consists of 120 parts on 6 different trees, four of the trees are molded in a light tan plastic and two consist of clear parts, i.e. windows and headlamp covers. Also included are instructions and a small sheet of decals, which consists of license plate numbers and a nomenclature plate. The instructions are 12 pages in length and are of a “book” format, stapled along the spine and easy to flip through. The instructions guide you through 17 steps in the construction of these vehicles. Each step consists of a drawing showing the correct assembly of the parts included and a guide to detail painting of parts. Also included are the assembly and paint guide for two accessories included in the kit. These “accessories” are a bomb cart and 8 jerry cans, a real nice touch by Academy. All of this comes in a traditional box with cover art showing the three main items in the kit parked near a Me 110 night fighter.
The idea with the bomb cart, fuel truck and jerry cans (as well as with the artists’ depiction on the box cover) is that these items would be found in use on a German airfield. My knowledge of German equipment is not too great, but I found it interesting that a Schwimmwagen would be included in this mix. I would have thought you would more likely find something like a Kubelwagen being used on an airfield. (Enough editorializing)
Construction
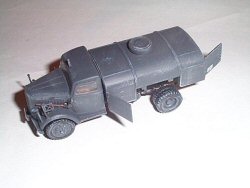
Construction of the kit begins with the assembly of the Opel Blitz fuel truck. The first few steps are the assembly of the chassis, including the engine, radiator, drive train and exhaust. The engine and radiator are nicely detailed parts and it would have been nice if Academy would include a way for these items to be viewed. Unfortunately they are closed up in the engine hood assembly. It would take some work to try and separate the hood cover from the rest of the parts. The construction of the chassis is all straight forward and quite easy. The only thing extra that needs to be done is to scrape mold seams on the tires and other parts. I detail painted the smaller items of the kit before adding them, including the tires, engine, springs, and exhaust. I painted the kit overall with Model Master Acryl Dunkelgrau. For most of the detail parts I used Flat Black.
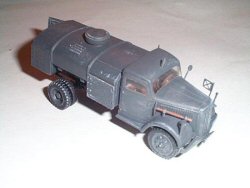
The next couple of steps (6-7) are the construction of the truck cab and hood. Most of this was straight forward, but the assembly of the cab sides and roof parts was a little fiddly and difficult. You need to go pretty slow and deliberate during this phase. You also attach the windshield and cab windows during these steps. The windows are nicely indented at the edges and fit very well into the window spaces. There was a slight gap on the right side of the cab that needed to be filled with putty. Everything else fit very well.
Steps 8-9 are the assembly of the fuel storage tank. This phase is also easy construction. Included in the fuel tank are the fuel pump and positional doors on both the front and back of the tank. The front doors can be positioned open or closed to show off a series of “drawers” where tool storage, pump fittings, etc. might be kept. The back doors can be positioned open or closed to show the pump and immediate inside of the tank area. I chose to open one of the front doors, as well as the back door containing the fire extinguisher. If you choose to do this, there are push out pin marks that need to be filled. Academy was able to mold the parts so that most of these flaws are hidden from view.
Steps 10-12 takes you through the completion of the vehicle, with the assembly of the truck cab to the frame, fuel tank and cradle to the frame and the attachment of small parts and tools to the truck cab. There is one item missing in the kit, and that is the distinctive trademark “flash” of the Opel Blitz on front grill. It is shown on the box art. Perhaps it was too difficult to reproduce in such a small scale.
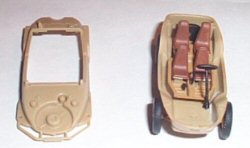
From here, you move on to the assembly of the Schwimmwagen, with the construction of the running gear to the lower body of the vehicle (Step 13). Because this area is so small and confined, I opted to detail paint this area first. I used Model Master Acryl Sandgelb for the overall body color for this kit. The next steps (14-16) are the construction of the interior and upper body of the vehicle. This is all straight forward and easily done. The fit of the upper body to the lower hull was not quite tight all the way around. There was a small gap on the rear decking/panel of the kit that needed to be filled. The last step is the completion of the kit and the assembly of small parts and tools, hand rails and muffler to the exterior. This was not too difficult; the attachment of hand rails to each side was a little difficult due to the smallness of the parts. The detail of both these kits is pretty amazing. I was very impressed with the Schwimmwagen especially. The only thing missing seems to be any kind of dashboard for the Schwimmwagen.
The last bit of construction is the assembly of the bomb cart and painting the jerry cans. The bomb cart basically falls together; there was no difficulty here at all. There are two different styles of jerry cans provided in the kit.
Painting and Finishing
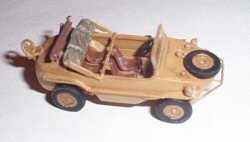
I will be the first to tell you that I am not too familiar with German vehicles. The box art shows the vehicles painted in a dark yellow color. I did some internet research and could not find too many documented color photographs of these vehicles. I did find some photos of the Schwimmwagen in the Sandgelb color. In asking a mutual friend and fellow modeler about the correct color to use he steered me to the Panzer Gray and the Sandgelb. As indicated above, I used Model Master Acryl in these different colors. The decals provided in the kit went on very well and I painted over them with Future and Testors Dull-Kote after the Future had dried.
Conclusions

I really enjoyed building this model; it was a fun and relaxing kit to build. Much of the kit just fell together and was quite easy. Some of the kit parts are rather small, but this would be a great kit to “cut your teeth” on in regard to gaining experience in small scale modeling. Academy has done a fantastic job in engineering the kit so that it fits so well. I applaud Academy for continuing their line of Ground Vehicles and look forward to other kits in this line. I would recommend this kit to anyone who has an interest in small scale German armor and vehicles. The only shortcomings are the lack of the distinctive flash trademark for the Opel Blitz fuel truck, as indicated above. This may be an important item if one is trying to faithfully reproduce the vehicle for a contest. Second, it would have been nice to offer an engine hood on the fuel truck that could be positioned opened or closed to allow one to show off the engine compartment.
Thanks to MRC/Academy for the review sample.