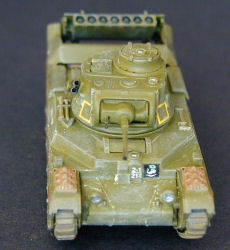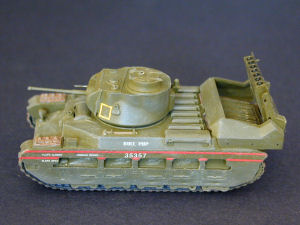
Airfix 1/76 Matilda 'Hedgehog'
By Llarry Amrose
| Date of Review | December 2009 | Manufacturer | Airfix |
|---|---|---|---|
| Subject | Matilda 'Hedgehog' | Scale | 1/76 |
| Kit Number | 2335 | Primary Media | Styrene |
| Pros | Molds still in good shape, interesting subject | Cons | New parts need work to fit, subject only a prototype |
| Skill Level | Basic | MSRP (BP) | £5.69 (about $9.30 USD) |
Build Review
In the mid-1930’s the British Army released a specification for an “Infantry Tank” to give direct tactical support to infantry units in terms of firepower and protection. The result was the A11 Matilda. As it was intended to move alongside troops, speed was considered unnecessary. It was quite well armored for the time, but only armed with a single machine gun.
A cannon-armed tank was also designed, and as war drew nearer, it was put into production as the A12 Matilda II, sometimes referred to as the “Matilda Senior”. It was faster, though still quite slow compared to other tanks in service around the world. The armor was still quite heavy compared to its contemporaries, and armed with either a 2-pounder anti-armor gun, or a 3-pounder to fire high explosive rounds.
The Matilda served in France in 1940, but was not very successful. It was too slow to keep up with the Nazi Blitzkrieg, and the 2-pounder (40mm) gun was a bit underpowered. It was used to much greater effect in the African desert where the terrain was more wide open and the adversaries had lighter armor. Still, it was soon clear that it was obsolete in terms of European combat. A number were sent to Australia and New Zealand to be used in Pacific combat, which was conducted on much different terms.
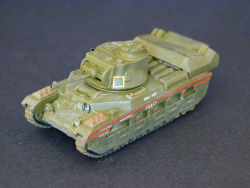
Over the years, a number of specialized variants were created, including flamethrower, mine-clearing and bridgelaying versions. The final Australian modification was the “Projector”, which utilized a naval antisubmarine weapon, “Hedgehog” to create an anti-bunker weapon. A few were so modified and tested satisfactorily, but did not see combat. One of them, callsign “Bullpup”, is the subject of this kit.
Hedgehog was an ATW, Ahead-Thrown-Weapon, used by allied naval vessels as an alternative to conventional depth charges in the anti-submarine role. It consisted of a bank of smaller mortar projectiles launched ahead of the vessel with contact detonators. Being launched ahead made it easier to keep sonar contact with the target during the attack, and the contact detonators would better identify when a hit had been obtained. It was used to great affect, mainly by US vessels, as the British ships tended to be armed with Squid, a similar system using fewer, heavier projectiles. It was thought that fired in smaller numbers, Hedgehog would make an effective anti-fortification weapon on land, but while the tests confirmed this, it was too late to see combat.
New red box, same old green plastic. Airfix has embarked on a program of new releases and re-releases, often with new add-on bits. After the Sherman Crab and Churchill Crocodile, we now get the Matilda Hedgehog. While Italeri has the old ESCI Matilda (also a fine kit), the Airfix Matilda is still a good kit. It is 1/76, like most of the Airfix armor, but that’s really only an issue in dioramas or if you’re really a stickler for scale. As an older kit, the detail is not quite up to the level we’ve been seeing in the newest releases, but it was a rather good kit for its time, and I think it’s still viable. A new sprue has been added containing the Hedgehog launcher. The tracks are old-style vinyl, which don’t take adhesives too well. A small, very well printed decal sheet and 7 pages of instructions round out the package.For a look at the kit in the box, look here.
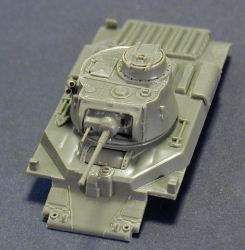
The instructions have you begin with the suspension, though certainly the upper hull and turret can be built as separate assemblies at any convenient point. Though not noted anywhere, the parts for the auxiliary fuel tank will not be used, as it would be in the way of the hedgehog launcher.
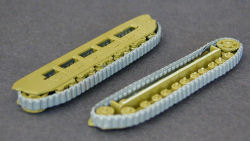
The outer sidewalls covering the running gear pose a challenge to building and painting. My solution was to glue the wheels, sprocket and idler to the inner wall, and then dryfit the outer wall and clamp it in place while the glue cured. Later the outer wall was removed allowing all the parts to be painted inside and out. The tracks are vinyl, and were to be heat-sealed. I added some two-part epoxy to strengthen the joint, and then the tracks were slipped over the wheels; the tracks were elastic enough to allow this.
Once the outer walls were permanently affixed, the upper and lower hulls could be matched up. The exhaust system needs to be attached and painted now, as it will end up under the hedgehog launcher.
This brings us to the new parts. The projectiles are to be painted in a dark green (Humbrol 195 is quoted) and installed in the launch tubes. The tube block is then added to the other parts, building the framework which will be mounted on the rear hull. If the tube block is fit without adhesive, as indicated in the directions, then the launcher will be able to be raised and lowered as desired.
The sides of the frame (parts 70 & 72) are where I encountered the one difficulty. The build instructions are a bit vague as to the intended alignment of the launcher, but the painting instructions show it well. The launcher needs to be all the way forward on the rear fenders such that the front edge meets the place where the engine deck angles inward revealing the rear fenders. Unfortunately, the lower surfaces of the side pieces are not properly shaped for this position. Unaltered, the frame will end up sitting too far back. Some judicious cutting and sanding will easily rectify this. I don’t know if these parts were originally intended for some other kit, and that’s why these parts need modification.
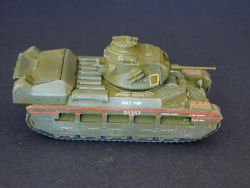
There’s only one set of markings, which makes sense as this system was only tried out on one vehicle. The paint reference is for Humbrol 150 Forest Green. Cross reference charts led me to PollyScale French Khaki, which I used, even though it seemed a little light to me. Other research turned up Humbrol 116 or 75 as possible shades. Eventually, I found the Osprey book which described this vehicle as being in “the Australian dark jungle green”, which would seem to confirm a darker shade. Something like RAAF Foliage Green might be a reasonable choice. Bullpup is in the Royal Australian Armoured Corps Tank Museum, Puckapunyal, Victoria, Australia, and the picture I’ve seen online looks like it’s a lighter, browner shade, but I don’t know its restoration history, and the wartime picture (though black-and-white) I’ve seen seems darker.
The decals went on very nicely, with a minimum of muss and fuss, even the fording markings that run the length of the sidewalls. Just a touch of setting solution was used, mainly to conform to the curves of the turret.
Even after all these years, the base kit still builds up well. Though the new parts require a bit of work to fit, the end result is attractive and unusual. While the level of detail reflects its original release date, it is essentially accurate. There are just a couple of minor points concerning the precise vehicle depicted. Many later Matildas had fender extensions to cover the fronts of the tracks that are not depicted in this kit. Also, most Australian Matildas used a lower profile commander’s cupola, although the pictures of Bullpup are inconclusive on this account.
All in all, a fun build of an unusual experimental vehicle.
My sincere thanks to Airfix for this review sample!


