


AMT 1/25 Mount N'Goat: Jeep Commando FRAM Group Build
By Phil Cooley, Front Range Auto Modelers (FRAM)
| Date of Review | June 2007 | Manufacturer | AMT/Steven's International |
|---|---|---|---|
| Subject | Mount N'Goat: Jeep Commando | Scale | 1/25 |
| Kit Number | 38555 | Primary Media | Styrene |
| Pros | Lots of options: Hi-rise and stock suspension, 3 sets of wheels/hubcaps, 2 sets of tires (one set is a great set of off road tires) | Cons | Driveline is fiddly to install. Recommend you install the engine, font transfer case and front driveshaft at the same time |
| Skill Level | Basic | MSRP (USD) | $23.99 |
The Project
Last spring our model club, Front Range Auto Modelers (FRAM) did a club build of the Model King ’70 Bonneville. It was so much fun we decided to do it again this year. There were a lot of great candidates, but after lots of discussion we decided to build the AMT/Stevens International Jeepster Commando. We did a little negotiating with the LHS and soon had at least half a dozen to work on.
One of our members, Tom Grossman, gets some of his kicks from challenging us to “do the improbable”. He was heavily involved in an upcoming IPMS contest, which was in mid May at an aircraft museum. He knew there would be all kinds of models there, from factory stock cars and trucks to accurate to the rivet WWII era military aircraft and armor. So, he threw down the gauntlet—challenging us to do a group build (5 similar models by 1 group of individuals). Needless to say, we took him up on the challenge.
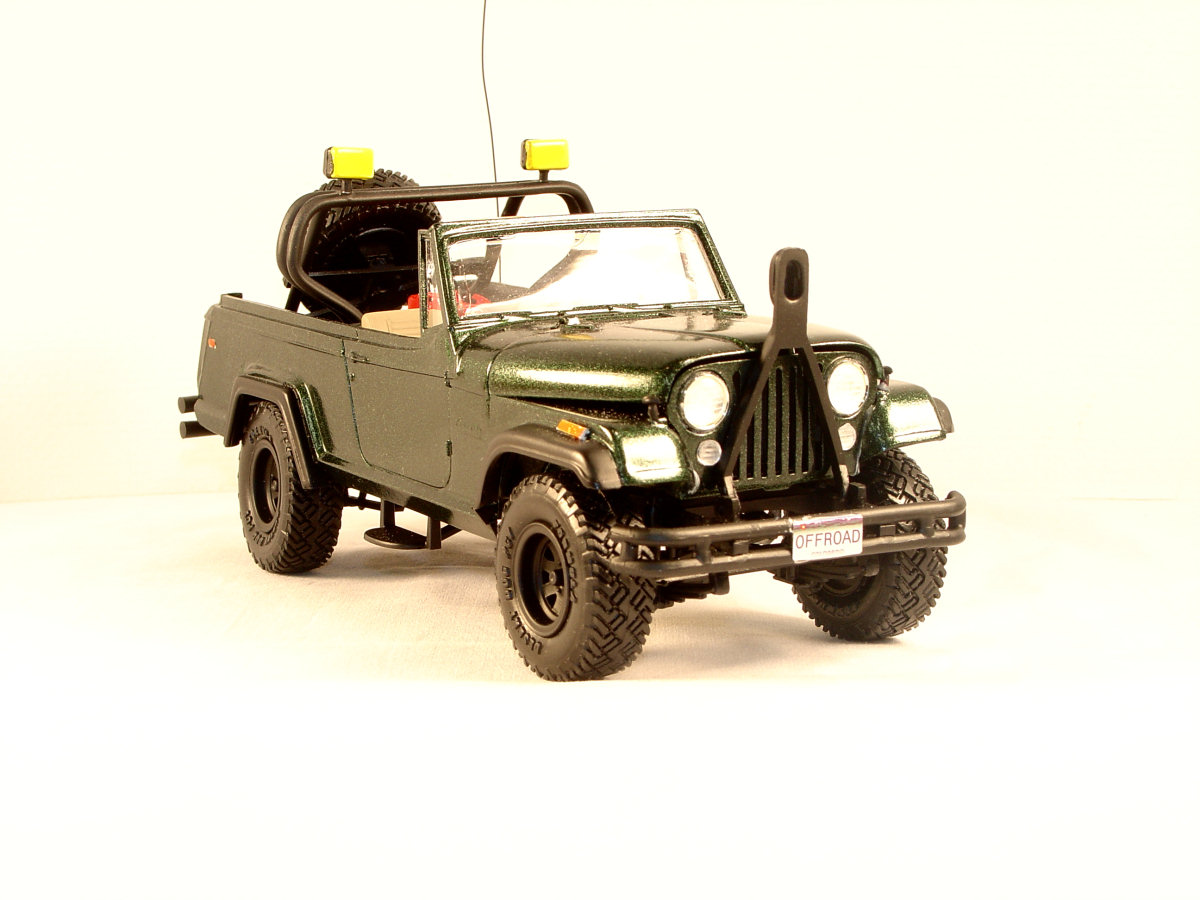
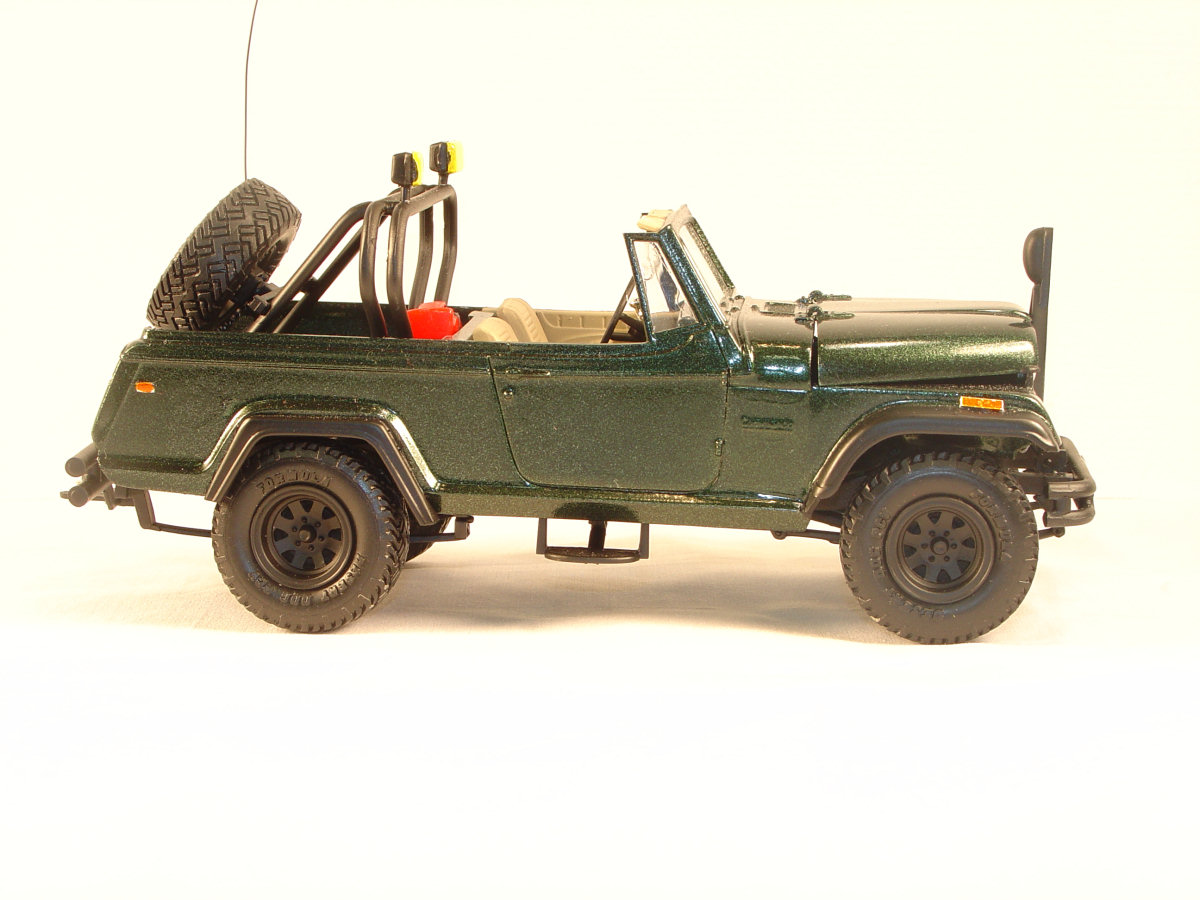
Ken Kitchen is one of our more prolific modelers and had two done pretty much before I had even started mine. He didn’t like the front clip on either of his kits, so he heavily modified each of them.. On his dark green off-road version, he grafted the front clip from a Daisy Dukes Jeep. (This technique is described in detail below.) He also scratch built the fender flares and added wheels and tires from the Daisy Duke kit to complete the look. For his final touch he added a large whip C/B antenna and topped it off with a cowboy cactus antenna topper!


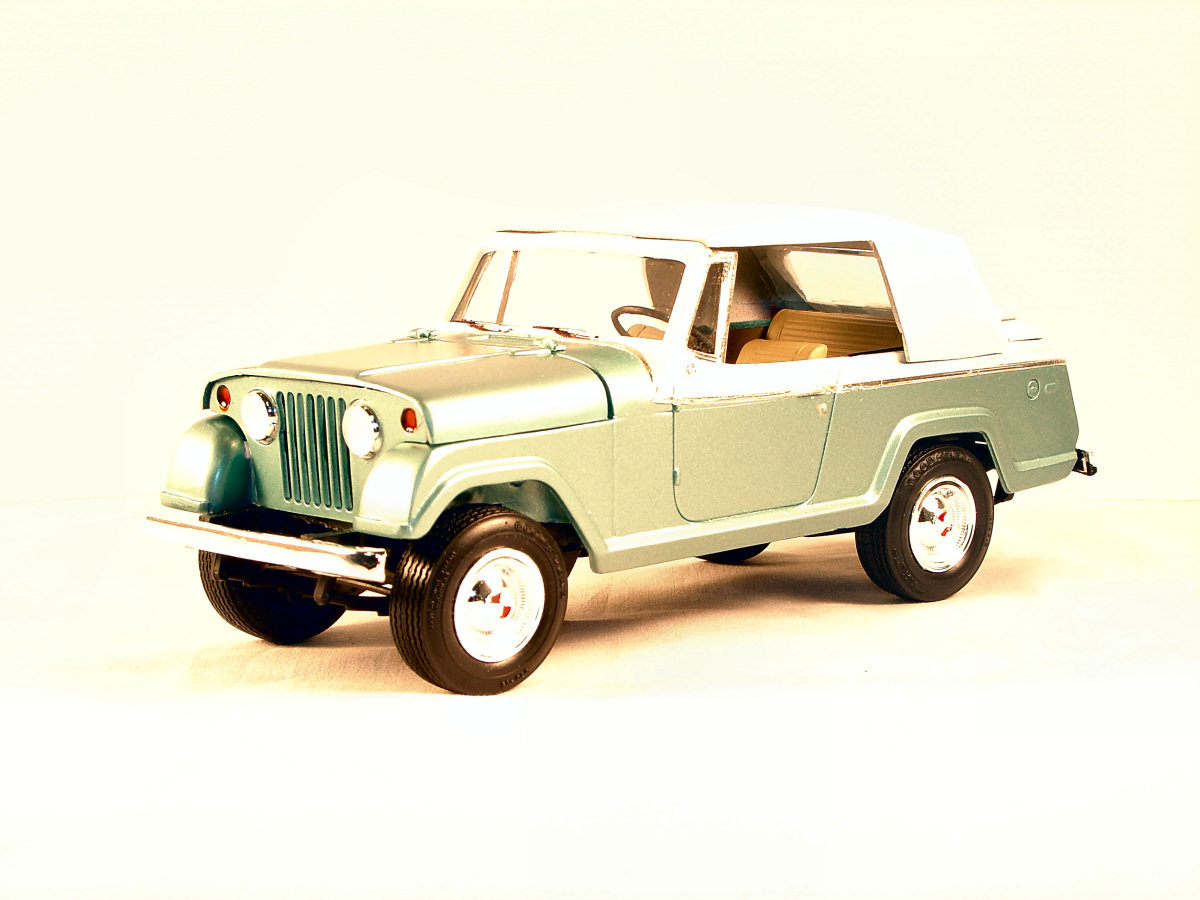
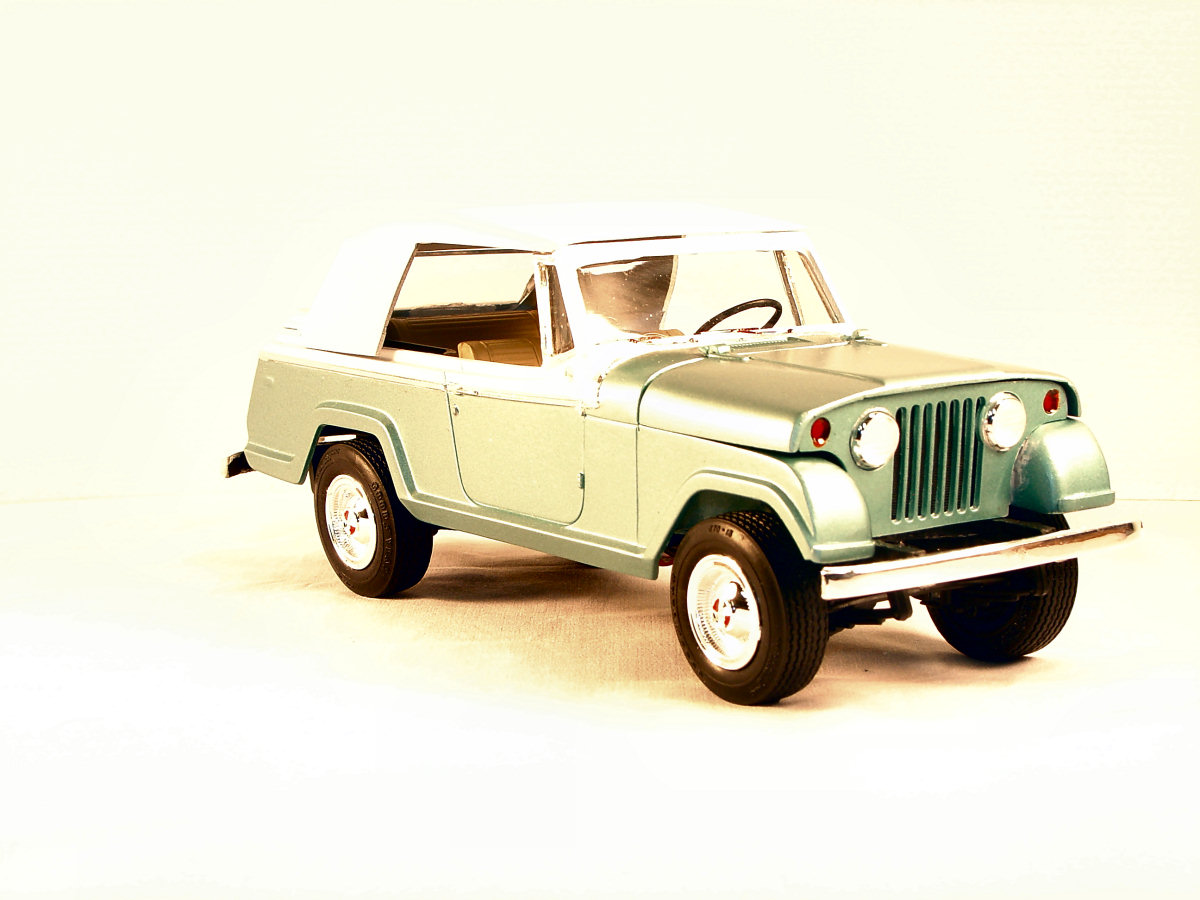
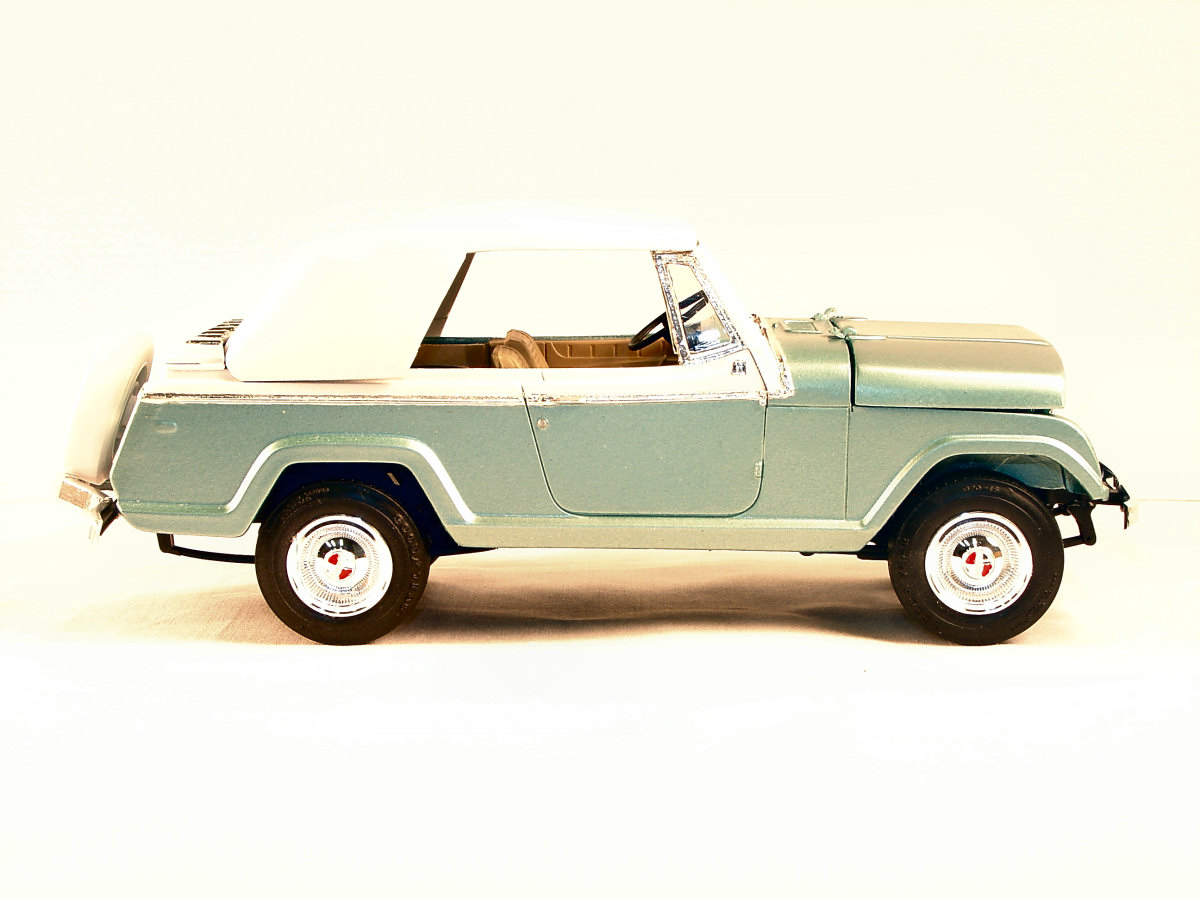
For his encore, Ken decided to do a factory stock type convertible. He did a lot of internet research (thank goodness for Google Images) and determined most Jeepster convertibles featured a two-tone paint job and the beltline chrome which is a prominent feature of the kit. Ken’s convertible has a lot of scratch-built features, including heavily modified front fenders, the convertible top (a heavily modified 41 Lincoln piece), deck cover, and rear bumper (for the continental kit, which came in the kit). Ken also extensively modified the Daisy Duke hood, cutting it and adding pie shaped styrene to make the hood prototypically correct for a Jeepster (the hood extends from fender to fender along the entire length instead of being tapered like a CJ-type hood.)
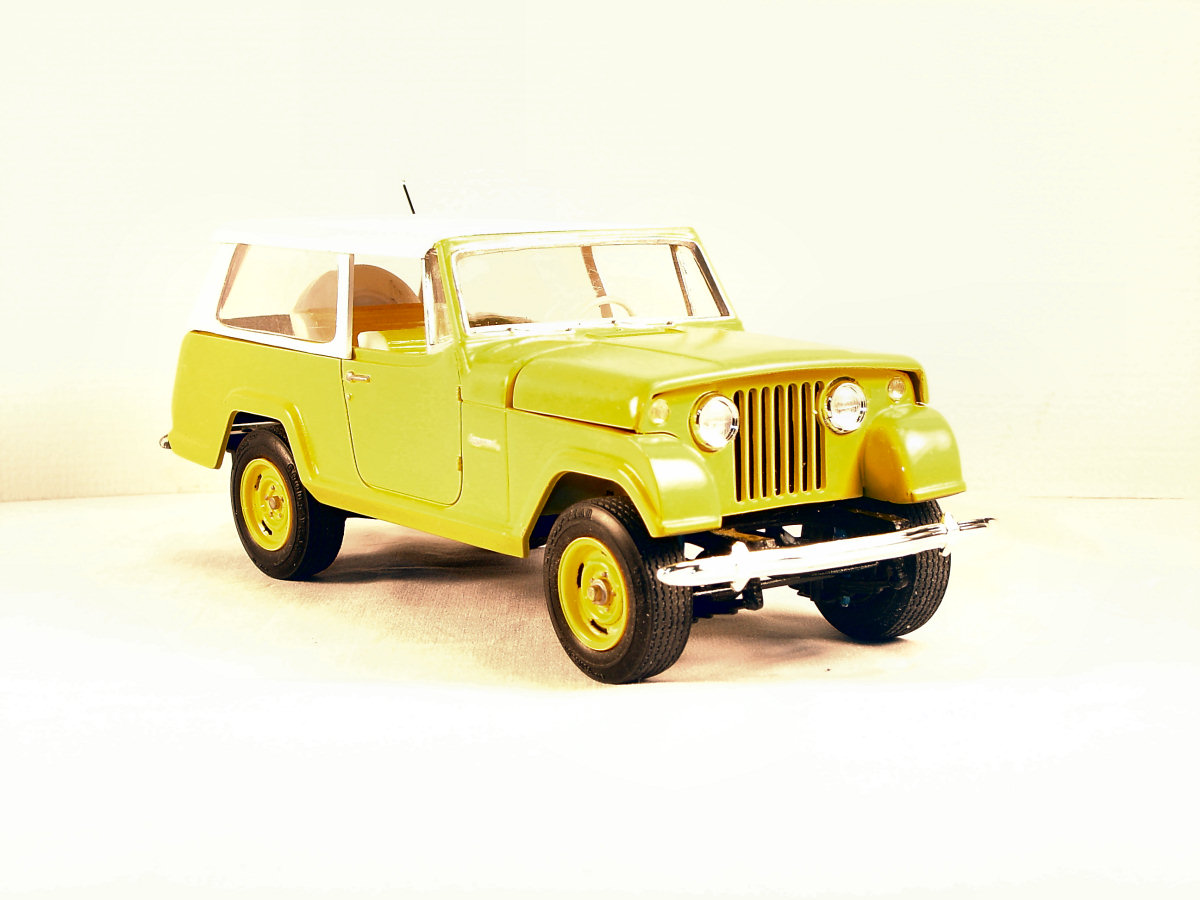
Jeff Conrad and I started off slowly. Jeff and I also disliked the AMC style front end of this kit - so we modified them – Jeff grafted on the front clip and hood from the Daisy Dukes Jeep kit (similar to Ken’s) and I changed the front to the earlier style (pre-1970). The technique we used was to cut off the top of the front fenders at the character line and then glue the tops of the fenders to the hood. Next I trimmed about 1/16” from the inside of the inner fenders, and then glued them to the body. Then I sanded off part of the outer fender to fit the inner fender’s contour and glued a small piece of styrene along the front edge of the fender to continue the body’s contours. That completed the basic mock up of the body. Fortunately the “Jeep style” grille was included in the kit, which greatly simplified things. Jeff used the stock v-6 engine that comes with the kit – and reports that it is a really nice piece.
Assembly was straight forward with very little cleanup or fiddling needed. His only regret is that he didn’t have time to detail it more (next time!)
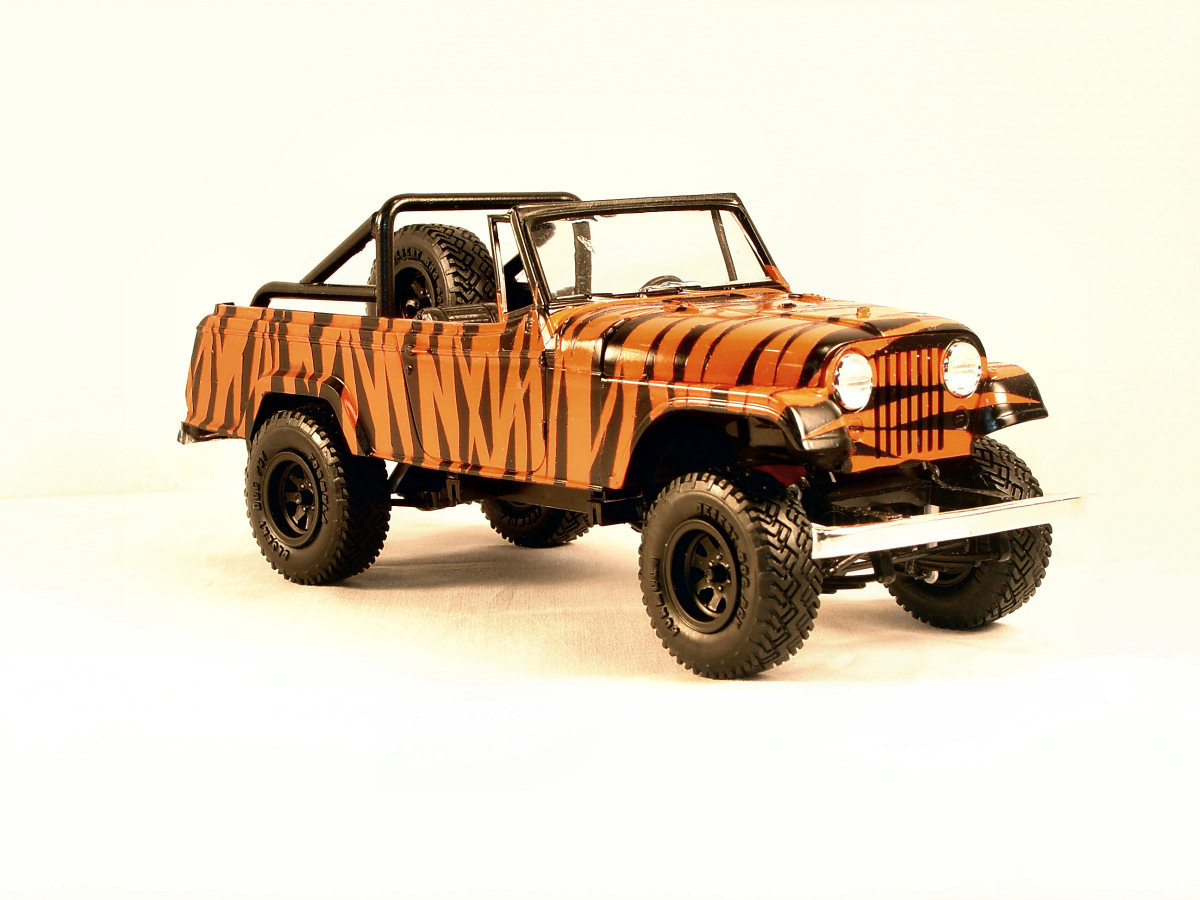
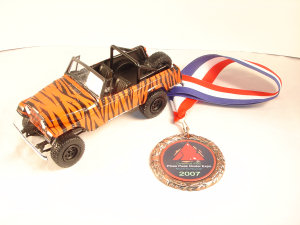
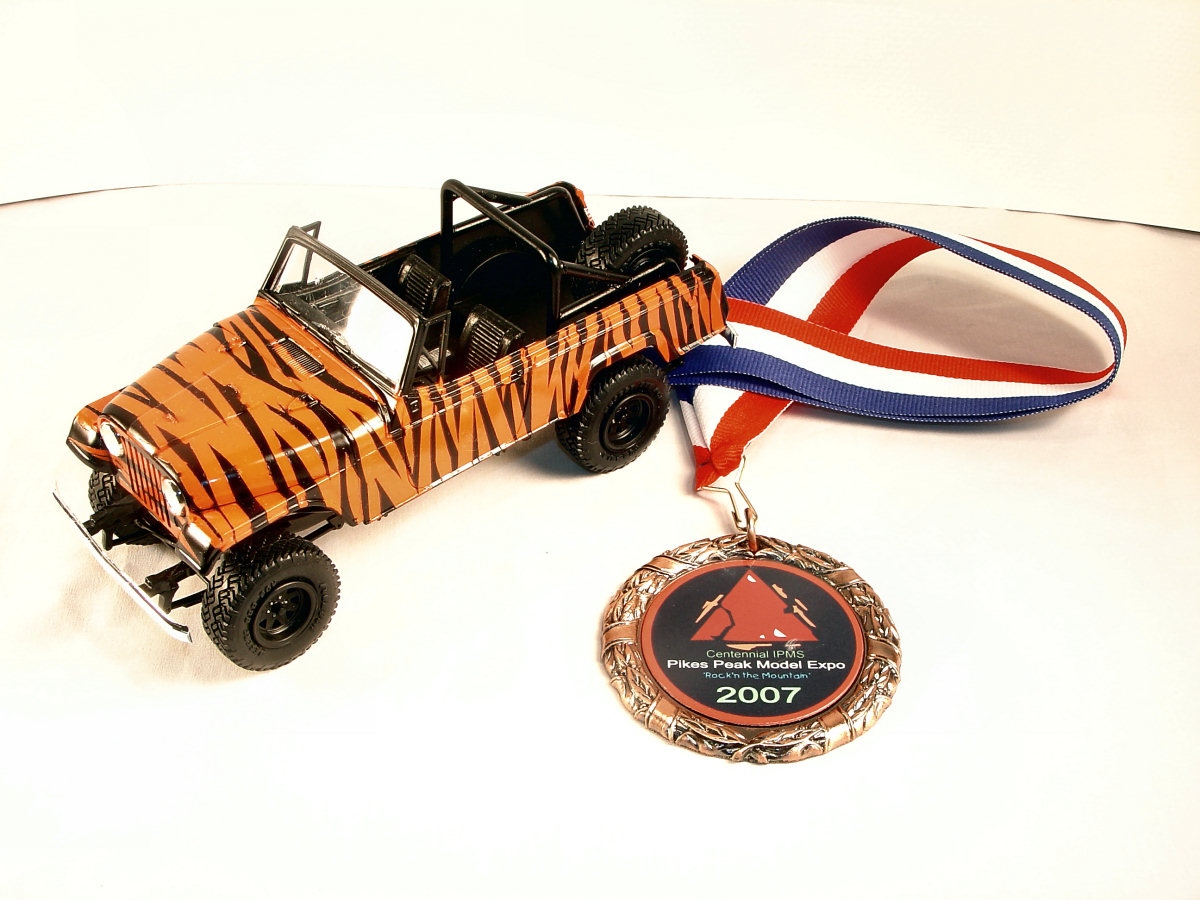
Jeff wanted to try something different to set his model apart from the others – so he came up with a “natural” camouflage paint job. It is loosely patterned after a Tiger. Jeff did it by painting his Jeepster with Tamiya TS-12 orange (several of us love Tamiya paints because they spray so nicely and dry quickly—great for those midnight-the-day-before-the-contest paint jobs). After it dried, Jeff masked it off with blue painters tape cut into shape with an Excel knife and then he sprayed it Tamiya black. It turned out great and was a favorite of those of us within the club!
Finally was my build. I wanted to do a “factory hot rod”. The engine in this kit is the Dauntless V-6; Jeep bought the tooling from Buick in the late 60s. Doing a little more research, I asked some dedicated Buick lovers for pics of carbureted Buick V-6s. From the many I received, I was able to cobble up a semi-realistic turbo intake and exhaust. That took care of my engine, but I wasn’t sure about the body.
I had the basic hood shape but it needed lots of refining. I glued sheet styrene to the top of the hood around the factory blister to “flatten out” the top of the hood. Then I added another piece of sheet styrene to the center of the hood to simulate the earlier style hood blister. I also glued half round to the front of the hood to complete the look. After some Squadron white putty, lots of sanding and Duplicolor primer, I ended up with a pretty good looking hood.

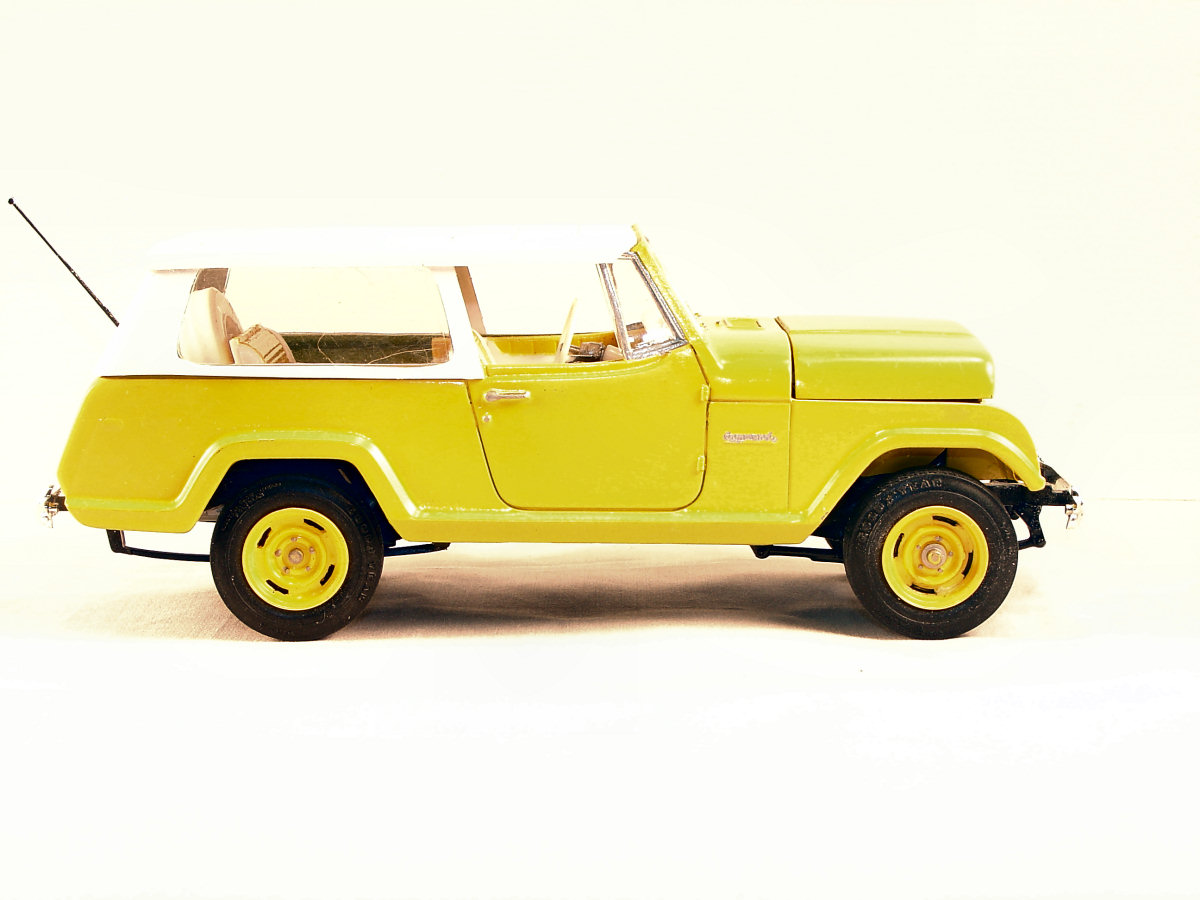
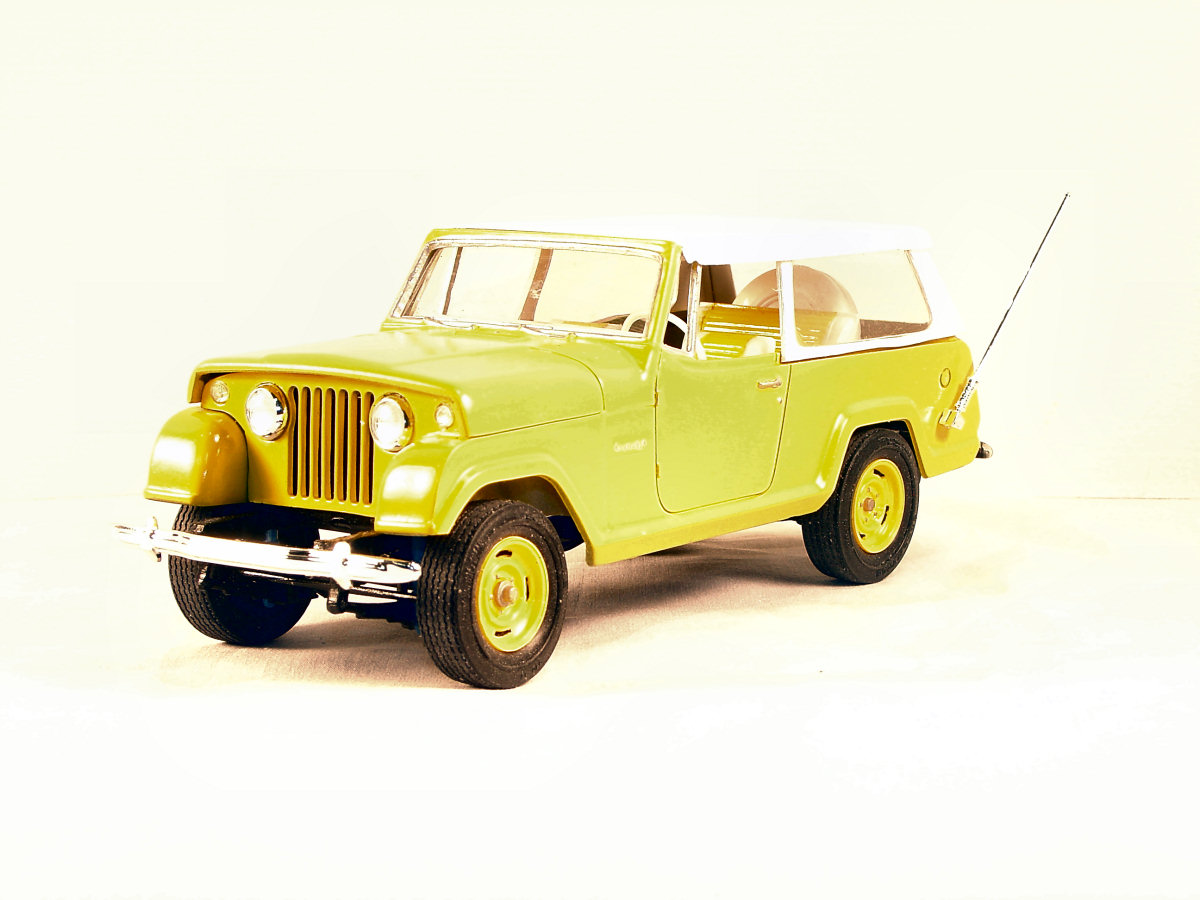
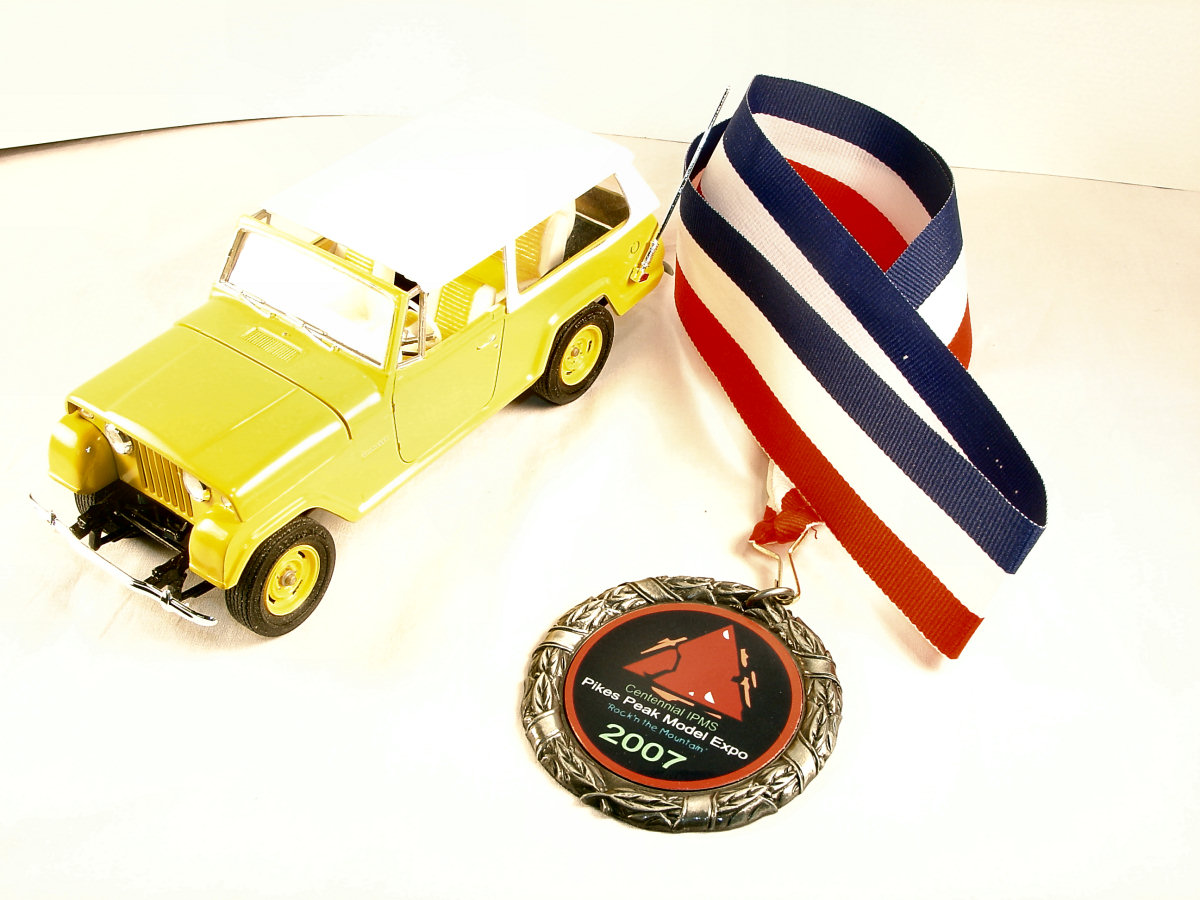
So far we had convertibles and open Jeepsters; I wanted to do something different, so opted for a factory correct station wagon body style. This involved scratch building the stationwagon top, using sheet styrene, Jeepster station wagon glass (included in the clear parts) and two of the pickup tops that come in the kit (Ken thanks for donating yours). I carefully cut out the sheet styrene side panels to fit the kit glass and painted my top with Krylon flat white. For my body color (and the matching white/yellow interior) I painted my kit with Tamiya TS-16 yellow. Mine was a two nights before the contest paint job.
Unfortunately we only got four Jeepsters finished for the contest, so we couldn’t enter them in the group category. Still, we were able to show several ways to build the kit and Jeff did garner a bronze for his Tiger camo Jeepster. And there are still several Jeepsters in various stages of build – at least one is going to be box stock and another is becoming a cabover pickup. We’re hoping when the next local contest rolls along in July that we’ll have at least 6 to put on display.
This was a fun build and shows what you can do with a little time and some in and out of the box thinking—lots of options in this kit, including three sets of wheels/hubcaps, two sets of tires, and two suspension setups! Thanks to Stevens International and AMT for bringing this one back to the market! I probably shouldn’t reveal this, but I remember building this kit when it first came out in the late 60s. Back then I only lived about 20 miles from the Jeep factory. It was fun to relive the memories, though I’m glad I don’t have my shoulder-length hair anymore. On the other hand, Ken just wishes he still had hair, while Jeff wishes his wasn’t so gray..)
Ed Note: Phil is a member of Front Range Auto Modelers.