


AMtech 1/72 Ju 88H-4 Fuhrungsmachine Build Review
By Michael Benolkin
| Date of Review | June 2004 Updated April 2019 |
Manufacturer | AMtech |
|---|---|---|---|
| Subject | Ju 88H-4 Fuhrungsmachine | Scale | 1/72 |
| Kit Number | 729206 | Primary Media | Styrene |
| Pros | Simple conversion, multiple versions in kit | Cons | Provide your own Fw 190 |
| Skill Level | Intermediate | MSRP (USD) | Out of Production |
Build Review
For a brief history and look at the kit out of the box, here is a link to the in-box review published earlier on Cybermodeler.
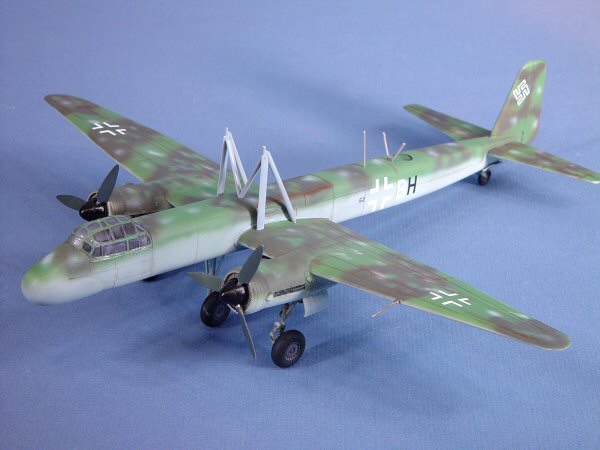
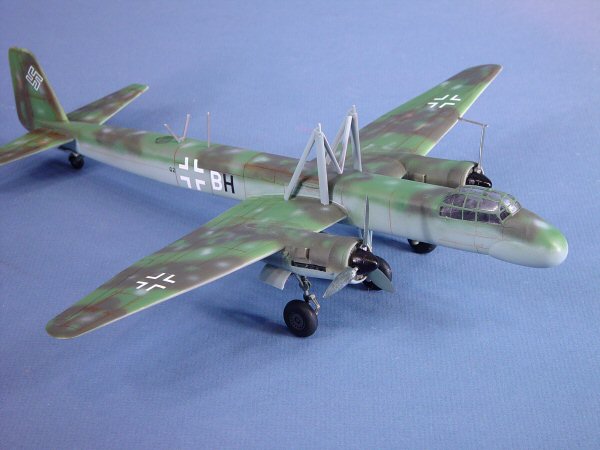
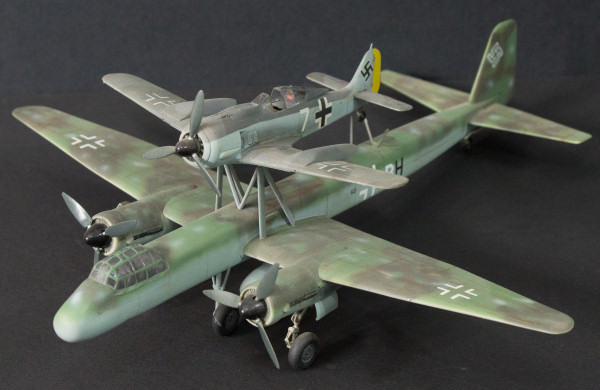
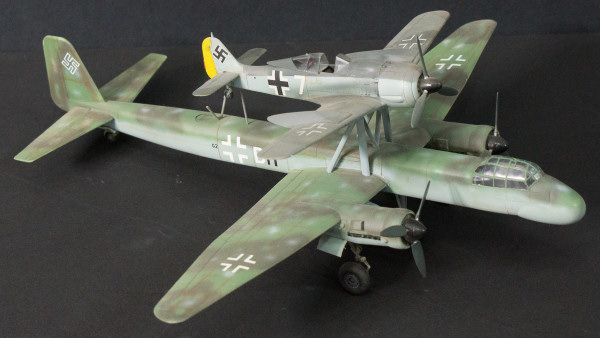
As described in the in-box review, you have two sets of parts in this kit. The light gray parts are from the stock AMT/ERTL Ju 88 kit, whereas the dark gray parts are the new fuselage, bomb nose, radome, etc., unique to the Ju 88H-3 and/or Ju 88H-4. While the Mistel Ju 88H-3 is an interesting bit of history leading up to the cruise missiles of today, I chose to build the maritime reconnaissance Ju 88H-4 aircraft that carried its own fighter protection on its back. In this role, the Ju 88H-4 would likely be far from home base when it might encounter enemy aircraft, so the Fw 190 would not only have to have the fuel to fight off the enemy threat, it would also have to find its own way home as there was no way to re-dock with the Ju 88 after launching.
The Luftwaffe developed an interesting overwing slipper tank for the Fw 190 to extend its range without incurring the drag of normal drop tanks. This escort fighter was to be one of the principal users of these new slipper tanks. Hasegawa made the solution easier by offering resin slipper tanks in their Fw 190A-7 kit. While my documentation says that the concept employed the Fw 190A-8, this was close enough for government work!
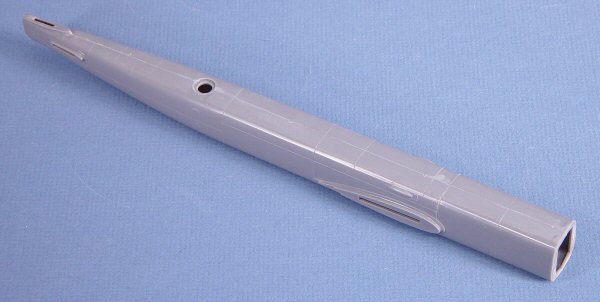
Step 1: We assemble the new stretched rear fuselage halves. The dark gray plastic has the same consistency of typical Hasegawa kits, while the light gray plastic from the AMT/ERTL kit is much softer. I used Tamiya thin cement for assembly.
Step 2: Next we assemble the fuel tank halves that are actually the stretch fuselage plug that goes between the rear fuselage and the cockpit.
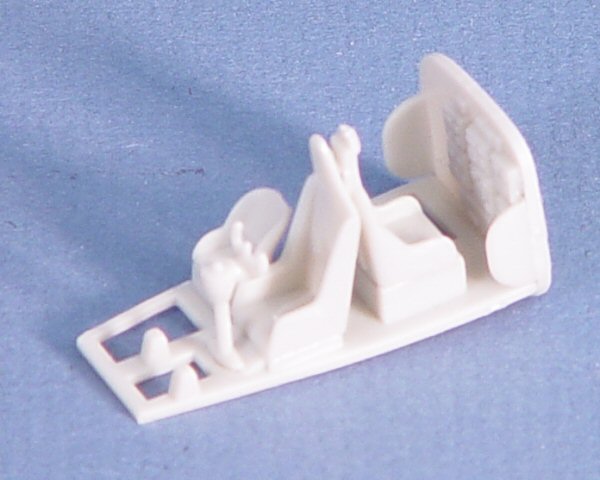
Step 3: Here is where you make your decision for Mistel or maritime recon aircraft. I assemble the cockpit for the H-4 version, though in the photo, I have not yet removed the floor and bulkhead sections indicated in the instructions. In the diagram 3b-1, pay close attention to the trim areas on Part 15 as I had missed the side protrusions until I tried dry-fitting the cockpit into the fuselage halves. Even after this was corrected, the sides of the cockpit floor required a bit is trimming to achieve a good fit. The H-4 radome halves are also assembled and cleaned up.
Step 4: The assembled cockpit goes together inside the cockpit fuselage halves. Once the cockpit floor had been narrowed a bit with a sanding stick, the cockpit went into the forward fuselage halves without a problem.
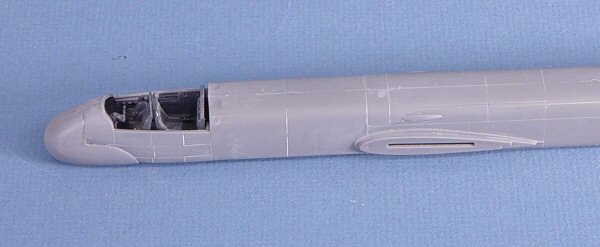
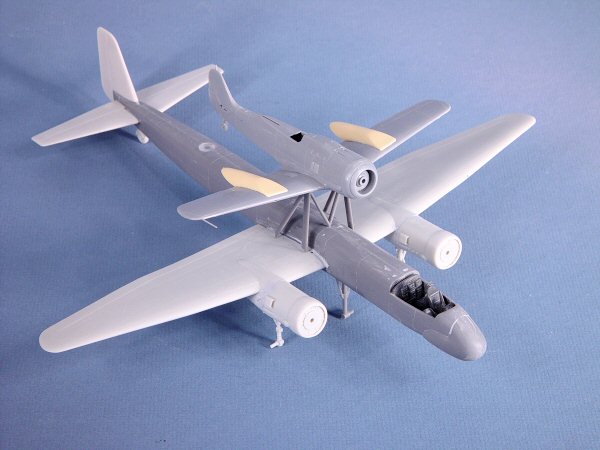
Step 5: The assembled cockpit section is mated to the stretched fuselage and radome assemblies. This is where a little patience and Tamiya liquid cement pays off. Glue the sections together aligning the parts while the glue is still wet. Set aside the assembled fuselage for a while (a few hours) and you can blend any joint problems away with a sanding stick. This photo shows the forward fuselage and radome mated to the rear fuselage with some preliminary sanding done, but more finishing yet to be done.
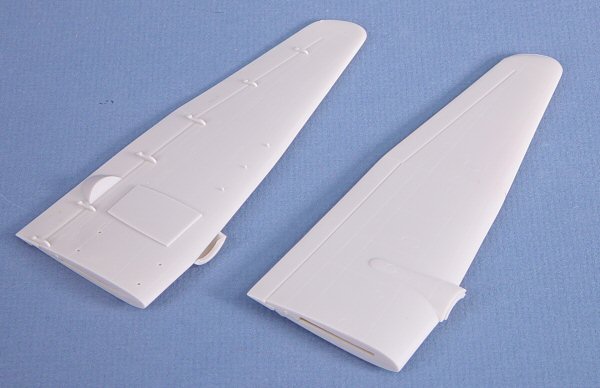
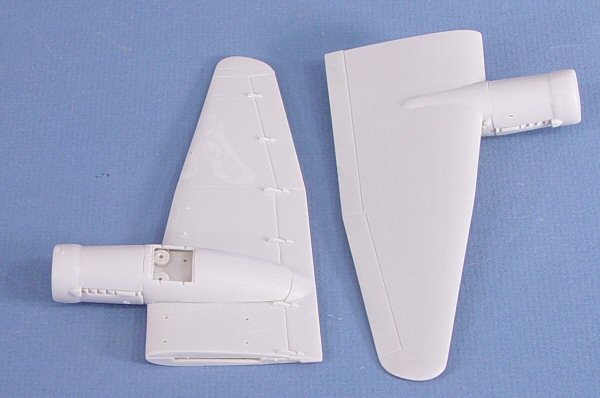
Step 6: The wings are assembled. These are from the stock Ju 88 kit and as the plastic is softer, seam clean-up is quick and easy with a sanding stick.
Step 7: The engine nacelle halves go together but there is no easy join until you get the wheel well ceiling installed. This is another excellent case for using liquid cement as you can lay a good amount on the seams and still move things around until everything settles into place.
Step 8: Installation of the main landing gear will wait until after painting.
Step 9: The nacelle halves go together trapping the radiator face in between. The only problem with this step is that the part numbers for the nacelle halves did not agree with what was in the kit. Don't forget to open the hole in the right side of each nacelle for the air intake part.
Step 10: Assembly of the centerline support strut and wheel was postponed with Step 8 until after the aircraft is painted and ready for landing gear.
Step 11: Joining the wing, engine nacelle and the engine itself should be straightforward, but here is where an adult beverage should be kept nearby, just in case. I installed the nacelles to the underside of the wings as indicated, and everything went together more or less okay. It wasn't until I mounted the engines that the poor fit came to light. Since this plastic is so soft, smothering the joint in liquid cement and pushing the engine assembly against the wing/nacelle mounts allowed for a solid join.
After setting the two assemblies aside to dry, I noticed that the forward edge of the landing gear fairing on the nacelle did not settle against the engine (pushing the engine into place will do that). I softened up this joint with a little liquid cement and clamped the edges against the engine. After all was dry, I did some blending with a sanding stick and, while some filling will be required around the engines, this bit was effectively overcome.
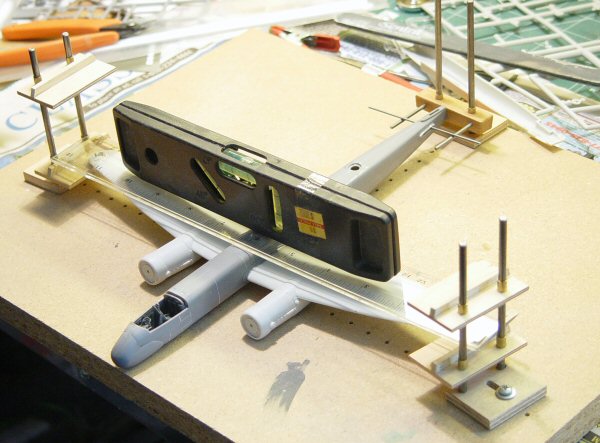
Here is the model getting its wings. The jig that the Ju 88 is sitting in was designed by Mr. Pat Trittle about 10 years ago. It is set up to allow me to level the fuselage at the tail, then adjust the risers on either side to achieve the dihedral I want. I added the ruler and level to the design to verify that everything is squared up.
Step 12: Next, the tail section is added to the aircraft (I used the jig in reverse to ensure proper alignment of the horizontal stabs). Once the Tamiya cement has set up properly, I applied a liberal amount of Gunze Sangyo Mr. Surfacer 500 to any seams, gaps and sink marks. Once this has set up, I'll take another round with the sanding stick to smooth out the surfaces and prep the aircraft for paint.
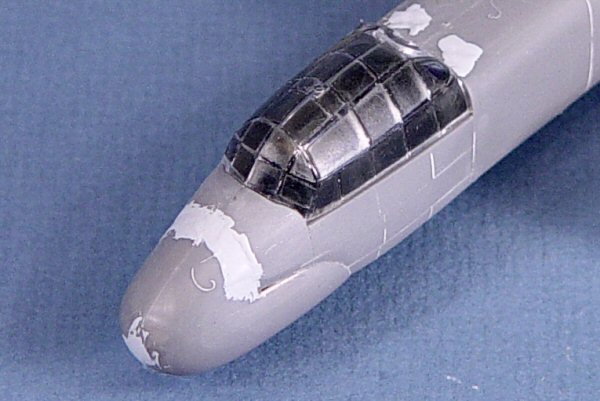
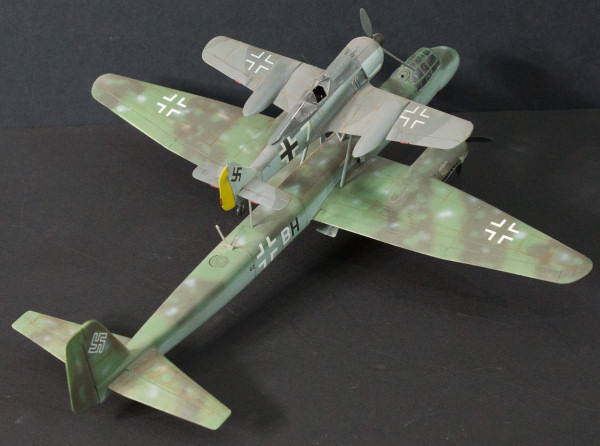
Here's a close-up of the aircraft canopy on the fuselage. The dark shade you see on the canopy are individual masks applied to each window pane from Eduard's Ju 88S Express Mask (XS237). Don't let the title fool you, these masks will work for any of AMtech's Ju 88s (so far). There are 31 individual masks just for that canopy! As I applied each of these masks, my feelings ranged from frustration at myself for not just putting the big honking bomb nose on the fuselage and being happy with a Ju 88H-3, to admiration of Eduard for the excellent job at making these perfect-fitting masks! I could have used some other medium like Bare Metal Foil to mask the windows, but the only thing more challenging than placing each of these pre-cut Eduard masks would be cutting each one out! No thank you!
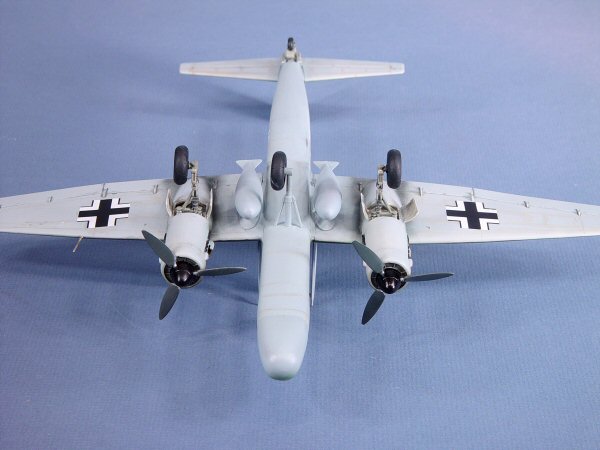
Step 13: The external fuel tanks are assembled per the instructions.
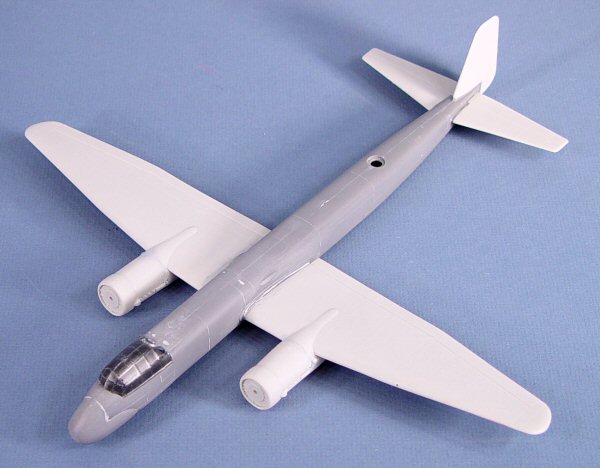
Step 14: The 'third leg' support strut is installed into a hole that is drilled slightly ahead of the main landing gear struts, however, I aligned the end of the strut at the wheel axle with the main landing gear axles. The mounts for the external fuel tanks are also installed with their anti-sway braces, but the tanks won't go into place until after painting.
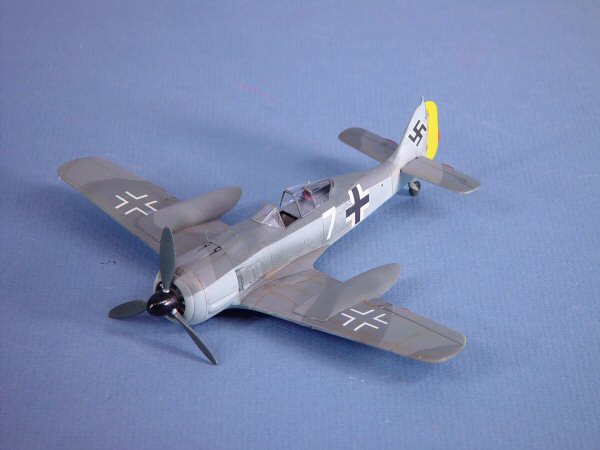
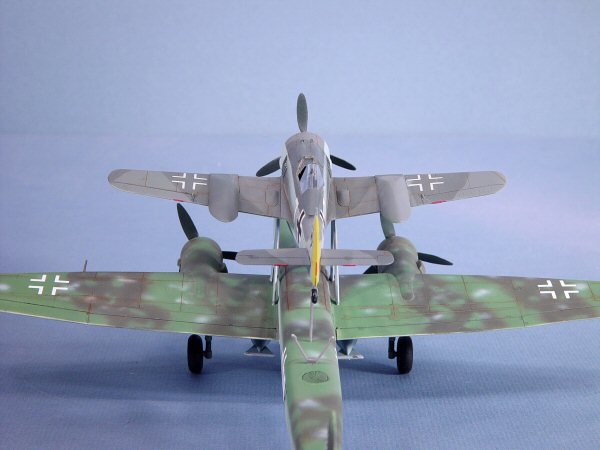
Fw 190A-8: As I mentioned above, I picked up the Hasegawa Fw 190A-7 release with the resin overwing slipper tanks that were to be used with the Ju 88 marriage. The kit actually has various parts included to make the A-5 and A-8, so we are in business. I opted to pick up an Eduard photo-etch set to dress up the cockpit, as I'll be posing the Fw 190 with its canopy open. To my surprise, the PE set has a replacement cockpit tub, and to my greater surprise, I whipped out my trusty 'Hold N Fold' tool and assembled the tub. Now mind you, I don't normally build 1/72 as this is just too small for these tired eyes, but to go so far as to build a PE cockpit tub in 1/72? I need that adult beverage now.
The Hasegawa kit is one of those rare kits that literally snaps together. The fuselage halves go together flawlessly as do the wings, but the most important join is the fuselage-wing joint, and it snaps into place with no seams or gaps. Bravo! The rest of the kit goes together as easily. The resin overwing tanks only required a bit of dry-fitting and preparation before installation. I used cyano to glue them into place.
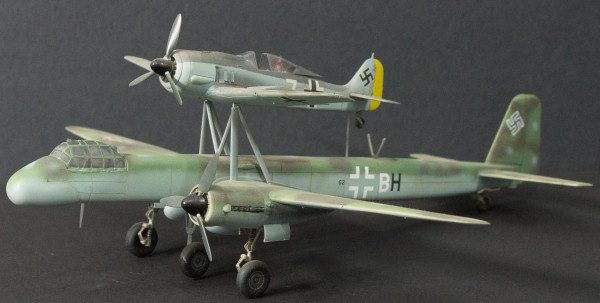
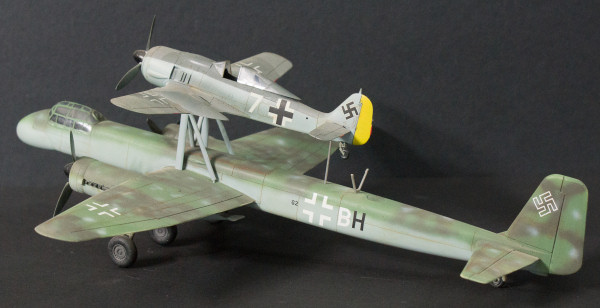
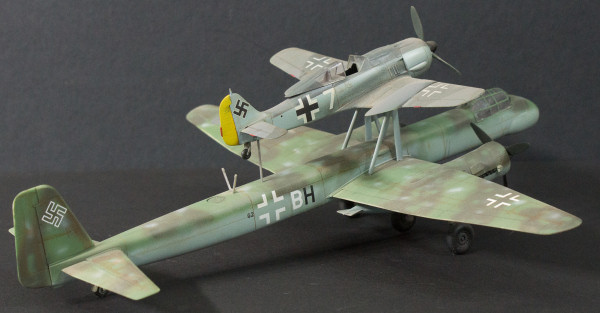
I decided to pose the aircraft gear-up atop the Ju 88 (photos show the dorsal-mounted Fw 190's gear up or down whilst parked on the ground). The kit wasn't designed for gear-up installation as the wheel wells are too shallow to accommodate the main gear tire (which is partially visible with the gear up) and still have the main gear door flush with the underside of the wing. With some quick experimentation, the solution was to cut one of the main wheels in half to be visible in the exposed area, and what little of the hub and tire that does extend under the closed gear door doesn't affect the fit.
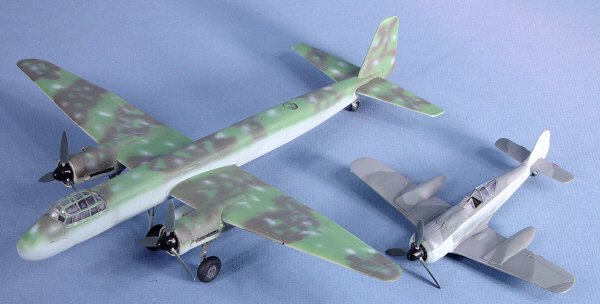
Step 15: Here are where a good set of drill bits, a pin vice, and a micrometer come in handy. We drill holes into the upper wings and fuselage for the Mistel mounts with precise distances. I used the micrometer to measure the distances between the holes and the pin vice to drill .032" holes in the proper locations. The whole process took a minute or two. The process was repeated for the underside of the Fw 190. With the holes completed, I dry-fit the three-piece main Mistel mount atop the Ju 88 and glue the V-brace to the support struts. I can now carefully handle this assembly as one piece for painting. It was time to test fit the Fw 190 atop the Ju 88, and as you can see, it rides nicely even without the tail support strut in place. Time for paint.
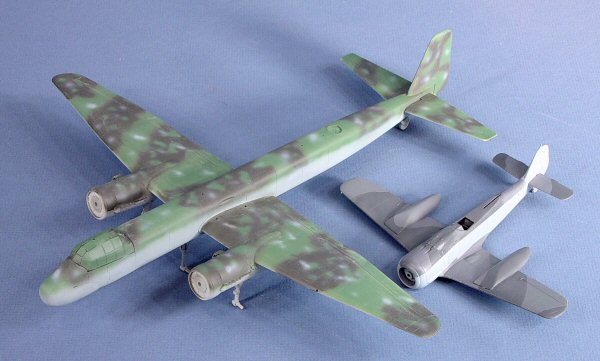
While I didn't have any reference photos for a Ju 88H-4, I selected the paint scheme portrayed as option 1 in the AMtech instructions. This scheme has RLM81 Brown Violet/RLM83 Medium Green over RLM76 Light Blue, but the traditional hard-line demarcation between colors appears feathered and broken up with splotches of 81, 83 and 76 on the upper surfaces. Testors Model Master paints were used for all of the RLM colors (including the compulsory RLM66 in the cockpit and RLM02 in the wheel wells, etc.
The Fw 190A-8 was finished in the standard RLM74 Grey Green/RLM75 Gray Violet over RLM76 Light Blue. I used Eduard's Fw 190 camouflage masks to create the hard-line color demarcation. Testors Model Master paints were also used here as well.
I did try something new on this project. After each coat of paint, I used a sheet of Micro Mesh 3600 grit sanding cloth to smooth the paint surface. This stuff appeared in the mail with a brochure after I visited their website and I must say, I am seriously impressed! I'll be talking to you more about this stuff soon!
Here are the aircraft finally off the paint rack, with the detail painting completed, canopies installed, and almost all of the minor details installed as well. This includes a side-trip down panic alley when I heard a snap during painting that turned out to be the Ju 88's port wing coming loose. Some quick field repairs of the main spar, re-filling the wing root joint, and touch-up painting completed the process. All that remains to do is add the markings, some weathering, and install the gear doors on the Ju 88 and a few small details on the Fw 190.


I used the markings indicated in the instructions for the Ju 88 and the Fw 190 kit decals which were actually close to perfect for the job. The AMtech Ju 88 decals settled into place nicely with a little MicroSol/MicroSet, whereas the Hasegawa decals needed a bit of coaxing with Solvaset to settle into place.
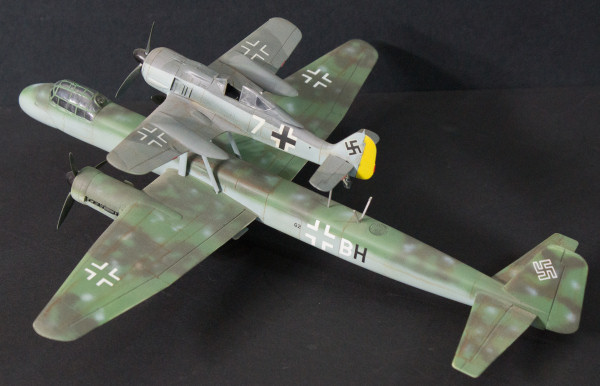

I applied a brown oil wash into the panel lines of both aircraft and a black wash to bring out the flight controls. I opted not to make the aircraft too war weary and sealed the decals with Gunze Sangyo acrylic Clear Flat.
Both kits went together nicely. While I did take my time on the project, there was nothing particularly challenging about either kit. The instructions are well-illustrated and the parts fit reasonably well. While a little filling and sanding was required, you can see that the result is well worth the effort. This builds into quite an eye-catching project!
My sincere thanks to AMtech for this review sample!