


Encore (Czech Model) 1/48 F3D-2 Skyknight Kit Build Review
By Fotios Rouch
| Date of Review | April 2005 Updated May 2015 |
Manufacturer | Encore (Czech Model) |
|---|---|---|---|
| Subject | F3D-2 Skyknight | Scale | 1/48 |
| Kit Number | 4814 (reissued as EC 48004) | Primary Media | Styrene, Resin |
| Pros | Improved injection molding, nicely cast resin parts, great decal sheet | Cons | Challenging fit |
| Skill Level | Intermediate | MSRP (USD) | Out of Production |
Editor's Note
Squadron/MMD has announced a limited reissue of their 1/48 F3D Skyknight kit which was previously released under a different Squadron brand - Czech Model. Fotios' build notes will be handy for those who haven't seen this kit before. Enjoy!
Background
Straight out of the box, this is a limited run kit and as such, will require the usual amount of dry fitting and sanding/filing to get all of the parts to come together. There are the usual ejector pin marks and stubs in places that will require attention before assembly. The worst of these were located inside the main wheel wells which are quite visible and mar the otherwise nice detail molded into these parts.
Assembly
I like the Skyknight. Don't ask me why. I know there is nothing aesthetically pleasing about its bulbous nose or bug eye canopy or its plank wings. It was love at first sight when I first looked at it at the Pima Air and Space museum back in 1992.
I liked it so much that I bought three copies of the resin kit that Collect-Aire sells. I was certain that nobody would ever bother making a 48th scale kit of it in plastic. And yet Encore (Czech Model) in its fine tradition of eroding my resin investment portfolio came out with a kit of the Skyknight!
After opening the kit and inspecting the contents I proceeded with washing the plastic and the resin parts with 409 cleaner and an old toothbrush. I let the parts air dry and then starting clipping them off their thick sprues. All the parts were cleaned off and all the spigots were taken care off so they would not interfere with mating the plastic parts together.
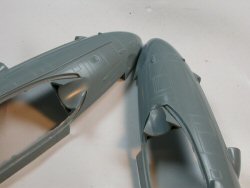
Test fitting the main fuselage parts appeared promising. Test fitting the jet engine trunks on the fuselage sides showed me that this was going to be an exercise in test fitting/sanding/cutting etc.
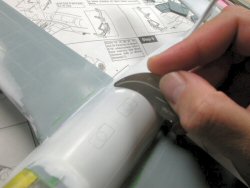
It was obvious that the trunks were not going to be a drop fit. They were wider and longer that the respective fuselage recessed area. It was going to take time and I would have to work from the front going back. I started with gluing the pieces that define the intake.
After the glue had set I used sand paper and polished the joint well. Note at the left side of the picture that the intake lip has been polished and that the one on the right side of the picture still needs to be worked on.
I used sanding sticks and reshaped these intake pieces so the intake trunks could even begin to fit on the front recess of the fuselage. I applied strong liquid glue and clamped the parts for an overnight cure.

Once dry I sanded and reshaped the rear portion of the intake trunking and with the help of clamps and lots of liquid glue I let it set for one more night. I also applied tape to secure the lower portion of the trunking so it would be done by the next day as well.
While these parts were drying I superglued the wheel wells to the plastic wings. I knew that the resin parts were too tall to fit in the wings but I wanted to secure them on the plastic so I could work them down to the correct thickness.
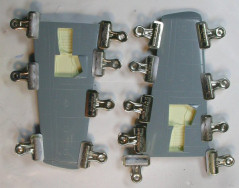
I had to sand them down quite a bit with the drum attachment of the Dremel tool. I also sanded down the plastic to add some more clearance. Test fiting the wing showed that I had a good clean joint. I used clamps and liquid glue and let the wings dry overnight as well.
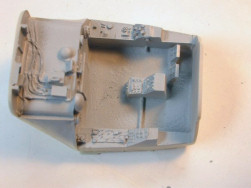
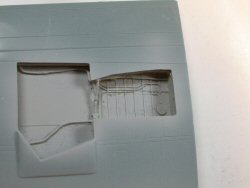
Next was my favorite part of building most limited run kits. The resin cockpit. It looks good but it certainly does not appear to have the quality that we have come to expect from the True Details/ Squadron folk. The resin floor and side walls and consoles have ripples and some detail is weak. Same goes for the wheel wells that have plumbing missing from worn out masters. For some other resin companies that might be fine and normal but from this outfit I have come to expect better. Maybe mine was a one off bad example.
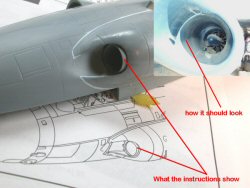
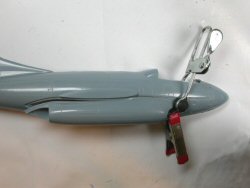
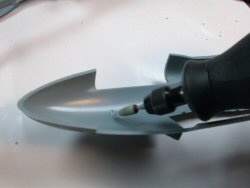
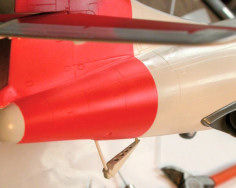
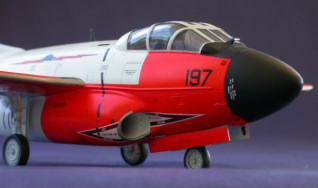
The time had come to start work on the intakes. I had noticed that other modelers had trouble in this area and I was curious to see what the deal was. It did not take long to realize that the kit master maker had not had the luxury of references in this area and just made a best guess. Looking at the plans and the way the intake trunking was meant to fit as well as my photos from my resident Tucson Skyknight made me realize that very serious work was laying ahead of me. You can see from the photo provided that the intakes do not have a tube just sitting there and certainly no tube is sticking out proud of the intake lip.
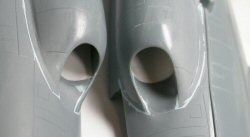
It was clear that the intake trunking would have to be moved back. I cut some styrene card stock, shaped it with a dowel and laid it inside the intake as a natural extension. After the glue had set on the plasticard, I glued the provided intake tube at the proper depth dictated by the little slotted aux inlets shaped at the bottom side of the intake tube.
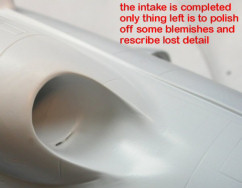
Now as you can see in the photo of the real intake there is no discernable intake tube and only the little aux intakes show. This meant that I had to build up the area with putty and blend it al carefully leaving only the little slots showing. Repeated applications of putty, careful sanding and lots of work with Mr. Surfacer 500 got me to a point were I could see favorable results. The ordeal was sealed with Mr. White primer which always helps me see all the defects. After all was done I sprayed the same primer all around the intake areas where I though more polishing was needed

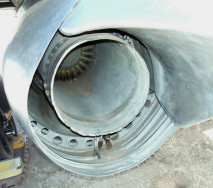
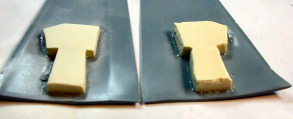
All this work took a couple of days and afforded me the opportunity to step away from the project occasionally and think about the next steps. While you are working on the exhausts take a look at his picture for inpiration and an idea of how this area really looks like.

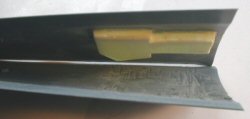
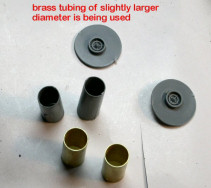
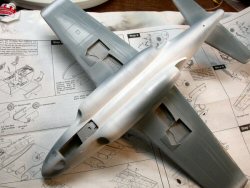
The stuffing of the fuselage was next. Lots of Dremel work was necessary to get the cockpit and the front wheel well to fit and allow the fuselage to even get close to coming together. Another item that might need your attention is the jet exhausts. I felt after looking at the real deal that the exhaust trunking provided was too small in diameter and I elected to replace it with brass stock of slightly larger diameter. It made a big difference and it also offered perfect roundness whish was lacking on the plastic assemblies.
Well, the moment of truth had come and it was time to see if all the preparation had paid off. I put the fuselage parts together in a dry fit mode to check final fit. All my old Greek curses surfaced at once! The Dremel tool was out again. The fuselage was totally shaved off to a semitransparent thinness! We finally had a chance to see things fitting. The top fuselage was kind of getting it together and the nose alignment was close to home.

My strongest styrene glue came out and all my plastic vice grips were at hand. The fuselage assembly was glued and was left to set overnight. The next day it would be time to deal with the horror! The bottom part of the fuselage had a huge gap that did not want to close! This was not a surprise. When I had dry fitted the fuselage parts before even assembly had began I had noted that the fuselage fit together OK.

So what had happened? What caused the fuselage to bow out was the intake bodies that were glued earlier. These buggers were a pain to fit and what they did was to force the fuselage halves to bow out as they tried to accept the big intake bodies. I noticed that this is what happened to some other modelers as well. The solution was not so elegant but I had no other choice. I used gap filling super glue and accelerator! Not a cool thing for plastic models but something I do routinely where it has to do with resin kits and conversions. When this was taken care off, I sanded it off real fast with heavy grit sand paper to take away the excess of cyaonacrylate glue before it would have a chance to set hard.
The next step was to attach the wings to the fuselage. The wings went on ok but the alignment was off and I had to work on it a bit to get to look right.
Next and final step for this installment was to spray again with Mr. White Primer and check for defects on the workmanship. There is a good reason why I am using white primer instead of gray. It will help me with the final finish. White? Well think of a lightning bolt and a turtle! This will give you a clue about my Skyknight's final finish!
After a hefty absence from the modeling bench due to a business trip the work continued in earnest. Actually, stepping away for a little while from any demanding project is a good thing as it allows the modeler to think and strategize their next move. So after laying down the primer and polishing it I had to revive all lost detail.
I used the Hasegawa Tritool set (used to be Trimaster's) and picked a tiny curved razor saw. I used this little handy tool to recreate the lost scribed detail on the top and bottom of the Skyknight's fuselage. You just run the saw lightly back and forth over the curved surface until you have the desired depth. Very clean and easy to use. I bought many some years ago from HobbyLink Japan.
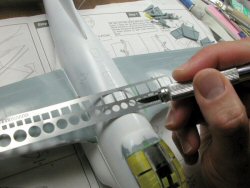
After that I brought out Verlinden's multi shape template and rescribed all the circles and panel boxes that had died while sanding down the plastic. These tools are necessary when you build limited run plastic or resin kits as it is often the case when you end up killing lots of scribed detail while attempting to beat the kits into submission.
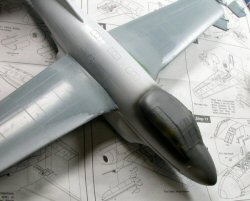
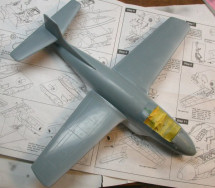
The next step was to mask the canopy and spray it with dark gull gray. The Skyknight has a lot of glass and I did not want the white surface paint to be seen through the canopy windows.
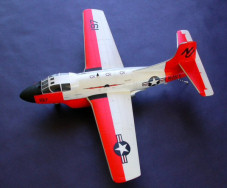
After all the surface details were take care of I sprayed the whole model with Testors gloss white. I let the model dry for a few days and then masked it again with Tamiya masking tape in preparation for the dayglo color. I thinned the red-orange dayglo paint about 50/50 with Testors thinner and sprayed it wet over the white base coat. Dayglo paints are translucent and do not work well at all unless there is a coat of white or light gray underneath. This paint was left to dry well also before I masked the model again and sprayed the matt black radome and silver leading edges on the wings and intakes.
I wanted to pose my model with the landing gear down and all of the pictures I have show the Skyknight always with the tail bumper lowered and some time with the arresting hook lowered as well. This meant that I had to do some minor surgery to it.
First, I cleaned up the trail bumper by sanding the inner surface flat. There was a mold mismatch on mine and it created a small step. I then drilled four different diameter holes on its inner surface as per the photos. Then a small diameter rod was inserted to the fuselage to serve as the pivot and joint point to the fuselage.
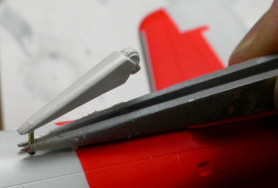
Lastly, some Evergreen rod was added to represent the tail bumper strut. The structure was secured to the fuselage with super glue.
The main landing gear struts were shortened by 25 millimeters because the model did not sit well at all. I chose to cut off the base of each strut and superglue it in place. Alternatively and if I knew better I could have removed the little resin towers molded in the resin wheel wells because they seem to be about 25mils high.
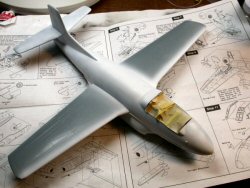
Painting the little details here and there followed next. The exhaust areas were painted with two shades of Alclad II, dark aluminum on the outside and exhaust shade on the inside. Lastly, I sprayed the whole model (save for the matt black areas) with Future in preparation for the decaling.
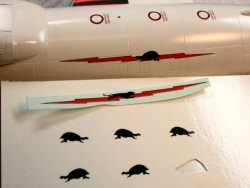
I have to admit that I like navy jets and that I have an affinity for white/orange paint schemes. For a while now I wanted to do one of my Collect-Aire Skyknights in white/dayglo scheme but never got around to it. Well, the decals from the resin kit were donated to the plastic one. The first order of business was to fix the Collect-Aire decals. For some inexplicable reason the artist decided to ruin the decal art by changing the turtle trademark on the orange lightning bolt to a running tiger! This meant more work for me. I scanned a black and white image of the turtle from the Steve Ginter book worked on it in Corel and printed a few left/right copies of the turtle in black ink on clear inkjet paper. Now this is by no means as good as silk-screened decals but it is the best thing a modeler can do if they have no dye sublimation printers.
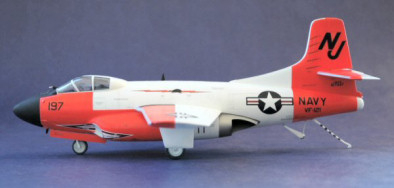
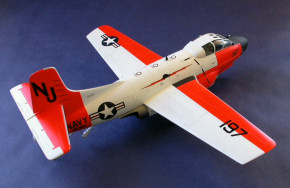
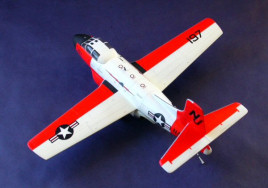
The 124597 (Fleet All Weather Training Unit Atlantic) Skyknight I chose to model appeared very clean and freshly painted on April 1962 at an airshow. It was devoid of stencils and any kind of weathering. I chose to depict said plane as it would have appeared a month or two later in service with the stencils on and very light weathering but certainly before the dayglo red/orange would have faded away! Fifty five of these airplanes were used operationally to train radar operators. VF-121 (West Coast) used the F3D-2T2 to train F3H pilots for radar intercept missions.

Conclusions
This kit left me with mixed feelings. If I were the Squadron king I would have stayed with the true and proven vacuform canopies. The master maker clearly does not understand or has little experience with clear plastic canopy molding. The three canopy pieces did not fit well to the fuselage, they were thick, and of different thicknesses amongst the three parts. The modelers that build these kind of kits are certainly not afraid of doing a vacuform canopy.
The master maker had no references of how the intakes are supposed to look or maybe he chose an easy way out and it was never caught when the model was proofed by the customer. The main landing gear forces the model to stoop forward. It needed to be shortened.

On the other hand the shape and outline of the model is not bad at all. The model looks right when completed. If I were to build another one and was willing to go through the same pain of fixing the intakes I think I could have had better results. As it stands I have two out of three of my Collect-Aire Skyknights to build and even though they do not look as good with their pointy noses I might still end up building them.
The kit is recommended to experienced modelers that love the DRUT.
My sincere thanks to Squadron Mail Order for this review sample!