


DML 1/72 Panzer III Ausf.N DAK Build Review
By Llarry Amrose
| Date of Review | May 2012 | Manufacturer | DML |
|---|---|---|---|
| Subject | Panzer III Ausf.N DAK | Scale | 1/72 |
| Kit Number | 7386 | Primary Media | Styrene/Photo-Etch |
| Pros | Nice detailing, new subject | Cons | Maybe a little over-engineered |
| Skill Level | Intermediate | MSRP (USD) | $21.95 |
Background
In the early 1930s, German military planners began designing the next generation of tanks. They came up with four designs of different sizes for different roles. The Panzer III medium tank was intended to be the main battle tank, a job it filled successfully through the first half of World War II. Eventually, as enemy armor became more powerful, the Panzer IV, originally designed to be a heavy support tank, took over that role.
Four manufacturers submitted prototypes. The design from Daimler-Benz was chosen, but production was delayed while further development was done. As it was, the design didn’t take its final shape until the E model. The initial plan called for a long-barreled 50mm gun, but as one was not available, an existing 37mm anti-tank gun was substituted. This was sufficient at first, though eventually a 50mm gun was developed and installed.
Finally, as the Panzer IV took over as the primary battle tank, the III was shifted to the support role and the Ausf..N model was fitted with a short-barreled 75mm, the largest gun the turret could handle. The first Ausf..Ns were sent to North Africa as depicted in this kit. Production ended in 1943, and factory capacity was turned to other vehicles based on the same hull, primarily the StuG.III tank destroyer.
The Kit
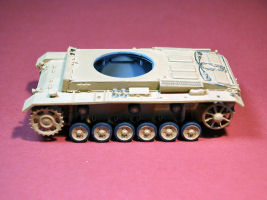
Dragon uses a standard two-part box, one that’s pretty sturdy. Inside are three individually wrapped sprues, upper and lower hulls, two small photo-etched sheets, and Dragon Styrene™ tracks. Dragon continues to make extensive use of slide molding, including a pre-drilled gun barrel and one-piece return rollers.
The instructions are printed full-color on glossy paper, with a sprue diagram with a couple of unused parts shaded out. Paint notations are given for Gunze Aqueous and Mr. Colour, with Model Master cross-references. Unfortunately, the paint list seems to be incorrect as it doesn’t match the colors called for later in the directions. Lastly, there is a small, nicely printed decal sheet.
Assembly
Construction consists of 8 steps, though there are a few places where a later step can be performed out of sequence while the glue or paint of an earlier step is allowed to dry.
Step one involves the lower hull, which is slide-molded as a single part rather than needing to be built up out of three or four as usual. The hull is used for kits of other Panzer III versions and derivatives. It includes fine ridges on either side, used to align the lower escape hatches. These hatches do not appear on the parts diagram, but did show up on the sprues anyway. The hatches were discontinued during production of the Ausf.M version, so in theory, the Ausf.N did not include them, but many were made from rebuilt earlier tanks and had them. I couldn’t find pictures to confirm or deny the presence of the hatches on Afrika Korps tanks, so I opted to shave and sand off the ridges; the directions make no mention of this.


The running gear go on here, though I prefer to hold off the road wheels until the lower hull is fully painted. The inclusion of a photo-etched grill for the underside of the rear hull overhang is a very attractive detail. Step three adds a number of details to the fenders, but I think it’s a better idea to hold off on some of those parts to protect them from handling accidents while installing the fenders in step five. Step four builds the upper hull from nine pieces, far more than in most competing kits. The fit of this assembly to the lower hull, with the fenders, can be kind of tricky, so frequent test-fitting is the order of the day.
The front glacis plate is a bit disappointing. The joint between the top and front of the forward hull is on the front, where in reality it should be on top. This leaves a seam that can be a little tricky to fill and sand if you installed the bar (part A38) on the front, which would hold spare track links, which, by the way, this kit doesn’t include any of. Presented with that seam, I took a stroll through the spare parts boxes and came up with some reasonably close track segments to fill in.
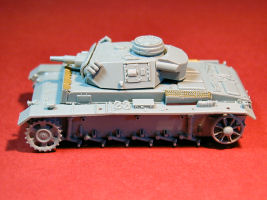
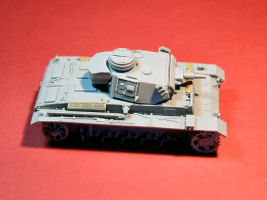
The turret goes together nicely. The commander’s hatch can be open or closed, even though there’s no visible interior, but that’s pretty much standard these days. The hatch is small enough that a decent figure will fill the space anyway.
The tracks are made from Dragon’s special Dragon Styrene that they are very proud of, and rightfully so. These tracks are very flexible and take paint and glue like no vinyl tracks ever have. Newer kits have included more elaborate directions, giving the length of the track run and tips on stretching the tracks to fit. Stretching before painting helps, but I can’t recommend doing the stretching from the ends, but rather working in smaller sections and moving along the track. I went a little too far in one spot and ended up tearing one track, but it turned out to be pretty easy to fix. I lined up the break right over one of the return rollers, a little liquid cement, and it’s all good.
Painting and Weathering
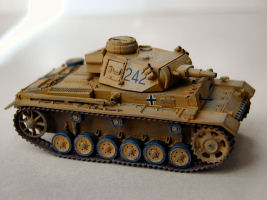
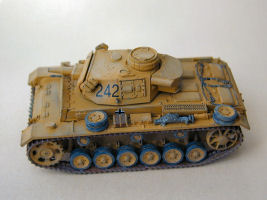
There are two schemes to choose from, both from the 501st Abteilung in Tunisia. The first is Red 07, 1942/43 and the second is Black 242, 1943. Both are in overall Desert Yellow. I used Vallejo’s Desert Yellow, and the details were done with an assortment of acrylic paints by various makers. Final finishing was done with Tamiya Weathering Masters, which are a series of pastels in makeup-like cases with an applicator sponge/brush which excel for more subtle affects, and hold up better than regular dry pastels. I kept the weathering light, to some light dust and sun fading.
Conclusion
The shape and detail are very good, it is every bit the late-model Panzer III. The Dragon Styrene tracks worked wonderfully, pre-stretching really helps get a better fit. Even my unfortunate tear of one track was easy to recover from.
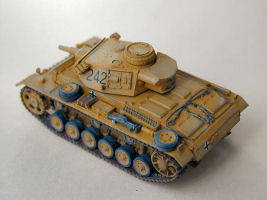
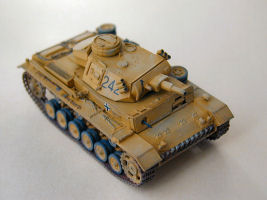
That said, this is not Dragon’s best kit. The upper hull is rather complicated, the tools, while nicely detailed, are molded onto the fenders, and the engine vents on the rear deck are molded solid instead of provided as separate parts as in some other Pz III kits, including Dragon’s own StuG.III. The errors in the instructions will also require careful attention to avoid trouble. However, Dragon has set the bar so high with their entire line of kits that a weaker effort like this is still a pretty darn good kit. While this is not the unquestionably best Panzer III kit on the market, with proper care it will still build up into a very nice finished model.
My sincere thanks to DML for this review sample!