


Gallery Models 1/16 Panzer III Ausf.J Kit Build Review
by Michael Benolkin
| Date of Review | June 2022 | Manufacturer | Gallery Models |
|---|---|---|---|
| Subject | Panzer III Ausf.J | Scale | 1/16 |
| Kit Number | 64011 | Primary Media | Styrene / Photo-Etch |
| Pros | Nicely detailed kit | Cons | See text |
| Skill Level | Experienced | MSRP (USD) | $184.98 |
Build Review
For an inbox review and history reference look here.
So, for those of you who followed my build review of the Gallery Models 1/16 StuG III Ausf.G, I ended my review saying that I wouldn’t mind building another that included an interior. Well, I didn’t get my wish, but I have the Panzer III Ausf.J/L/M kit instead. The lower hull and much of the upper hull are nearly identical to the StuG III kit, so I decided to build the Panzer III and see how that goes. I examined the Panzer III kit here, so I won’t repeat what I found in the box, but I will say that it is predictably ‘déjà vu all over again’.
While I could have some fun with the improvised camouflage schemes worn on the later model Panzer IIIs, I’ve decided to build the Ausf.J, and the example I’m given in the box is for an overall Panzer Gray scheme for one of the early intruders into Russia. While it doesn’t have anything to do with my choice of subjects, it just so happens that the Ausf.J has a turned aluminum barrel for the main gun, whereas the L/M kits have a regular styrene main gun assembly instead. I won’t get into any details on assembling this kit unless I run into problems, but as before, I’ll photo-document each of the steps on the way.
Here’s step one with the rubber up-stops for the suspension installed.

Here’s step two with the torsion bar suspension installed. The torsion bars do work.
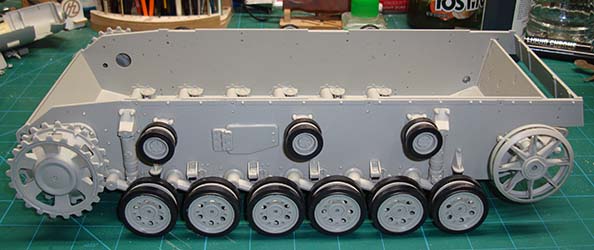
Here’s steps three-through-five with the road wheels, return rollers, etc., installed. I am leaving part of the return roller unglued until I can get the track installed to see if I can modify the roller assembly to deal with the track tension.
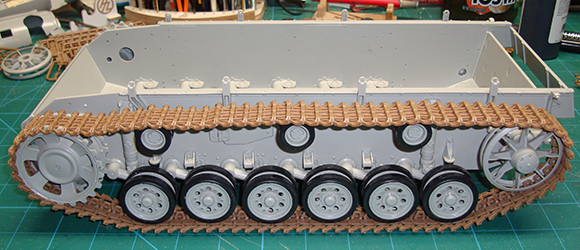
This is just one half of the shortest step, but this involves 273 parts. This step builds two full track runs for a total of 546 parts, but only warrants a brief message in the instructions.
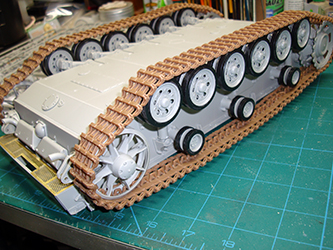
The second track run in completed, and unlike the StuG III build, this time 91 track links work perfectly per side. With the addition of the rear details including the two mufflers, it is time to start working on the upper side of the hull!

The upper transmission cover is in place but that wasn't the fit I expected. The lower hull had to be widened slightly it order to allow the cover to fit into place, so I glued the part into place and set it aside to harden. Before I move on with the fenders, etc., I decided to apply a base coat of Panzer Gray (Tamiya acrylic thinned with lacquer thinner) to get access to the various subassemblies before they become more difficult to reach. I removed the tracks as I'll paint them separately.

The base coat is completed and now I can continue to build a little and paint a little going forward.

Next, I add the hinge details and track mounts to the front glacis of the vehicle.

The front hinges and other details on the front are painted Panzer Gray and work starts on the right fender. It takes a little time and patience to get the fender mounted to the hull, but it is on there now.

The left fender is next and it has over three pages of instructions to mount up everything there. Like the right fender, the left also takes time and effort to fit into place.


I'm temporarily out of Panzer Gray, so I take the opportunity to spray the tracks Metallic Gray. What you see there took about five coats of paint to be airbrushed and it still needs a couple of more coats.

While I await the Panzer Gray, I mounted the tracks temporarily and I am liking the direction this build is taking me.


With a fresh supply of Panzer Gray, I removed the tracks and sprayed the fenders top and bottom. I set the assembly aside to dry while starting the top of the hull by mounting the driver's vision port and the machine gunner's tool to the front.

While the track is removed, I decided to give it another coat of Metallic Gray to finish off their base coat.

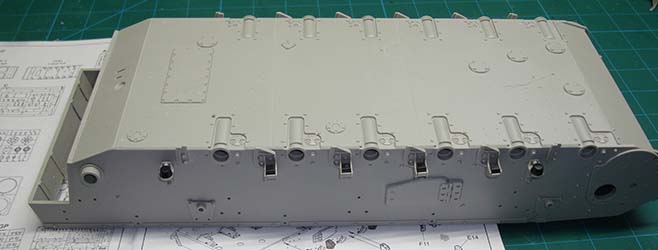
Back to the hull top, I add the spacers that support the spaced armor plate on the front and added the photo-etched cover.


Next comes the engine deck with all of the tiny parts that make up the hinges, lift hooks, etc.

I set the hull top aside for another evening to dry/cure.

For the final stretch on the hull top, it was time to add more tiny parts that go along with the tow cables and their mountings atop the engine deck. This was followed by the intake ducts/grilles on either side of the engine deck and even more lift hooks.


The hull top is completed and awaits the next gray painting session.

The hull top is painted and now we add the HF radio antenna and storage trough.

The main gun goes together relatively quickly...


...and mounts into the turret assembly.


The turret fits nicely and awaits the next gray session.

The cupola is assembled and added to the turret along with the final details.

Once I finished the gray base coat for the tank, I used some lighter shades of gray to add some wear/age to the paint. I also opted to add a field-applied winter camouflage and dulled that down with some lighter shades of gray.


Next I gloss-coated the model, applied the relevant decals, then finish weathering the tank. I applied each of the weathering shades one by one until I reached this point, but I'll likely continue when I add the commander figure to the cupola hatch later on. I may add those photos to this mix as well, but in any case, this was an interesting build that didn't have any real problems.


My sincere thanks to MRC for this review sample!