ICM 1/32 Stearman PT-17/N2S-3 Kaydet Build Review
By Kelly Jamison
| Date of Review | March 2022 | Manufacturer | ICM |
|---|---|---|---|
| Subject | Stearman PT-17/N2S-3 Kaydet | Scale | 1/32 |
| Kit Number | 32050 | Primary Media | Styrene |
| Pros | Best subject, nice details | Cons | See text |
| Skill Level | Basic | MSRP (USD) | $90.00 |
Build Review
Like with all my build reviews, I will write about the problems that I encountered and the path I took to get the model complete. Sometimes it is poor engineering of the kit and sometimes it is all me. You make decisions on your particular build based on what you have in front of you at the time, but things change. You might want to try a new technique or are working in a medium that you don’t normally deal with, missing or broken part or even an inaccurate part for what you are going for. As things progress in the build, they don’t always work out. The build seems to take a different path than what you wanted. There are a few paths I took on this one and I back tracked a few times and covered the evidence best I could.
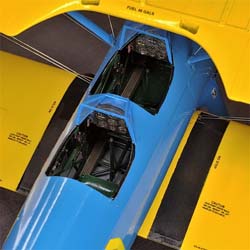
The box is a little on the light side for such a big kit but when I opened it, I was greeted with a well-engineered kit. The light grey styrene makes for a nice neutral color to paint on but is almost the same color as Tamiya grey putty which makes it a bit of a challenge to ensure you have killed that pesky seam. Luckily it takes the putty well and that excellent engineering comes back into play with very few seams that need to be addressed. The cockpit is finely casts and a bit fragile getting off the tree and handling once assembled but makes a great representation of the PT-17’s spindly interior tubing. You can detail this area as much as you want or just go stock and still have a very nice interior.
One of the most difficult things that I delt with surprised me, was research. I had a few books that showed exterior shots but no interior shots or close ups of the engine and external points of interest. I was surprised to find out that very few color period photos are available, especially pertaining to the interior. There are many restored aircraft out there and lots of photos but always be wary that if you use a restoration as a reference, the accuracy is not always there. Also, the aircraft was produced for years and for many different clients so there were many changes made through its production run. So, some educated guesses had to be made.
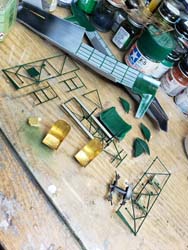
I added the Eduard BIG ED photoetch super detail set. The set is around $40 but can be found for sale from time to time. I thought the photoetch really added to the end product, but it is not necessary to build a nice kit. I trimmed out the different interior brass pieces to build the map case and seats then prepared the parts that will get the printed pieces like the instrument panels and throttle quadrants.
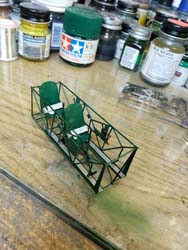
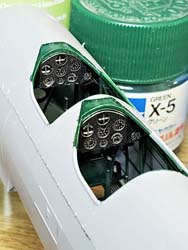
The interior got a coat of Tamiya XF-66 Light Grey to emulate the fabric and I used a Tamiya X-5 Green D for the interior ribbing. For all the grid work on the fuselage sides, all I did was paint the horizonal stripes first by masking front to back. Then after letting those stripes dry and removing the tape I re-masked and painted the vertical stripes. Don’t try to cut individual rectangles unless you just love that kind of thing. I do not! This little technique works very well on Stuka canopies and many Navy bomber aircraft like the SBD and TBD. You will drive yourself crazy cutting out all those little squares and rarely get the lines even.
All the interior pieces got a coat of the same Tamiya X-5 Green. I thought the assembly of the foot petals was awkward at first but not bad once you understand how they “work” mounted to the side tubing, then it makes a bit more sense. I did follow the instructions closely here. For such a big plane the cockpit was a bit on the delicate side and care needs to be taken to not snap off a piece here or there. The photoetch seats went together no problem and looked great when set off by the seat belts and buckles. I did learn that there are thousands of variants of interior modifications and colors so just pick one to use for a reference and go with that.
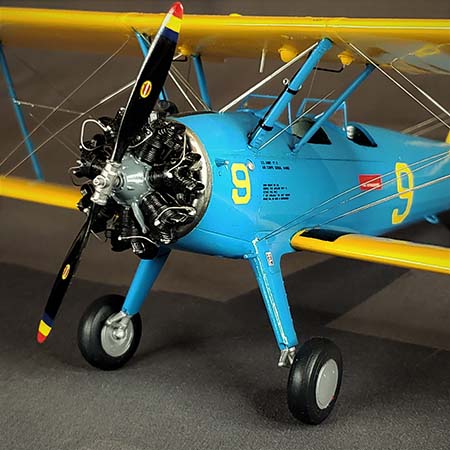
The instructions say to put in Part C33, Tail Wheel Strut, to the left fuselage half. I did that and I broke it off somewhere during the assembly. I never did find it. I had to scratch build one and I really didn’t think I did the best job with that. (Just another path I took) So be aware that it is a bit fragile for the entire weight of the plane. I also held off on Part C27, Tail Wheel. I really didn’t like the oddly shaped axle. It is a cone and not a rod like you would think but I do remember that when I did glue it together later in the build and prior to breaking it off, it fit very well and naturally centered the wheel by design. It worked like a champ, and I had no problem at all with the main wheels. I used a widespread clamp to get pressure on them and get them to fully seat in the cone shape sockets on the wheels. For wheels I have been using a Vallejo Black Grey acrylic. It gives the tires a more natural look than flat black.
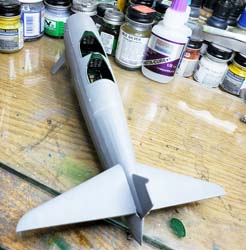
The fuselage goes together very cleanly but does not give you a solid feeling since the entire top of the fuselage is a turtle deck that needs to be added later. The bottom forward section, Part B8, adds more rigidity to the fuselage and needs to be glued into place before you put the cockpit cage in place. I didn’t have to use any putty in this area due to the superior engineering around the landing gear struts area. Just a couple of swipes with a sanding stick and it was ready to be painted.
Next thing in Step 13 was to tackle the turtle deck upper fuselage that the instrument panels will be attached to. This is where the Eduard instrument panels really shine. Especially in an open cockpit like this. You will notice in the picture that I painted the area that will be under the wind screen. My research pictures not only said that this was wrong but, that area is smooth and the area in front of the windscreen. There should be no lowered area behind the windscreen. The upper turtle deck went on but I wasn’t crazy about the fit at the back where it met near the rudder. It was a bit out of alignment with the rest of the fuselage. It took some clamps to twist it into place and even then, a little putty had to be use.
In Step 15 you add a panel to the left side of the forward fuselage. I am not sure why ICM engineered it this way. Maybe they had plans for a fully furnished inner area, but complexity and parts count dissuaded them after the engineering was already done. But it was not that big of a deal, and it fit perfectly. A little Tamiya liquid glue and it looked like the part had been cast that way.
In Step 16, I kept Part D11, Engine Fire Wall, off until more towards the end of the build. I did the same thing with the landing gear assembly in Step 17 to 21. But I did do Step 22 and put on the inner landing gear spats (Parts C13 and C14.) It helps in sanding, priming and painting.
The tail planes were put together with no trouble, but I did make a tactical error here that haunted me throughout the rest of the build. I thought I would put them on later. I should have glued the elevators to the tail plane in a solid fashion with a bead of epoxy or superglue. This caused me to continually break them off dozen times during final assembly. I ended up drilling and putting in small connecting rods to pin them together after painting. Not the best way of doing it. (Another one of those paths.)
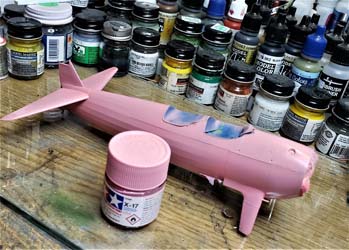
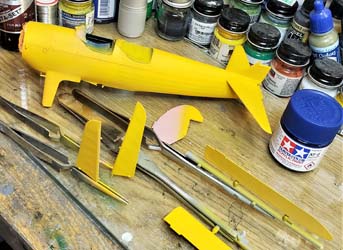
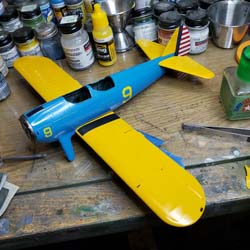
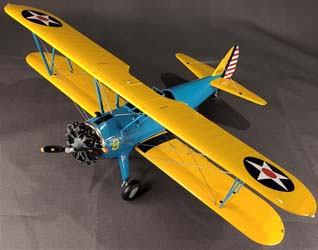
This is where I departed the instructions advice several times. (And took different paths.) I held off on, Part 30, Carburetor Intake, and both front windscreens that Step 33 calls for. I painted the fuselage and all parts of the build including the wings Tamiya X-17 Pink! Yes, pink. I have been experimenting with this technique that I picked up awhile back with different pre-shading techniques for particular colors. Yellow being one of them. The pink pre-shading helps bring out the yellow better by absorbing some of the light that shifts the yellow to the green and/or orange side of the spectrum. Conduct your own experiments on a scrap plane and determine for yourself if this is a technique you would use. I can tell you it works better on smaller areas like nose cones and fuselage bands.
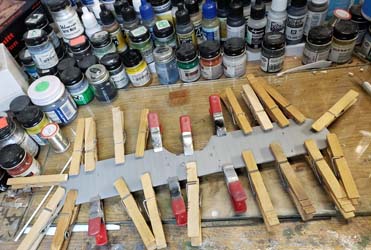
Then it was time to tackle the lower wing. They glued up using every clamp I had in the shop. The ailerons are molded as one piece, which is nice but need to be glued to the wings. While I had the clamps out, I did the upper wing also. I painted the ailerons along with the wing Tamiya XF-3 Yellow and then I glued them in place with superglue. This was because I thought I wouldn’t be able to airbrush the area between the wing and ailerons but, after the fact, I determined that it wasn’t really a problem.
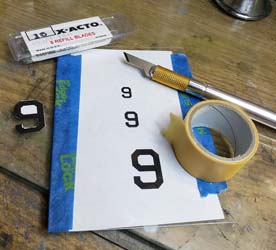
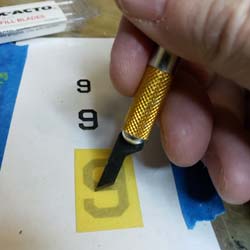
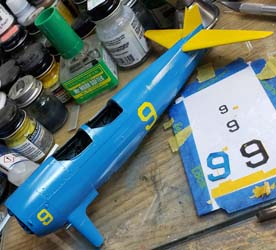
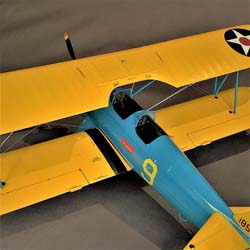
I masked off the number 9 by printing a series of 9’s off my printer using the AirbornE II font at different sizes, then put them under some clear plastic and a layer of Tamiya masking tape. With a new Exacto blade firmly chucked in my handle, I slowly hand cut each one out. If you take your time, you can make some really nice stencils with masking tape. This is when I discovered another gaffe, that the fuselage numbers were more of a lemon yellow and not the same yellow as the wings. I had never noticed this before. So, I had to paint the fuselage again around those areas where the numbers would be, therefore I used Mig-0048 Yellow to correct this oversight and put down the number masks again. Then after masking off the tail planes and rudder area I painted the bright blue on the fuselage. I used Mig-0229 FS15102 Dark Grey Blue. I think this color is misnamed for sure for this shade of blue. I really like the results.
Back to the wings. Once dry, I painted the wing walk areas before attaching the wings to the fuselage. The lower wing fit was much better than I thought it would be. I did tape one wing tip and ran it to the fuselage then to the other wing tip while sitting it on paint bottles for a makeshift gig then ran liquid glue in all the seams around the wing to fuselage joint. This did make a strong bond but caused me to have to touch up the “melted” paint in those areas. In hindsight I might have gone ahead and glued the wings on before painting and just masked everything off when it was time to paint the wings.
I left the rudder off and decided to airbrush the red, white and blue stripes. It took a bit of measuring but not too difficult. The whole rudder got painted Tamiya X-2 White then left to dry. Once dry, I masked off the top front to be painted Tamiya X-17 Pink and after drying, it got airbrushed XF-3 Yellow. Then I masked off the stripes to be painted Tamiya X-7 Red and shot it with my airbrush and left to dry without removing the tape, I taped off the areas to be painted Tamiya XF-8 Blue but had to lighten it up just a bit with white to get that rich blue color first then shot that on the rudder and left it to dry. See the theme here? This blue stripe gave a good line for the red and white stripes to look even on their short edge. Once it was dry, I removed each layer of tape slowly. I really like the result and I think it was worth the effort. Although from the experience I had with the other decals, I think you would be just fine using the kit decal for the rudder and save yourself a day of painting and taping.
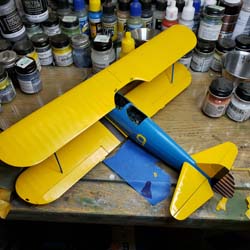
Now for the most difficult part of the kit. The upper wing. I decided to use a technique a buddy told me about who has much more experience with biplanes. It was to use white glue to join the struts and upper wing to the lower wing. Use masking tape, jigs, magnets, swear words, anything and everything you need to get the wings leveled in all directions and then walk away. Let the white glue dry fully then hit it with super thin superglue to reinforce it. You need that white glue to be able to wiggle and adjust everything into place first. The smaller fuselage to upper wing struts were the worse getting it all aligned. The white glue slow working time made it so much easier to get right. It worked for me but what a pain! It has and will continue to turn me off on doing biplanes. I know that folks that build biplanes have much better techniques in their bag of tricks. I defer to their superior knowledge.
The engine and exhaust are an area where you should treat it like its own little sub-model. It is a focal point of the kit, and you have a lot to work with. You can detail it to your hearts content. I didn’t understand the little exhaust stubs at first but here is where I actually followed the directions and took my time. I also used the Eduard photoetch spark plug wires. You could use some wire and replicate it much better in my opinion and save the money. But it all went together. I added some tube to the gear box and brass rod to the propeller just to get a better mating surface, but it is not necessary. For the record the prop and gear box have the same conical mounting point as the land gear struts to the wheels.
Now for what I consider the most painful part of the kit. (Once again, another path) I decided to use old guitar strings (E string .010 off a Telecaster to be exact) and I drilled small holes and “strung” each one. One at a time, for many hours. It was very difficult and something I will re-think about on any future builds, but I wanted to try it. They look great but I think flex line or fishing line might be a much better choice. The actual wings on the real thing have these see-through ports at the mounting points for inspection. I could have drilled them out and added epoxy to replicate the port or some other method, but the build started to drag on past my comfort limit. So, I pressed forward.
Next thing to tackle was all the little parts and pieces. Pitot tube, windscreens and I scratch built fuel lines coming from the bottom of the top wing down to the engine area. Those should have been molded in plastic from ICM but were not, so some wire, some soldier and some black paint was all that was needed to replicate the fuel lines.
To gloss things up I used Bona High Gloss Shine Hard-Surface Floor Polish. I like it better than Future but there really is nothing wrong with either product. A thin coat went on and then it was time for the decals. The decals were very good. Opaque and easy to get into place. I thought all the little stencils really added to the look of the plane and highly encourage you to take the time and put them all on. Go in a few sessions. Don’t do them all at once. You will get a much better result in the long run. Once everything was dry, another coat of Bona went down. I let it dry and polished the large surfaces with a soft cloth to smooth out the clear coat.
I wrote this article with the intent that you probably already have the needed basic skills but would like to know where the “gatcha’s” are on this kit and maybe share a few techniques (paths less taken) that you can try or pass on if you wish. I like the overall look of the kit and honestly wouldn’t mind building another one with the knowledge I have gained from this exercise. On the shelf, beautiful. Fond memories, not so much.


