


Italeri 1/72 BR 20 Cicogna Build Review
By Bill Kreuger
| Date of Review | February 2006 | Manufacturer | Italeri |
|---|---|---|---|
| Subject | Fiat BR 20 Cicogna | Scale | 1/72 |
| Kit Number | 1143 | Primary Media | Styrene |
| Pros | Nicely detailed, interesting decal options | Cons | Seam filling required |
| Skill Level | Basic | MSRP (USD) | $28.50 |
Background
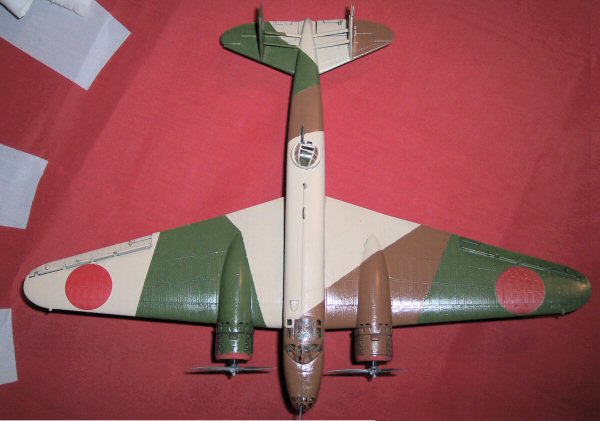
The Fiat BR 20 Cicogna (Stork) was a twin engine bomber developed by Italy in 1936 and used by the Italian Regia Aeronautica, as well as many other Axis air forces in the early days of World War II. The Cigogna was an all metal aircraft, something that was quite new at that period, and was first flown at Turin in 1936. It became one of the best known medium bombers of the Italian air force. In 1939, a modified long range version of the aircraft made a highly publicized nonstop flight from Rome to Addis Ababa at an average speed of 400 km/h, a new record for aircraft in its category. BR 20s were used briefly in the Spanish Civil War and several were sold to Japan. The aircraft sold to Japan saw action in the Sino-Japanese War with the Japanese Army air force and were designated as the Type 1 Model 100 Ruth. They were later replaced by the Mitsubishi Ki-21 Sally. The aircraft was in action on almost all fronts, over England from bases in Belgium and in North Africa and Russia. It carried a bomb load of 1,600 kg. and was armed with 1x12.7mm machine gun and 2x7.7mm machine guns. In total, there were 580 examples of the aircraft built.
The Kit
This is a re-release of an older Italeri kit and labeled on the box as a Limited Edition. You can see an in-box review of the kit here.
Construction
As indicated above, construction of the kit is covered in 6 steps with each step consisting of exploded drawings indicating where parts are to be placed.
Step 1 is the construction of the cockpit and flight deck. This construction is very straight forward. The kit includes 4 flight crew figures, which I opted to leave out. Besides seats for the flight crew, two bulkheads, and simplified control column, there is very little detail on the flight deck.
Step 2 consists of the construction of the fuselage, including the assembly of the bulk of the interior. This construction, for the most part is pretty straight forward. However, I did have a bit of a problem with the assembly of the machine gun into the rear turret. The instructions simply illustrate the gun being placed into the turret, but the attachment points on the gun and their corresponding holes inside the turret did not match up well. Additionally, I built my plane with the turret deployed, as it would not fit quite right in the fuselage when it was retracted. There is also a machine gun that is assembled in a coal chute style turret in the ventral position. I opted to seal this space up with the assembly, as there is no detail to see up inside the coal chute. Besides this, everything else went together well. I did have some pretty large gaps in the fuselage that needed to be filled after this assembly.
Step 3 is the assembly of the engines and wings. This step was straight forward and not complicated. The engine nacelles are a part of the wings, so the instructions show the engines being attached as the wings are assembled. I opted to assemble the wings and then put the engines in place, which seemed to work well. The nacelle rings are then added to cover the front section of the nacelle and hold the engine in place. I then added the propellers after everything was installed and set. The wings have positionable ailerons, which are shown being added to the wings in this step. I chose not to add them at this time. There are counterweights that are attached to each of the ailerons, both top and bottom.
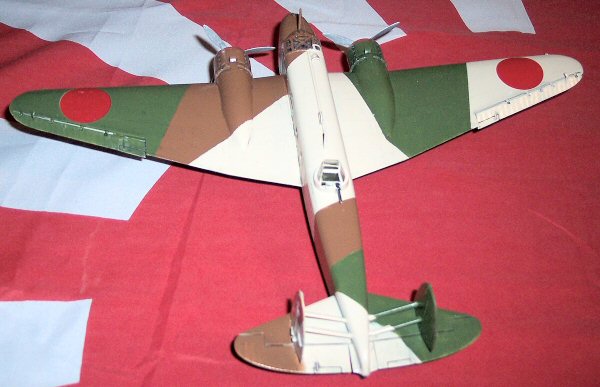
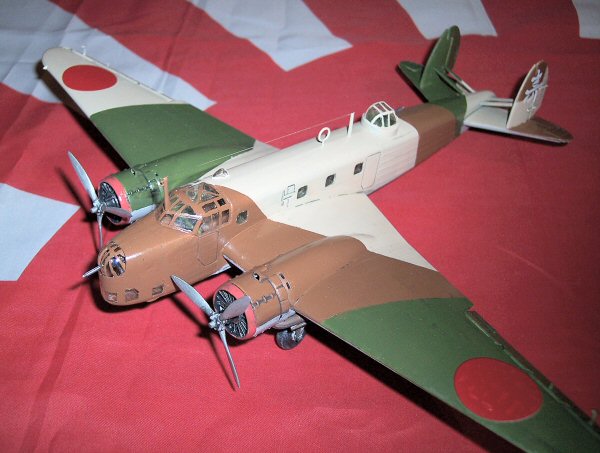
Step 4 is the assembly of the wings to the fuselage and completion of the fuselage details. It is at this point that you decide which version of the aircraft you are building. There are two different nose cones provided depending upon which version you are constructing.The nose cones are molded in clear plastic, with most of it being painted. I opted for the Japanese version D/2. During assembly of the nose cone, you attach the front turret and machine gun. Again, different turrets are provided. This assembly went along very well. You also add a section of clear plastic at the front bottom of the aircraft, which must be the sight for the bombardier, although this is not explained. This is added through the front of the fuselage, before attaching the nose cone.The nose cone fit well, but there are some gaps between it and the main fuselage that had to be filled. At this stage you add the wings to the fuselage as well as the main canopy. The wings went on nicely, but there were some gaps between them and the fuselage. I chose to add the main canopy after most of the painting was completed.
Step 5 is the assembly of the tail plane, rudders and elevators. The aircraft has a twin tail, which is attached with struts connecting it to the fuselage. Most of this assembly was straight forward, but there were small gaps in both the rudder and elevator sections that had to be filled.
Step 6 is the final assembly and consists of the construction of the main wheels, attaching the wheels to their wells and construction and assembly of the exhaust pipes to the engines. This step is also very painless. I drilled out the ends of the exhaust pipes to give them a more realistic appearance. The very last thing I did was to add the ailerons in the down position and antenna wire.
Painting and Detailing
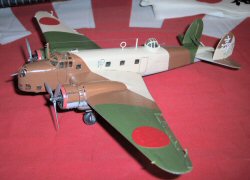
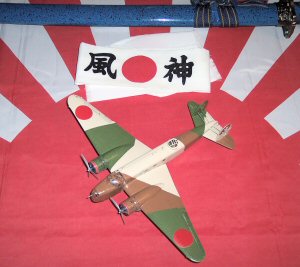
Most of the detail painting was accomplished before assembly, including the interior, engines, propellers, wheel wells, tires, turrets and armament. Because of the amount of clear pieces, there is a lot of taping and masking that has to be done. After assembly of most of the aircraft, I filled all the gaps, primed and sanded the seams. Because of the amount of sanding that was done on the fuselage seams, much of the raised detail was removed. When this was accomplished, I painted the aircraft overall with Model Master Acryl Sand. I let this dry for a couple of days and then masked off areas for the lozenge camouflage. The first color that I sprayed over the Sand was Model Master Acryl Medium Green. After this was thoroughly dry I then added the last color, Model Master Acryl Earth Red. After everything was completed and having set for a few days, I painted over all surfaces with a coat of Future. When this coat was completely dry, I highlighted panel lines with a black wash. The very last step was the application of the decals. I chose to build the Japanese version, used by the 12th Sentai in China in 1939. The decals went on very nicely and I used Solva-set to make sure they would snuggle down into the raised detail on the wings and rudders.
Conclusions
This is a nice kit to build, but it can also be challenging and a little frustrating. I think most of the frustration comes from the age of the kit. There were a lot of gaps that had to be filled and it did not seem to fall together as well as some of the newer model kits tend to. You will need to add a lot of putty or seam filler and will be required to do a lot of sanding to get the kit to turn out looking well.
It would have been nice if there was a better guide on how the machine guns are supposed to be installed into the turrets. I was impressed with the overall kit, though, and super detailers should have a fun time re-doing the interior spaces. I liked the fact that Italeri specified paint numbers as well as colors on each of the versions that were depicted. I think the fact that there are several versions that can be built from this kit will entice anyone interested in Axis aircraft of World War II. It may be a bit of a challenge for beginners, however. With that said, I would recommend this kit to anyone who might be interested in a unique, oldie but goody model of an Italian aircraft.
My thanks to Testors for the review sample.