


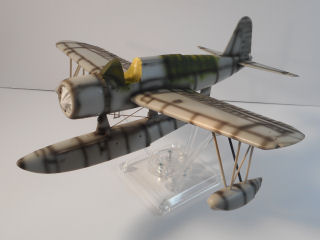
Kitty Hawk Models 1/32 OS2U Kingfisher Build Review
By Larry Horyna
| Date of Review | December 2015 | Manufacturer | Kitty Hawk Models |
|---|---|---|---|
| Subject | OS2U Kingfisher | Scale | 1/32 |
| Kit Number | 32016 | Primary Media | Styrene, Photo-Etch |
| Pros | First styrene kit of this subject in this scale | Cons | A few minor glitches (see text) |
| Skill Level | Experienced | MSRP (USD) | $89.95 |
The Build
For a brief discussion of this subject and a look at this kit out of the box, look here.
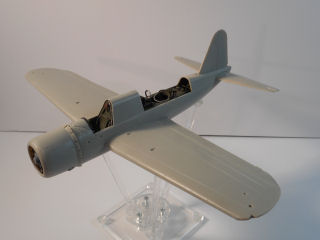
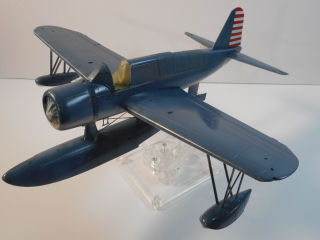
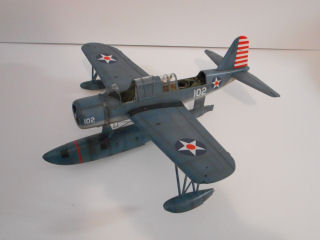
Kitty Hawk's new 1/32 OS2U Kingfisher is a welcome addition to fans of large scale WWII US Navy aircraft. Box reviews have shown this kit to be well molded and accurate looking in outline. I even saw one review online that compared the castings to Wingnut Wings. Well, let's get down to the nitty-gritty and see how the kit goes together. This is my second Kitty Hawk 1/32 build so I had some idea of what to expect.
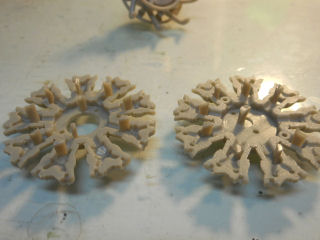
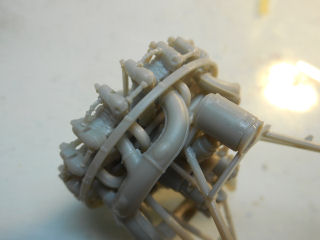
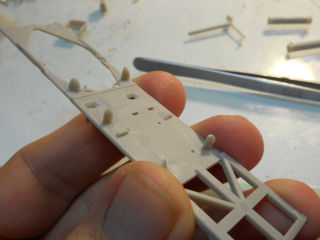
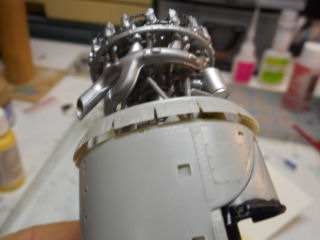
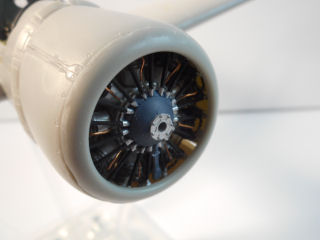
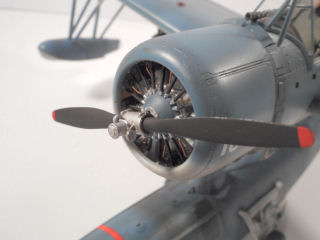
Let me first say that when you look closely at the detail parts, this does not compare to Wingnut Wings! That is not to say this is not good, but the fidelity of the small detail parts is a bit "soft" around the edges if you compare them to Hasegawa, WNW, Eduard and of course, Tamiya. Many tiny parts have very large sprue runners making cutting the parts from the trees without damaging them is a bit of a challenge. The only casualty I incurred was the ignition ring, which had four huge runners that were very hard to get to, even with a fine razor saw.
The engine halves are nicely molded, but had huge injection plugs on the back of each half that needed to be cut away. This is not difficult, but it does set the tone for where you're going. Be prepared for lots of cleanup work and test fitting! And it's not like you can just nip these big plugs off the back and put the engine halves together. You have to make sure you get down below the seam line or you will have fit issues. This is where I ran into another recurring theme; alignment pins that do not fit their corresponding holes. The plastic used for Kitty Hawk's kits is quite soft and I am wondering if that has an effect on the "fine tuning" of parts in their fit. I don't know, but I have never built a kit that had this many fit problems involving the size of pins to holes. I would classify this as an annoyance more than a problem.
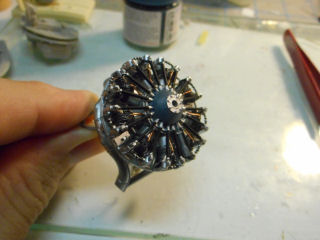
For a relatively simple single row engine, this kit has lots of parts. Counting the engine mounting brackets, 73 parts to be exact. The valve covers on top of each cylinder are separate pieces and all of the oil transfer pipes are included as well. This is great, except for two little issues. On the valve covers there is not a clean fit to the top of the cylinders. There are square cut out areas on the top of the cylinders and corresponding shapes on the bottom of the valve covers, but they do not line up.... at all. I ended up just setting them in what looked like the right position using photos of the real engine and slathering some Tamiya thin cement around them! This may have had something to do with problem number two; the oil transfer pipes do not fit between the valve covers without a bit of trimming. And these are tiny parts! It's enough work to clean them up as they have wide runners as well. Again, be prepared to spend some time on this, it doesn't "fall" together by any stretch.

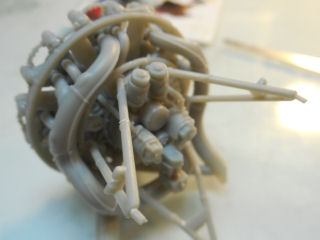
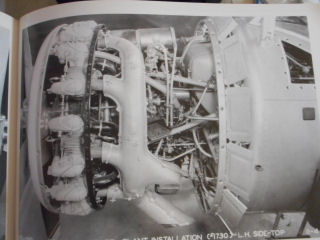
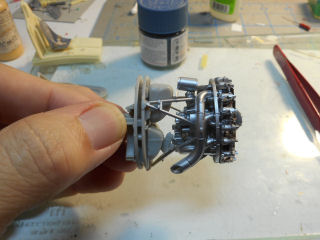
The pushrod/gear reduction housing assembly is a single piece that fits on the front of the engine and I also had do a bit of adjusting to the bottom of the valve covers to get the this to fit. Next comes the back of the engine, and there are quite a few parts here as well. Here is a little bit of a beef I have with this type of construction. I love detail, but I don't usually like to open up areas like the one between back of the engine and the firewall. Now I realize that's simply personal preference but you have to build most of this anyway as it's part of the whole assembly. This adds a lot of room for fit problems. I had a very similar problem with Kitty Hawk's T-6. And by the way, if you do want to display this area, you have one heck of a lot of plumbing to scratch-build! I'll include a photo of the real thing in this area and you will see what I mean.
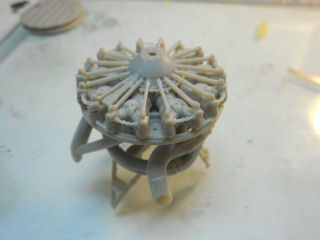
The exhaust pipes are also a bit of work to clean up and fit. They are engineered to be hollow, which is nice, but again, you'll have a bit of clean up to do to get them smooth. Once attached, they look a little "off" to me. I won't know how off until I try and fit the cowl panels, but looking at them from the underside, they are not symmetrical at all and they appear to be in photos. The instructions have you mounting two small cylindrical objects (I am not sure what they are, they look like oil filters) before attaching the engine mounts. DO NOT do this! Attach them after the brackets or you will have to take them off like I did as they will end up in the way. At least the brackets are somewhat more stout than those in the T-6, which I found useless. When I attached the engine to the firewall I noticed a distinct upward tilt to the engine. I'm sure this is wrong and I will probably have to adjust this when I put the assembly in the fuselage.

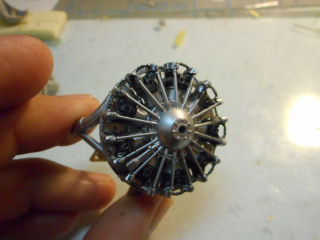
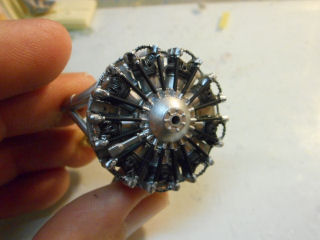
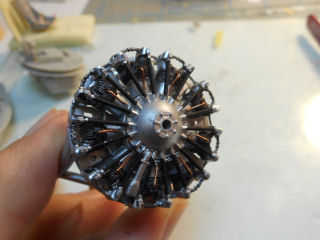
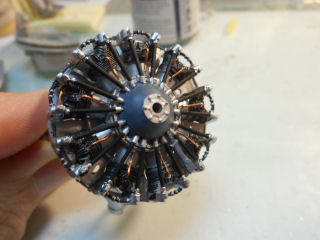
I painted the entire engine assembly with Tamiya silver leaf, decanted and sprayed through the airbrush. I normally would have just rattle canned this but I has some other stuff to paint with the silver leaf that I needed to airbrush and included the engine with that. The cylinder heads received a black acrylic wash followed by flat black on the pushrods and oil transfer pipes. I next added the ignition wires from copper wire and painted the gear reduction housing blue-grey. I am very pleased with the end result but a bit disappointed in what it took to get there. Busy detail can be cool, if it all fits reasonably well.
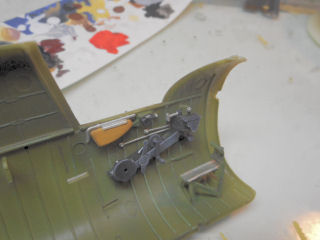
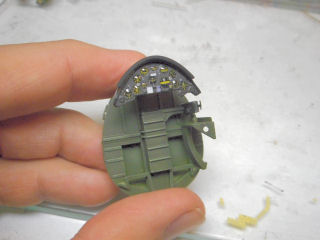
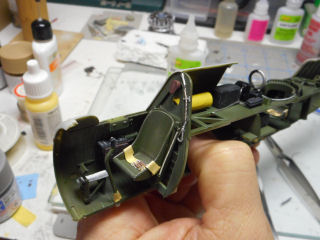
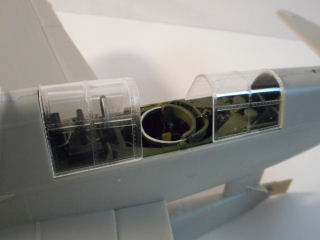
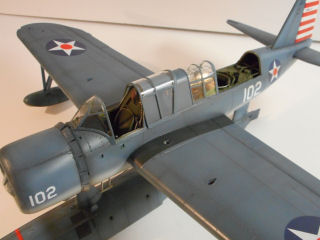
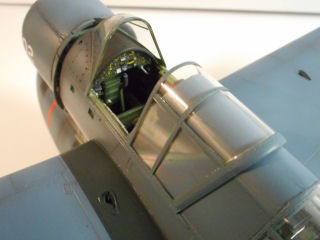
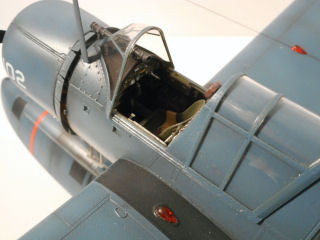
I got a bit of work done on the Kingfisher's cockpit. Overall, it was a bit smoother experience than the engine! However, I did run into many of the same fit issues. Primarily, these involved pre-shaped fitting areas not being the same size as their corresponding parts' attachment points and a few ejector pin marks in some pain in the butt locations. I also found a few things that were not quite right in terms of accuracy, but they are fairly minor. A quick note; I am not a "rivet counter" in how I look at other's people's models, but one reason I like 1/32 scale is the level of detail I can see. I like these details to be relatively accurate. If they are not, I enjoy making them accurate. I realize this is just a replica and everyone has different tastes as to what constitutes "accuracy" or just how accurate they want it to be, so keep that in mind as I go through this build. Some of the things that bug me may not matter to someone else.
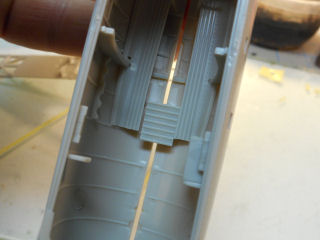
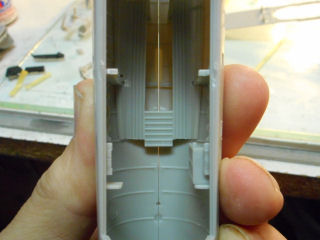
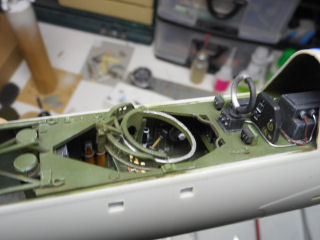
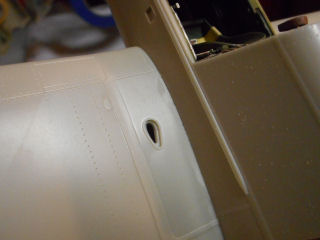
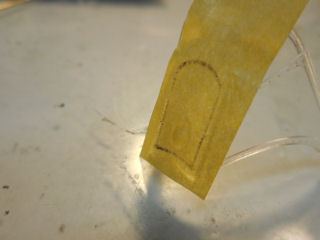
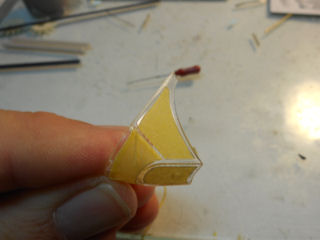
The decking around the observer's compartment features the same large sprue injection plugs that the engine had but they are under the deck so simply cutting them away is all that is required. The inside of the fuselage halves does have some large ejector pin marks but these are all invisible once all of the details and bulkheads are in place. I don't think any of them need to be filled or sanded out. Just aft of the rear gun mount there are two angled tubes. These are the for dropping the light markers and have a corresponding panel door on the outside of the fuselage that is in the correct location. According to all of my reference, these tubes had covers on them but the kit does not. I made them by using my punch and die set and punching out two covers in .010 card stock.
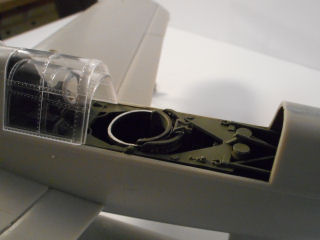
There is some bracing behind the gun as well and this is not represented quite correctly. Two of the angled pieces, which are the thickness of heavy bracing, are in fact bungee cords on the real airplane that are part of the gun stowage brace. There should be some angled braces just beneath the bungee cords but they are not in the kit at all. I made these braces out of square strip stock (the real bracing is square cross sectioned metal, not round as the kit is molded, so I also sanded the rear bracing sections square). More could be done here but this will suffice for this build. I will make the bungee cord out of stretched sprue later.
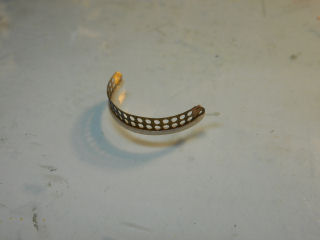
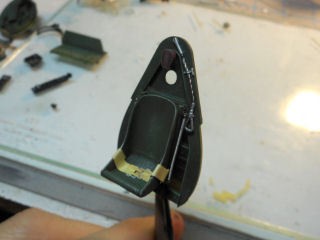
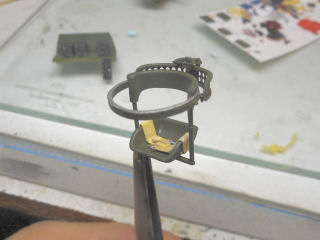
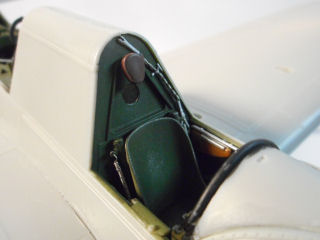
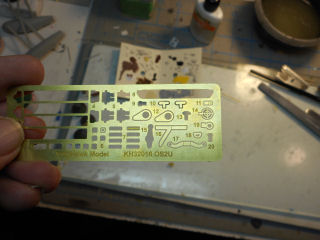
My biggest problem with the rear section was with the gun ring itself. Part of the assembly is a very nice photo etched piece that needs to be curved to match two corresponding plastic pieces. This was not too difficult (and made easier by annealing the brass part). The problem was that the top plastic part was way too short! I believe I cut it a tiny bit short as it was hard to tell where it actually ended (a byproduct of the "soft" detail casting). But even taking that into account, the part was far too short to cover the top of the photo etched part. I rectified this by using two part epoxy putty and extending the plastic upper ring part.

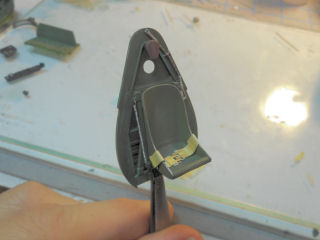
The rest of the rear area assembly was fairly hassle free. Moving to the cockpit, the only "miss" I found is in the bulkhead behind the pilot's seat. There is a triangular shaped access door that should have a round window in it. It is possible that Kitty Hawk did this on purpose because the outline of this window is actually on the backside of the bulkhead, so maybe it is an option to cut it out. But there is nothing in the instructions to inform you of what his might be. Since all but one of the markings options in this kit are for an OS2U-3 (and ALL -3's had the window) I think this is a mistake on Kitty Hawk's part. Giving them the benefit of the doubt, one marking option is for an OS2U-1 and they did not have the window (no, they missed it). I cut out the window and thinned the back of the bulkhead. I will make an acetate window before finishing the cockpit.
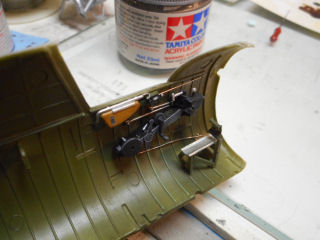
The next issue was a few ejector pin marks in the rudder pedals and foot support rails. These are fairly deep and should probably be filled and sanded but I elected to just sand them completely out, which makes the parts a bit thin! But once painted they should look fine. The pilot's rudder pedal assembly is a bit tricky and fidgety to assemble but it fits well into its corresponding groves in the fuselage halves. There is a small detail on the starboard pilot's canopy sill that did not fit because there should be a small notch in the sill that is not there (you can see it in the instruction illustration!) It would seem simple enough but it was actually a bit of a pain to cut the notch in the sill.


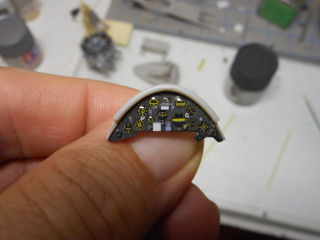
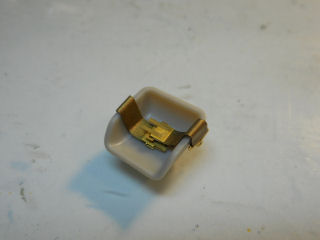
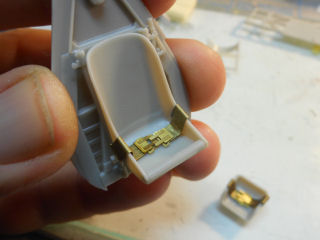
The bright spots to the forward cockpit were the instrument panel and seat belts. The instrument panel is a one piece decal that actually went down very nicely over the raised detail of the injection molded instrument panel. I added a little five minute epoxy to the dial faces. The photo etched seat belts are a nice representation of the Kingfisher's unique wide lap belts. One little thing Kitty Hawk missed here though. By mid 1943 all Kingfishers were fitted with shoulder harnesses. I am doing markings from 1941 so it's no big deal to me but if you want to model a late war Kingfisher (as some of the kit markings are) you will need to grab some aftermarket shoulder harnesses.
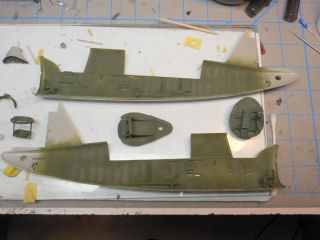
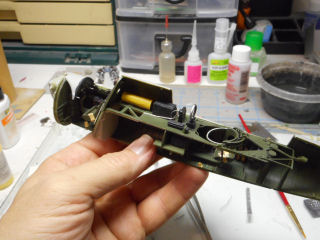
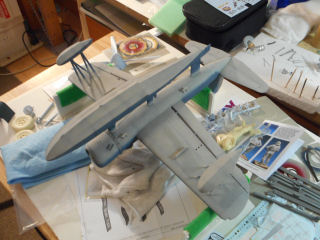
Once the major components were in place in the fuselage halves the entire interior was painted with Tamiya XF-67 NATO Green, which is a very good match to the FS number for dark dull green, the particular color Vought used on Kingfisher interiors. The only fit issue caused by the interior components was a section of flooring under the observer's compartment. A little sanding solved this and the fuselage halves fit together nicely as this point. I have not fit the forward firewall and engine bulkhead yet. The next installment will finish out the interior detailing and move on to some major assembly fitting.
So far the interior is going together with a minimal amount of fuss. There are still a few issues with tabs and pins not being the same size as their corresponding holes so keep in mind you will need to test fit pretty much every little thing to ensure you don't have to drill out holes or carve down mounting tabs. Cockpit detail is pretty good overall. Other than the issues with the seat and bulkhead addressed in the last installment, the rest of the interior only needs a little wiring and you will have a pretty nicely detailed interior.
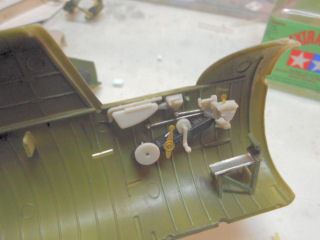
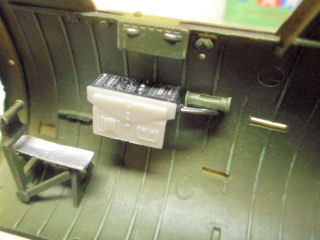
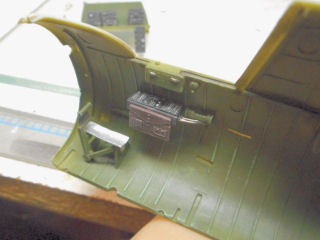
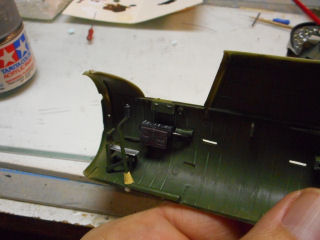
I finished out the pilot's seat by adding scratch build adjustment springs. These are a very prominent detail and I am a bit surprised Kitty Hawk did not bother to give you some sort of representation of them. Also, in the instructions but not included in the kit is the hoist cable which mounts to the port side of the seat bulkhead. It's a funny omission because they do give you a photo etched clamp that goes over the cable. It just magically appears in the instructions. But it did not magically appear on my kit! I made the cable out of some twisted wire.

While the instrument panel decal worked quite well, the other instrument decals (one for the rear cockpit instrument board, one for the starboard side electrical panel and one for the port side control panel) were not well thought out. The surfaces they are supposed to cover have way too much sharply raised detail to conform to, I don't care how much decal solvent you try and use! I cut these decals into smaller pieces, mainly the instruments, and discarded the rest.
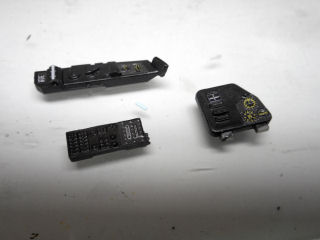
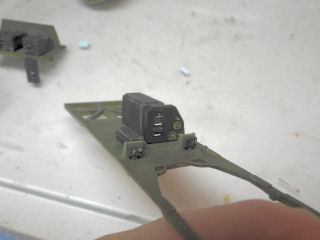
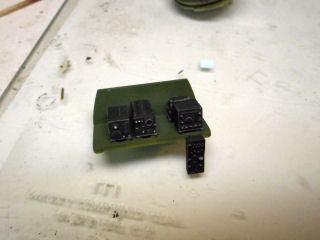
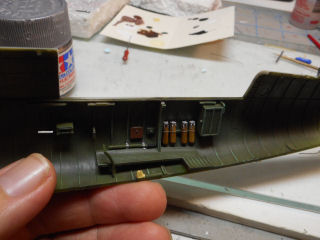
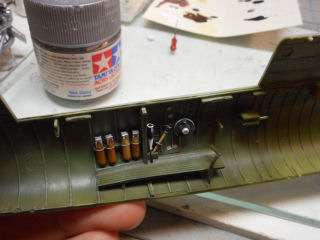
The radio gear in the rear cockpit is well represented. Again, most of the radio boxes did not fit into their corresponding holes so those had to be drilled out a little larger. A little wiring is all that is required to get a nice look out of this area. Keep in mind that you can see much of this equipment through the center section windows, including the back of the rear instrument panel so if you want a realistic look to the radio equipment you really need to add some wiring here.
The only things added to the interior were some wiring, canvas boots for the control sticks and something to represent the life raft, which was not included. The raft sits behind the pilot's bulkhead and is barely visible through the small window in the access door. However, being yellow, it is visible. I did not worry about making it look like a folded up deflated raft since you can't see that level of detail. I simply rolled a small piece of lead foil up and painted it yellow. The canvas boots on the control columns were also made from lead foil. The rear control column was cut and put in the stowed position as it would only be mounted when the gunner needed it to fly the airplane. For normal operations, the rear stick would actually be in the way and a potential hazard as the gunner could accidentally limit the stick's travel. That would probably not make the pilot very happy! One more big omission from the interior - during 1941, all OS2U-2s (and subsequently -3s) had added armor for the rear gunner. This consisted of a plate mounted to the gun itself with a vision cut out and a sectioned piece of chest armor in the seat. I will scratch-build it later and install it with the gun. Classic Warship's publication on the Kingfisher has excellent photos and drawings of this armor, which was in all combat aircraft from 1941 onward.


The Mk. IV float lights were painted to simulate varnished wood. I found some very nice photos online of these markers. The kit gives you no idea as to how to paint them. They were varnished wood with metal fins. Frankly, the way the fins are represented is a bit lame. Fortunately, they are not visible enough to really worry about. I would imagine someone like Eduard might make photo etched ones, which would be ideal. One last little extra was a stencil decal I fished out of the spares box to put on the folded wooden armrest in the pilot's cockpit. I saw it in photos and thought it would be a neat little detail to add. I didn't bother to add this, but there was a cool little slide-out navigation table under the pilot's instrument panel. You normally wouldn't see it, but it would look kind of neat to have it partially slid out. I was a bit anxious about how all of this stuff would fit and still let the fuselage go together smoothly. Everything went together very nicely. The interior bulkheads snapped into place and nothing held up the fit of the fuselage halves.
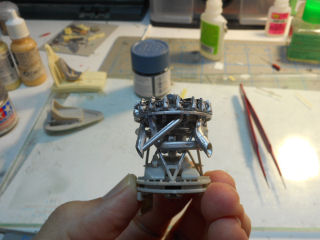
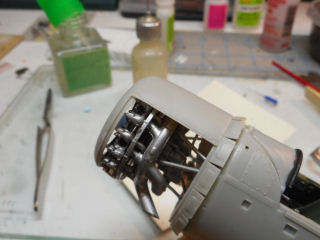
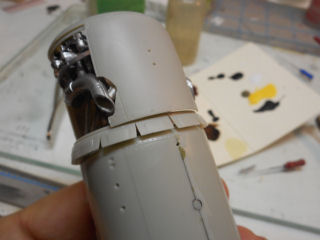
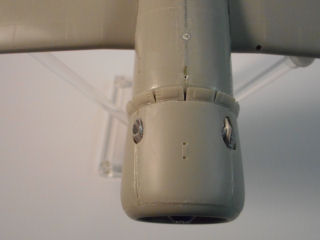
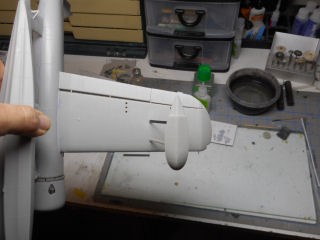
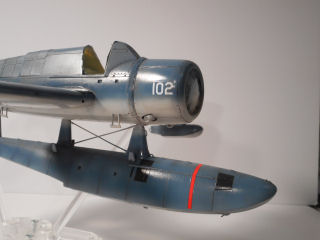
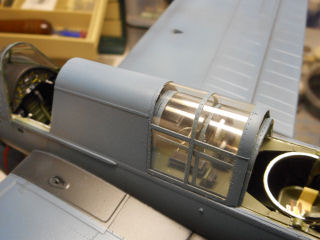
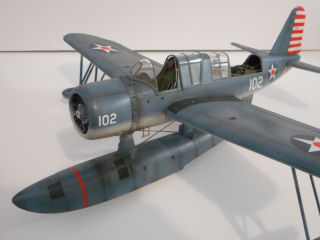
Next came the dreaded engine and cowling. As I stated earlier, I do not care for how Kitty Hawk engineers the forward fuselage of kits like this (the T-6 was similar). It just begs for fit problems and this did not disappoint. However, the problems were not nightmarish to solve. I thought about just ditching the whole forward assembly process and glue the cowl flaps to the fuselage, then attach the forward fuselage panels and attach the engine and cowl ring to that. Well, you can't do that. The cowl flaps to not directly attach to the fuselage. They attach to the engine mount brackets and "float" in front of the forward fuselage. It's a somewhat flimsy assembly. When I attached the engine to the firewall via the mounts, the engine tilted up noticeably. I solved this by bending the hell out of the lower mount (no big deal for me since I am closing the cowling. Have fun if you want to keep the cowl open!). Once the engine looked level, I attached the cowl flaps. They did not quite fit all the way around. There was a small gap on top but much of it is hidden once you attach the top panel. They were a royal pain to attach because they have no stout, balanced mounting points. Each side attaches to an area on the engine mounting brackets.
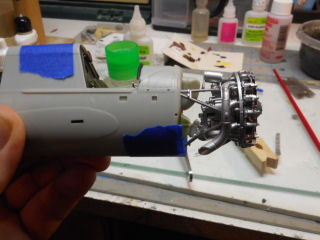
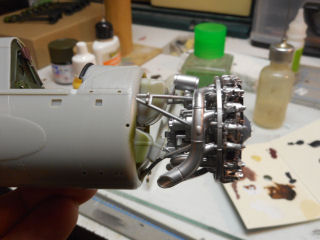
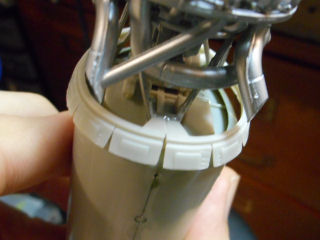
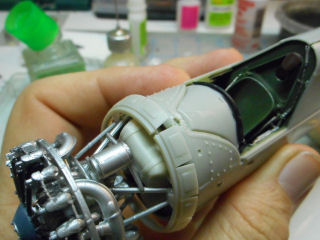
Once I got the cowl flaps into what looked like a straight, balanced position, I immediately set the upper cowling panel in place to see if the alignment was good. To my amazement, it was. I then attached the bottom panel. This one did not fit as well where it attaches to the cowl flaps but again, it's a minor fill and fix. One other note at this point. The cowl ring is supposed to attach to three points on the engine. I have no idea which ones, they are not marked nor do they stand out. I just eyeballed it and attached it to the engine. It turned out fine but I hate ambiguities in instructions like this. As you may recall, I thought that perhaps the exhaust pipes looked somewhat unbalanced when I built the engine. I was certain they would not line up with the cut-outs in the panel, but indeed they did. Next came the side panels which also fit pretty well. I do have some gaps, but not nearly as large as I expected and should be easily filled with Mr. Surfacer 500. Again, this whole thing is fine if you want to detail the area between the firewall and the back of the engine. But if you don't, it's just lots more work and fidgeting.


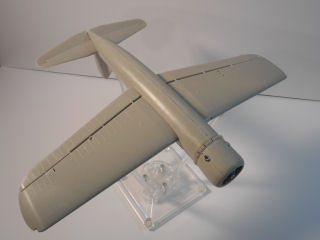
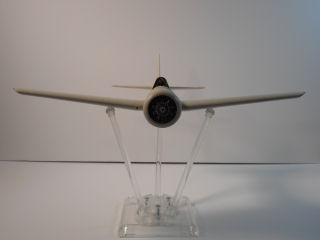
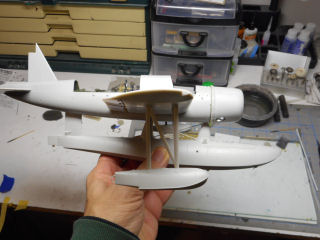
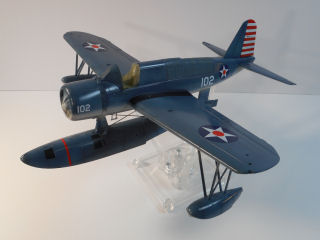
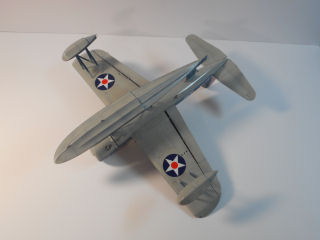
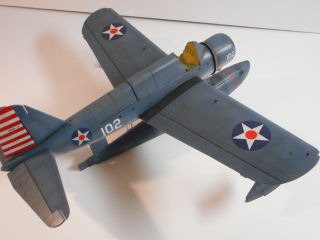
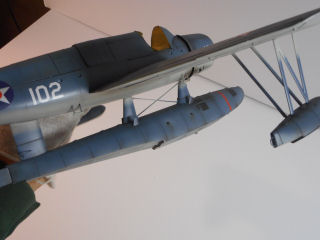
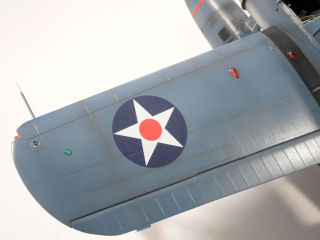
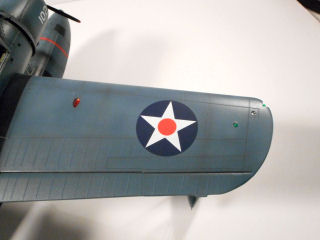
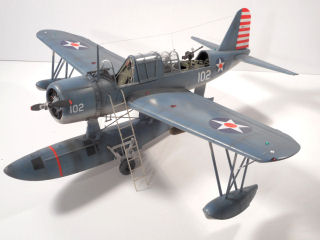
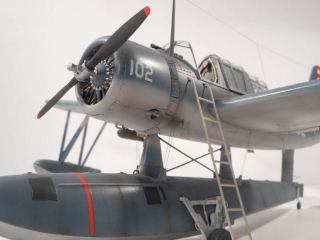
Next up were the wings and horizontal tail surfaces. Fit here was exceptional. My only gripe is that the trailing edges are too thick. Nothing a little sanding won't cure. I had wanted to drop the flaps and the ailerons to show off the unique "drooping ailerons" of the Kingfisher, but these are pretty much engineered to be up. You can lower them, but you will have some work to do on them and they will be very delicate. There is one other thing you need to pay attention to - this model will make either the land or float version, there are holes that need to be drilled in the bottom of the fuselage and in the bottom of the wings. Kitty Hawk DOES NOT remind you in the instructions! I completely forgot to drill the holes in the wings before I glued them together and now I will have to measure out where the struts go and make the holes from the outside. In fact, the instructions don't tell you anything about versions as you go so keep that in mind as you are building.
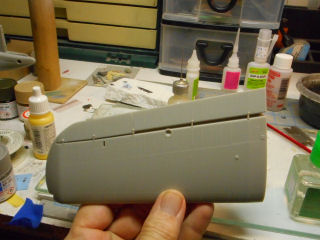
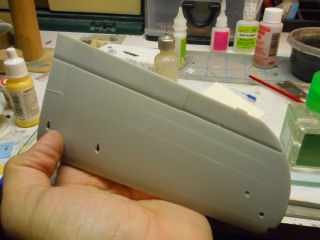


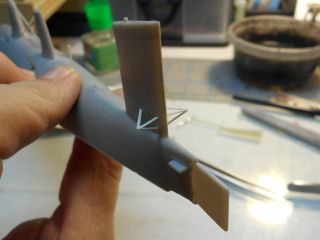
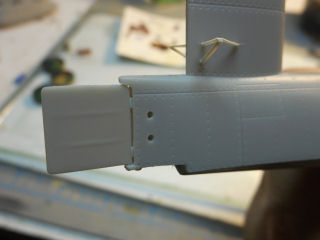
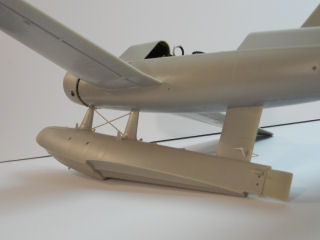
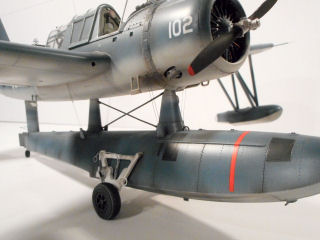
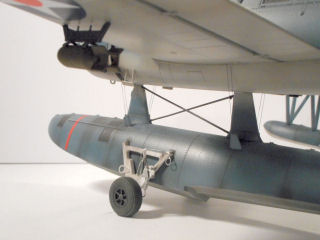
The horizontal tail surfaces fit fine except for the alignment pins. They did not match up size wise and held the top and bottom pieces apart. I just cut the useless pins off and they fit great. They attached to the fuselage with no problems at all. Again, very little filler will be needed on the general construction and much of that is my fault in trimming the huge sprue runners off. This is very soft plastic so use extra caution when trimming parts. The main float suffered from the same pin problems as the horizontal tail surfaces. Again, I just cut them off and aligned the halves by hand. Use extreme caution (and a razor saw) in cutting way the left half of the main float. The molded on crossing support wires are attached by really thick sprue runners. My kit already had one line broken on it.


A note regarding the main float; it is the EDO pattern, not the Vought pattern. All OS2U-1s and some -2s employed the Vought main float. OS2U-1s assigned to ship board duty specifically used the Vought float. However, for pretty much any wartime Kingfisher the EDO float was most likely employed. While the Vought and EDO main floats were quite different in shape and used different beaching gear, the wing float design was virtually identical between the two manufacturers.
There are few little issues with the main float. First, parts A26 and A27 are reversed. These are the attachment fairings for the wire float reinforcements. They are sided by design so you really can't put them on the wrong side, it's just that the instructions have the numbers reversed. Part A50 is the hook that goes under the bottom forward edge of the main float for catching the tow net. It is a tiny part. It has no number on the part tree so you'll need to find it by appearance. At least it is on tree "A". There are two small brackets that mount to the rear main float support. I do not know what these brackets are for. You see them on most Kingfishers in photos but not all of them. The part is supplied on the photo etched fret. One should go on either side and the instructions call out two part numbers, P21 and P16. The problem is, there is no P21. As it turns out, these brackets are over-scaled anyway. I used the one supplied as a template to scratch build a much more scale looking set of replacements from plastic strip stock. Again, you can just leave them off as well. Lastly, on the back of the main float there are a set of holes on either side for the tail wheel beaching gear. You will need to fill the holes on the starboard side, they shouldn't be there. The tail wheel mounted to the port side only.
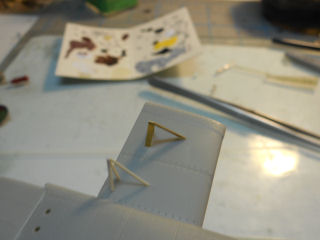
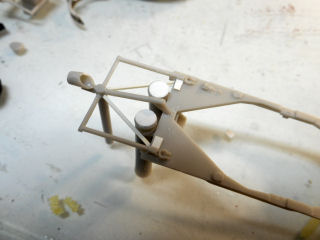
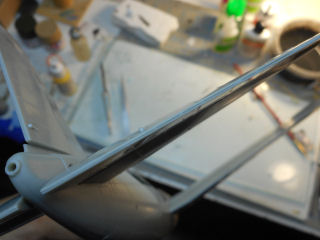
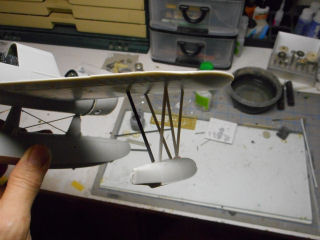
The main float attached with no fit issues and is nice and sturdy. As mentioned earlier, I forgot to drill out the holes marked on the inside of the wings for the wing floats. It was easy to mark where they went with photos and drawings and I drilled the holes and mounded the floats by the "N" shaped struts first. Using drawings, I set the correct angle for the floats before attaching the angled struts. I ran into one problem here. The wing floats angle slightly upward. The "N" struts have the correct angle to them, but the support struts were apparently not measured to compensate for the float's angle. The aft angled strut should be a little longer than the forward one. They are the same length in the kit. Luckily, I have an ample supply of Contrail strut stock and found a piece the same width as the kit struts so I could scratch-build the aft struts. Again, more of an annoyance than a big problem.

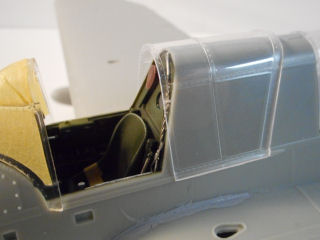
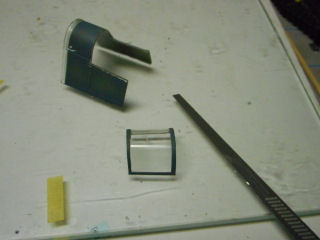
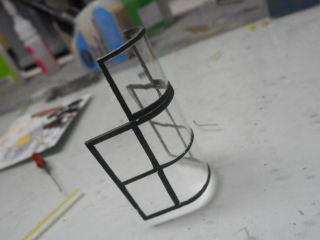
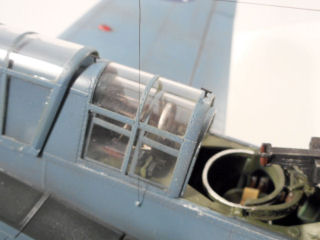
Next I decided to start masking the clear parts in preparation for painting. Unfortunately, there are no aftermarket masks yet! I use two different methods for masking canopies using Tamiya tape. I either cut strips, frame each window with the strips and then fill in the rest with more tape. This is the "safest" way but it is very time consuming. On this build, I decided to save some time and use the faster method which is to put a piece of tape over an area and burnish it down with a burnishing tool to mark the frame line. I then take a mechanical pencil and draw the frame outline before cutting the tape with a new, sharp hobby knife blade. The pencil line helps me keep things straight and not veer off course!


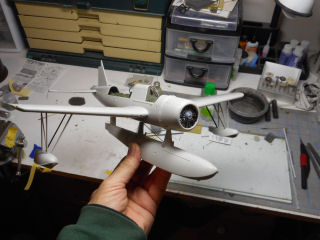
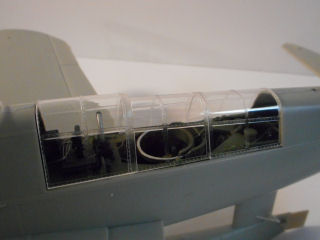
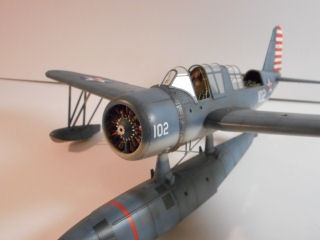
Here is where I have to give the biggest props to Kitty Hawk. The clear parts fit absolutely fantastic! The pilots canopy fits great open or closed. This has got to be one of my biggest gripes to most kit manufacturers. If you're going to supply a multi-piece canopy, it should fit in the open or closed position! I have had some of the worst problems with open canopies not sitting down correctly in the open position (Hasegawa is a major offender!) But these fit perfectly. The rear section will fit in any combination of positions with one slight exception. Keep in mind that the Kingfisher's two rear canopy sections do not "telescope" under each other in the fully open position. The middle section can be opened by itself or the two rear sections can be slid back together to clear the rear gun. When these two sections are open, the middle section is slid underneath the area between the front and rear cockpits. The kit's middle section will not fit underneath this section. If you want to show the center section open only, it fits very well under the forward section. If you choose to open both rear sections, you don't need to use the center piece at all, just place the rearmost section under the forward section.

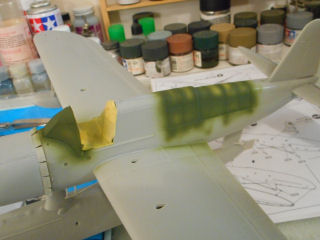
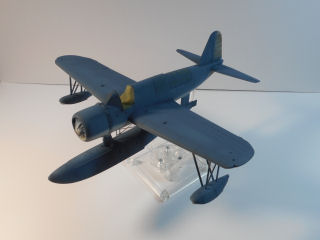
This week the Kingfisher got painted and weathered. Painting was fairly straightforward. I elected to attach the main float and wing floats prior to painting. While this made it a little tricky to get around some areas and keeping the top and bottom demarcation lines clean, it was not that difficult and I don't have to worry about glue blemishes on the finished paint where all of these things attach. This also enabled me to give all of these attachments ample adhesive for strength. I am a big fan of pre-shading, not as a weathering technique but as a general shading effect that helps give the illusion of size and distance.
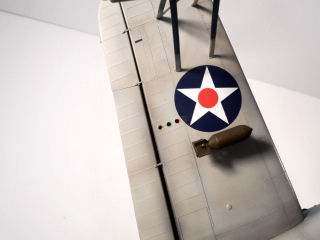
First I painted the canopy framing the interior green then proceeded to hit the panel lines with Tamiya XF-1 flat black. For the bottom color, which for this scheme is M495 light grey, I used a mix of Tamiya XF-80 Royal Light Gray and cut it with about 20% XF-2 flat white. The top color of M485 Blue Grey is Tamiya XF-18 medium blue cut with 18% XF-12 IJN grey and 2% XF-71 cockpit green. This is a formula I found online that looks pretty good to my eye. By keeping at the appropriate angles I was able to keep the demarcation lines clean with no masking. I had to go back in a few places after each color and touch up a tiny bit of overspray where I didn't pay close enough attention to my angles! One last quick note on Kingfisher paint schemes. According to my resources, there was no "official" paint guide to where the demarcation of upper and lower colors went. You can certainly see this in photos in terms of the variance.
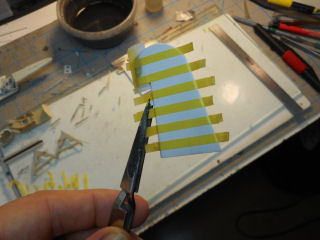
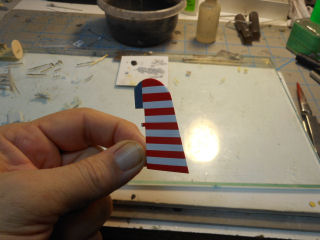
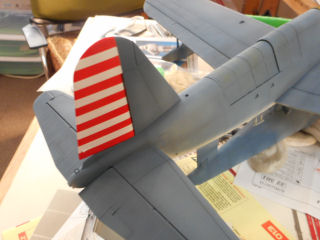
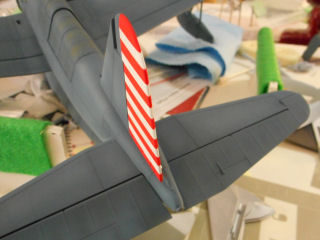
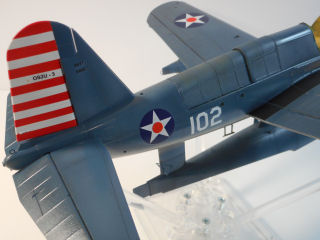
While the decals looked good, I have never been a fan of rudder stripe decals. They typically never line up well on the trailing edges and you have to use lots of solvent to get them to conform. And even after that, they tend to not look so good where they overlap. I masked and painted the rudder stripes and I think they look better than any decal could. The red is straight Tamiya XF-7 flat red. Next the model was clear coated with several coats of Future (now called Pledge Floor Care Tile and Vinyl Floor Finish). The decals were easy to work with and went down over details and into panel lines fairly well with a few coats of Micro Sol. Even the wing walk decals went down nicely over a formation light mount on the port wing. I usually like to paint wing walks as well but these saved time and worked just fine.

Because as I attached the wing floats before paint I had already decided on the option of having the lower wing insignia between the float struts and the bomb racks (the instructions actually show this as the main option). The actual airplane varied. I have found photos with these same insignia between the struts and bomb racks and some where the insignia is under the float struts. Keep this in mind as you are building so you don't attach the floats if you need to put your decals under the struts! After the decals were good and dry, I sprayed a few more coats of Future to help hide the decal film. It is just a tad thick so this helps to hide it.
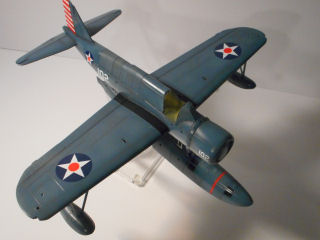

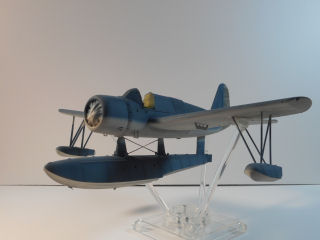
After the Future dried overnight, I did a pin wash with MIG products dark brown enamel wash. This was followed by airbrushing a dark reddish black wash and then a black wash. I do this by simply diluting Tamiya paint about 80% with thinner. I have found in the last year or so that 91% Isopropyl alcohol works just as well as Tamiya thinner for airbrushing their paint (and it's a hell of a lot cheaper!). I had tried 70% and rubbing alcohol in the past and neither of them worked well but the 91% seems to perform just like the Tamiya thinner. The airbrushed weathering was for exhaust staining and some general weathering on the airframe and floats. I studied photos to get ideas of general weathering on the aircraft. Of course this varied greatly depending on the aircraft's service life and theater of operations. This particular airplane was not terribly weather beaten.

Once the wash dried overnight I flat coated the entire model with a "home brew" flat coat made from thinning Tamiya X-21 flat base (this is specifically designed to mix with gloss paints to make them flat) with 91% Isopropyl and then adding Future in a 50/50 mix. You can vary this formula to create anything from a satin sheen to a dead flat. As a side note, Tamiya now makes a bottled flat coat. I have tried it and had a few problems with it giving me a cloudy appearance. I need to play with it some more. Until then, this formula works fine.
I removed the canopy masking and also took off the two aft canopy sections (these were tacked on with Testors clear parts cement). I next cut the top aft most panel from the center section and glued it to the forward center top of the aft most section. This was to give the illusion that the center section is under the area between the cockpits as on the real airplane. As mentioned earlier, the center section will not fit underneath this area but you can see the top piece just a little. I think the "illusion" worked out well.
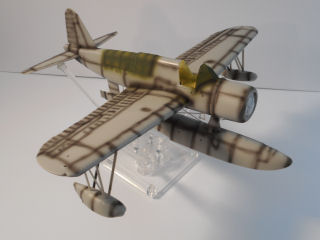
Well, the Kingfisher is finally finished. Overall, I am very pleased with the result but the amount of work it took to get there was definitely more than I bargained for. The last details and finishing out typically takes me far longer than I had planned. In the case of the Kingfisher, more of that is caused by some shortcomings in the kit.
Let's start with the rear gun. As I mentioned earlier, the rear gunner's armor plate is not included in the kit. ALL combat aircraft had this armor. I will probably scratch-build it later but in order to get the project finished, I did not get to it. The gun itself is fairly simple to assemble. The kit instructions give part numbers for a total of three ammo boxes. Two are stored in a tray under the gun and one is meant to attach to the gun. If you want an ammo box on the gun, leave one out of the storage area as there are NOT enough parts to do three. Oddly, one of the panels for the gun's ammo box is duplicated while the rest of the box is missing entirely. Part 11 and 12, which are supposed to be two different parts of the box, are in fact the same part on the tree (two part 11s). Nothing major, just annoying. I scratch-built a simple ammo box for the gun using scrap resin and lead foil since I could not fish one of the spares out of the completed rear cockpit.
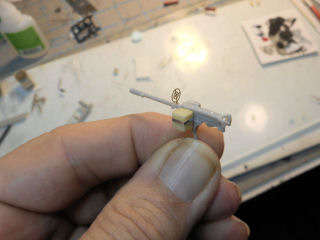
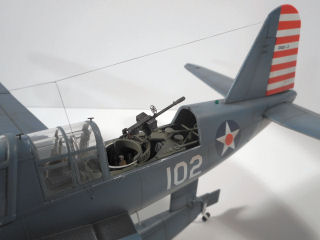
The mount for the gun did not even come close to fitting in the slot designed for it in the mount ring. I just cut most of it off. Even after that I had to trim the heck out of what was left. I figured once the gun was in I would add the two grab handles on top of the rear canopy. These are for the rear gunner to hold onto as he works his way forward after getting out of the cockpit. The kit supplies these as photo etched parts. Throw them out or save them for some scratch-building project in the future. They are out of scale and shaped wrong.
Next I attached the main float support wires. These are not mentioned at all in the instructions but the fairing for them are at least included. I initially used fine steel wire for them but found out that while the main float is fairly sturdy, it does have enough play if you handle the model by the float to snap the stiff wires loose. I took the steel wire off and used elastic thread instead, which has some give to compensate for any movement in the float.
The propeller was a bit of chore. The balance weights do not line up well with their corresponding slots so you have to do a little fidgeting to get everything looking even. The propeller was sprayed with Tamiya Silver Leaf, then the red tips were painted, masked off and the black sprayed last. A little water and a stiff brush was used to chip the black off of the leading edge of the blades.
Now to the beaching gear. These were not simply a frame with wheels attached. Each frame had a bracket with a brake lever, brake cylinder, brake lines. a tow cable, and the release cable with a circular handle (and part of this cable had a prominent spring in the center of the frame). Both sides had this equipment and they were not optional components. The brakes were manned and used to steer the airplane into position on the ramp and of course the release cable was used to detach the gear one the aircraft was buoyant. The kit supplies a photo etched tow ring but that's it. The 1960s Monogram 1/48 kit had that much. At least Kitty Hawk shaped the frame more accurately than the old Monogram kit. With some good photos I scratch built the missing details from plastic card, wire and some spare photo etched parts. While beaching gear for Kingfishers appear to have been painted blue, I did find several photos of aircraft with white gear so I elected to go with white for a little more color variance and to help the detail stand out. As you can see in the photos, it makes a huge difference.
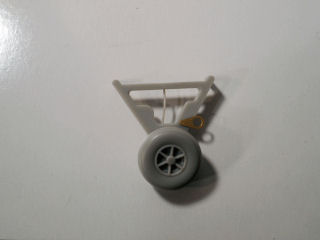
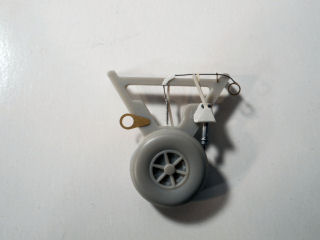
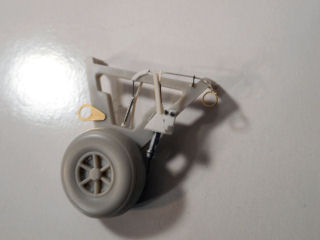
Here's were ignoring my own rule really made things a hassle. I did not check the fit of the beaching gear. Big mistake. Like many other small components on this kit, you must test fit because most of it does not fit without some adjustment. I cut about 1/3 of the gear's mounting pins off and also had to drill the holes out little bigger. Not fun after the model is painted and has lots of details hanging off of it!
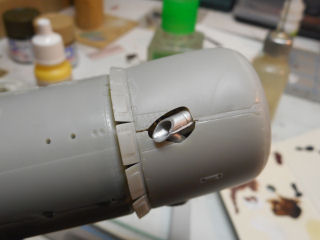
One of the last tasks is one I really dreaded: all of the little navigation/formation lights. There are a lot of lights on this airplane and the possibility of trimming and test fitting them all without losing one is pretty slim. I have never understood why manufacturers do not give you a few spares for parts like this (I'm not picking on Kitty Hawk here, nobody I know of does this). Well, I only lost one. There are two bulb shaped lights, one for the spine near the vertical fin and one on the tip of the empennage that are identical. I lost one of them trying to trim it. I made a new one for the tip of the empennage and used the kit part for the spine light. Do not use the kit reference for coloring the lights, they are wrong. They have you paint just about all of them red except for the starboard wingtip light. I have nice color photos that clearly show the spine light and inboard upper wing lights to all be green, not red. The outboard upper wing lights are clear as well as the empennage tip light. The large upper wing lights are all red. Most of the lights fit okay but many still needed the holes enlarged slightly. The large teardrop shaped upper wing lights fit okay as long as they were very well trimmed.
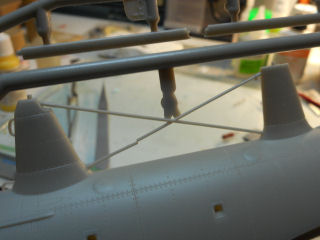
Lastly the antenna mast and wire were added. This is a tiny nitpick, but the base of the antenna mast is not quite right. Another unique feature of the Kingfisher was a folding antenna mast. The base had what looked like a ball joint hinge of sorts which allowed the antenna mast to be folded 90 degrees to port to clear the antenna line of the hoist cable. I didn't do anything about it but if you want to represent this feature you will need to modify the base of the antenna mast.
In conclusion, this kit is accurate in outline and will make a fine replica of Vought's venerable Kingfisher in 1/32 scale. Be prepared to spend a little extra time with small fit issues. Buy yourself a good reference book, either Squadron's In Action book or the newer Classic Warships Publishing title.


My sincere thanks to Kitty Hawk Models for this review sample!