


Revell 1/25 Nash Bridges '71 Cuda Kit Build Review
By Stephen Sutton
| Date of Review | September 2004 | Manufacturer | Revell-Monogram |
|---|---|---|---|
| Subject | Nash Bridges '71 Cuda | Scale | 1/25 |
| Kit Number | 2381 | Primary Media | Styrene |
| Pros | Easy build | Cons | |
| Skill Level | Basic | MSRP (USD) | $16.05 |
Background
A history of this kit and complete inbox review can be found here.
The Kit
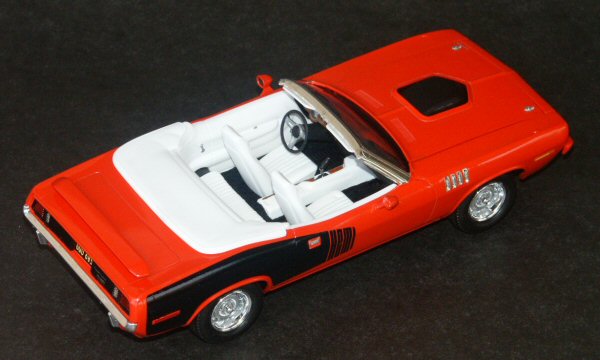
I decided to build this Cuda as a retro Hemi Cuda convertible with full Hemi orange striping with white leather interior. Even though I love the Nash Bridges lemon twist color, I’m a big fan of the Hemi orange. I build this kit straight from the box, with the addition of spark plug wiring. At first inspection of the body, I noticed the windshield frame was warped on one side, so I use very hot water to straighten out the frame without breaking it. I would point out the body was very straight and no warping was present. Next I washed the body and hood in a mild dish soap and water, and then I lightly sanded all the mold seams from the top of the front and rear fenders. No sink marks was present on the body or hood. The hood hinge brackets had slight impressions visible from the top of the hood so I use Tamiya putty to fill these impressions then I prepped everything for paint.
 |
 |
 |
 |
 |
 |
 |
 |
 |
The Engine
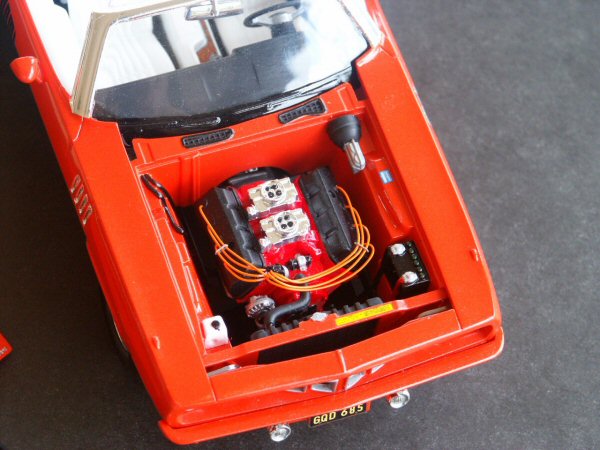
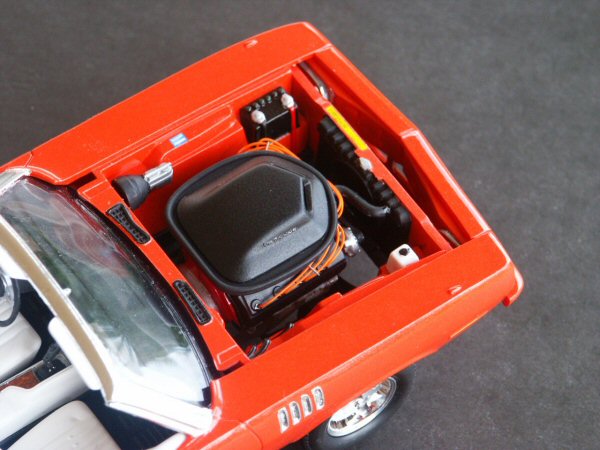
The 426 Hemi engine consisted of 14 parts, I assembled these as per the instructions, I painted the block with the new paint line from Model Master Chrysler engine red custom lacquer system. I painted the transition aluminum and detailed the started with semi-gloss black enamel. The valve covers were found on the chrome tree, so I removed these and I soaked these in Fantastic household cleaner to remove the chrome, then I thoroughly washed the valve covers. I wanted to run spark plug wires so I drilled the valve covers with a pin-vice and very small drill bit, then I painted the covers semi-gloss black. Next I wired the distributor with T & J Hobbies spark plug orange wiring, I drilled the distributor cap and I secured all the wires with super glue. I used T & J Hobbies wire looms to line up the wire to the Hemi calve covers and I secured the wires in the valve covers with superglue. The kit instructions have you install the exhaust headers before you install the engine on the frame, I installed the engine first then I installed the exhaust headers so everything would line up properly and so the headers would fit under the frame without difficulty.
The Wheels and Suspension
I pre-painted all suspension parts either flat black or semi-gloss black, next the exhaust pipes were painted steel and the brake lines were painted aluminum. Everything assembled with no difficulty. The wheel centers were painted aluminum as per the kit instructions. These whole assemblies are very simplified.
The Windshield and Interior
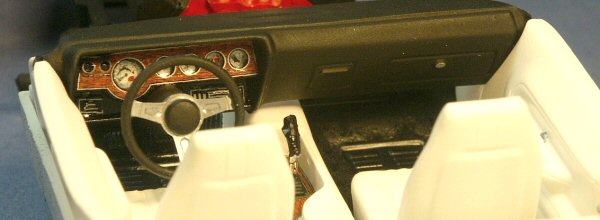
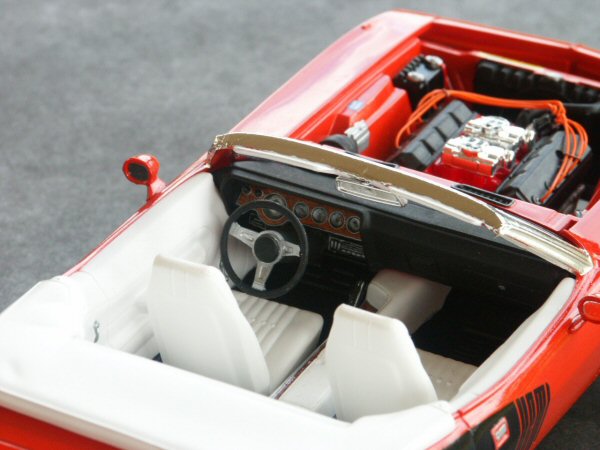
Before I glued the windshield to the window frame, I dipped the windshield in Future floor wax; this really made the windshield crystal clear. I glued the windshield in place with canopy glue; Elmer’s white glue will work also. The radiator frame was painted the same as the body color and the radiator was painted plat black, then the radiator assembly was glued to the body. The interior consists of ten pieces, I painted all the interior parts flat white, and then I sprayed the seats and door panel semi-gloss clear to simulate white leather. I painted the carpet flat black and I use Model Master black flocking for the carpet. I painted the dash flat black and I used the 3 decals supplied for the instruments, first I painted the instrument faces glass white and painted the details with a toothpick.
Frame and Body Assembly
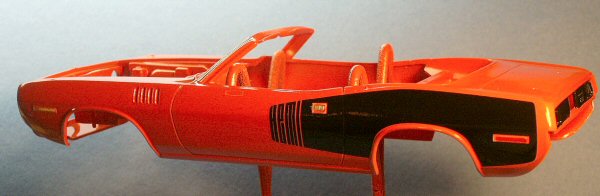
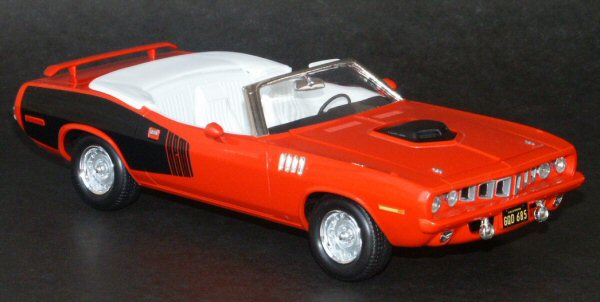
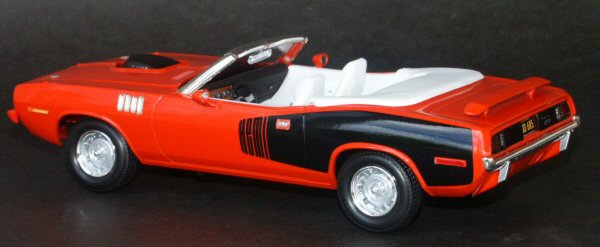
The front grill clip and body are separate, so I glued the front grill clip to the body; I had to use some Tamiya putty to fill the seams on the front grill clip and side fenders. I wanted to paint the front bumper the same color as the body, so I stripped the chrome off with Fantastic. I chose to use the new two part lacquer paint system from Model Master, this time I didn’t use any primer. Before I painted the body I drilled he location holes for the rear spoiler then I carefully inspected the body for seams and dust particles. I painted the body, hood, front bumper, and rear spoiler Model Master Hemi Orange, note this paint has a very fine metallic flakes. After three hours, I overcoated with Model Master Ultra Gloss Clearcoat. I let everything cure for 48 hours. Next I wet sanded the body and hood with Micromesh polishing kit and I applied the Hemi Billboard fender decals and all the other decals as per the instructions, the Billboard decals wouldn’t conform well to the rear fenders to I used Walthers Solvaset Decal Setting Solution, the decals smoothed out just fine. I let the decals dry overnight. Next I spray painted a final coat of Model Master Ultra Gloss Coat, I was very pleased with this final clear coat, no polishing was required. The window frame and front fender vents were covered with chrome Bare Metal foil.
Final Assembly
The body, frame, and interior assembled very easy, everything lined up great, normally lots of manipulation is required to get everything to come together, but this was very simple task.
Conclusion
I really enjoyed building this kit, it was a very simple build and no difficulties were incurred during assembly, I would highly recommend this kit for the beginner modeler who is using glue and paint for the first time. Thank to Revell for the review sample.
My sincere thanks to Revell for this review sample!