Revell 1/48 Ju 87G-1 Stuka Kit Build Review
By Kelly Jamison
| Date of Review | November 2020 | Manufacturer | Revell |
|---|---|---|---|
| Subject | Ju 87G-1 Stuka | Scale | 1/48 |
| Kit Number | 5270 | Primary Media | Styrene |
| Pros | Low cost, ease of build and looks great hanging from the ceiling | Cons | See text |
| Skill Level | Basic for normal people Advanced for the insane |
MSRP (USD) | $13.50 |
Build Review
I just can’t help it. I am a sucker for those old Monogram kits. Who among us hasn’t built at least of one of these kits: P-39 Airacobra, F4F Wildcat, P-40 Warhawk, Fw-190, P-47 Thunderbolt, TBD Devastator and the seminal P-61 Black Widow? Who among us didn’t get a thrill of pouring over the Shep Paine fold outs late at night when your parents told you to turn off the light and go to bed? I still have so many fond memories of these kits and the absolute joy they gave me growing up. I need to revisit them from time to time and try to recapture that feeling. Or so I thought….
The first time I built this kit I was about 9 years old in 1970. I really enjoyed it. First cast in 1968 by Monogram in a dark green plastic with raised panel lines, it was the best thing out there for a budding model builder to build something with BIG guns! It was reboxed in 2007 when Revell took over ownership of the molds. There has been a reboxing of the kit with new art and decals in 2009 and 2016 but they are still all the old 1968 molds.
So, I saw it on the shelf at my local hobby shop and went ahead and bought it. Boy the price has risen just a bit since I mowed lawns and saved my allowance to buy it the first time. Revell has cast the old kit in a soft grey plastic. The molds are in fair shape considering what they have been through all these years, but mine did have some flash on delicate parts such as the counterweights that go on the flaperons.
I started with a close inspection and noticed for the first time how out of dimension it is. The engine cowl is way too narrow and the fuselage is too short along with the tail, but the wings were not too bad. The cockpit tub was underwhelming and under detailed. The wheels were cast within the wheel spats and the canopy was so thick that it was distorted and just about opaque. The tail wheel was molded onto the left fuselage half. The decals were thick and practically useable. The instructions are clear and concise and easy to read so, of course, I threw them away.
I wanted to do something to make this kit unique, so I needed a plan. Since I am going to build a Hasegawa Stuka with a resin cockpit later, I stole that kit’s cockpit and used it on this build. I ended up going on eBay and procured some Hasegawa Ju-87G-2 single trees to get just the parts I needed. A little cheaper than buying 40-dollar kit for doner parts on a 15-dollar kit, but not by much. While on eBay, I continued to buy aftermarket parts to update the kit to more modern standards. Quickboost uncovered landing gear and radiators, True Detail wheels, Master Brass cannon barrels, Eduard photo-etch upgrade, Squadron Vac-U-Form canopy, etc. By now you have noticed that my budget on this one is blown. I just had a desire to build one of these kits to the best standard I could with the skills I have developed over the past 45 years. I should be able to pull this off…. maybe.
After going through an Alexandrian library of research material I have gathered on the Stuka over the years, I found some plans and copied them to blueprint the dimensions. Putting the fuselage up to the plans shows the shortcomings of this kit and what I had in store for me to get it right. Out comes the razor saw and let the cutting begin! I had to remove that tail wheel and cut the fuselage and tail apart at key points to keep the angle of the rudder and slope of the fuselage in line with my drawings. The rudder needed to be a bit taller too, so it got cut in half at the lower portion.

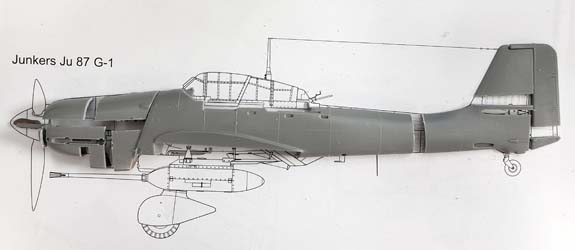
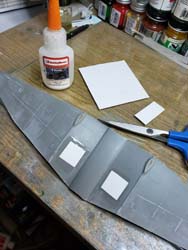
The Flaperons were hard molded to the wings and the hinge points are completely wrong so I started by cutting them off and sanded all the panel lines smooth. I sanded off the walkway anti-slip strips. The walkway surface detail was wrong to begin with. I also cut out the mating points of the spatted landing gear in preparation for the un-spatted resin gear. The underwing radiators that come with the kit are oversized and too flat. After filling in the area with sheet plastic and superglue, a set of Quickboost resin radiators were added.
The engine cowling was so off that I used the Hasegawa cowl only to find it was undersized too. It got the chop treatment to get it back in line. I didn’t expect it to be in 5 pieces at the end of the cutting process. This was going to be more work than I had anticipated, and I anticipated a lot of work. Everything got sanded down as to re-scribe later in the build. While I had the sandpaper out, I sanded the molded in detail of the cockpit tub so I could glue in the Hasegawa parts. They are vastly superior to what comes with the kit.
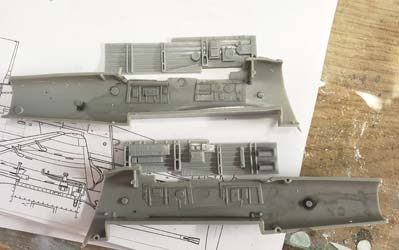
The fuselage halves got glued together with just cockpit floor and side walls installed but not the tail or engine. With such an open cockpit, I decided to hold off putting the seats and radio equipment in. I knew there were going to be many hours of wet sanding and primer in my near future that would have just ruined the interior anyway. So, I turned my attention to the tail and rudder. I knew getting the alignment was going to be tough if I built each fuselage half with the modified section independently, so I decided to build the tail as one unit so I could get the angle, twist and slope all lined up. Evergreen plastic strips were stacked up to get the dimensions back to spec. Many different size pieces of Evergreen plastic were used, and things started to line up better. I did go back and reshape the already modified engine cowl again. I ended up cutting it along a panel line and sanding off some of the cowl to lower the top and get the upper cowl back to the shape of the drawings.


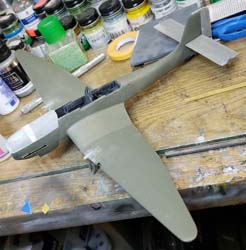
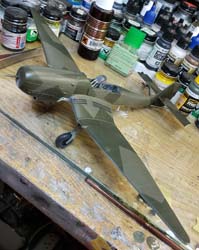
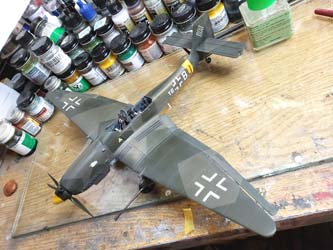
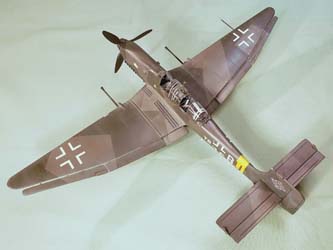
The wings got placed onto the fuselage to act as a temporarily jig. This help get them line up properly in both anhedral and dihedral due to the unique wing design. Then the leading and trailing edges got glued together while they were temporarily affixed to the fuselage. I had to use every clamp and clothespin I had to keep the wing lined up and straight. After everything dried, I had to take a few minutes to get the wing tips into a Ju-87G-1 shape according to my drawings. Then reinstalled, with superglue this time, the wings onto the fuselage along with the elevators, rudder and unused gun cover bulges. I cut and raised the elevators up a few degrees and installed the counterweights from the Hasegawa kit. It is a little thing but makes the kit look “more right” sitting on the table and matches photos of the real deal. Everything got sanded down and rescribed. I also got out the rivet tool and started to rivet the whole thing in accordance with my reference plans from earlier.

More modifications continued like using the Hasegawa aft gunner’s cockpit area and faring over the Piel EZ 6 Radio Direction Finder antenna. I added the tail plane struts with lots of superglue to fill in the gaps and I added the tail wheel using a bit of hollow brass tube and brass rod attached to the modified kit tail wheel. I started altering the wings for the spat-less landing gear struts by carving out a tear drop shape to replicate the mating surface of the resin parts then superglued it into place, followed by lots of putty and sanding to blend it into the wing.
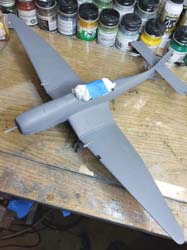
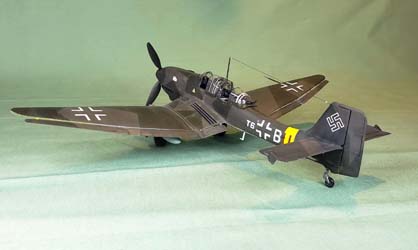
The front cowl got superglued in and a lot of sanding and filling got it into shape ensued. More primer, filling and sanding. This is where I spent the bulk of my time during the construction. It needed going over many times. Each time I would find something new that had to be addressed. Next came the flaperons and dive brakes. On the real thing the dive brakes were removed but the mounting brackets were left on. I just used some old photoetch scrap to make these. I made small hinge shaped pieces from card stock and glued them to replicate the hinge points for the flaperons using pictures of the Stuka at the Imperial War Museum (which is a Ju-87G-1 without the cannon pods and wrong tail gun.)


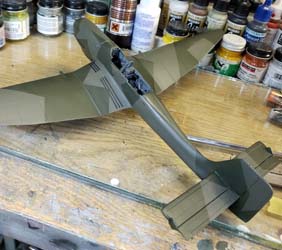
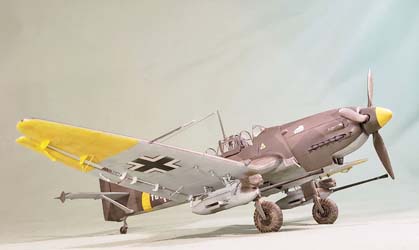
I have been using Stynylrez Acrylic Polyurethane Primer a lot lately. I like the way it covers my multitude of sins and is a great medium for sanding and smoothing the surfaces. But I continued to find flaws and each one had to be addressed before final paint could be applied. Once I was finally done with surface prep, I purchased a set of Ammo MIG Acrylics Luftwaffe Early Colors. This gives you RLM 02, 65, 70 and 71. All you need to paint a Stuka. I used the mask pattern that came in the Hasegawa kit and made a few copies to use. I used low tack Tamiya tape and made my own masks. This sure made life so much easier to replicate that splinter camouflage. Weathering Stukas is fun because these planes were literally flying guns. They were used and quick turned so there was no time for cleaning and repainting. They were usually used until crashed, shot down or scuttled. I used different techniques of washes, but I noticed that there was not a lot of chipping according to period photographs. I don’t think these planes had a long enough life to get chipped too much. They did get dirty though!
After getting that complex and time-consuming splinter camouflage pattern down, I noticed that I completely forgot to add the walkway anti-slip strips! Now what do I do without having to repaint the camo around the wing root area? I used strips of masking tape painted black and put on with a layer of Future to nail it all down. I then took a fine metal pick and put the “rivets” on the strips by poking very small holes replicating the sheet metal screws. The effect came out nice without redoing a lot of hard work already done. I also added the side armor for the pilot at this time along with a lot of little pieces.
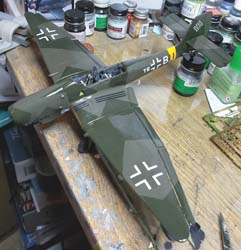
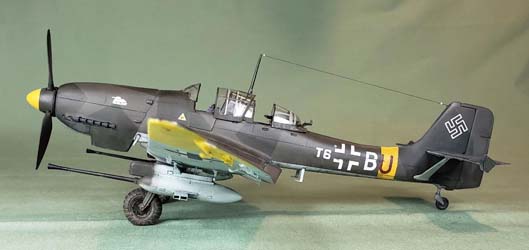
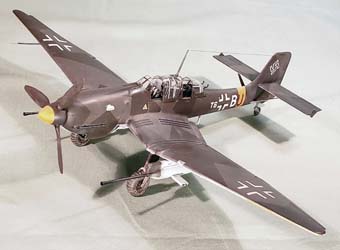
Everything got a coat of Future in preparation for the decals. Off to the decal dungeon I go to assemble a set of decals that I can use. I picked a picture of Ju-87G-1 “T6+BU” to be my scheme. One of the things I noticed was the last call letter within the yellow stripe was not centered in the yellow stripe but was farther forward throwing it off center. So, I replicated that on my model too. Everything went down with no problem and a flat coat was applied. Model Master’s Clear Flat is what I use but I have heard of many excellent flat coats out there so pick your poison and use it if it works for you. I took a soft cotton cloth and polished out high wear areas which gave the weathering a more realistic look. Areas like the flaperons were not walked on so they stayed very flat.
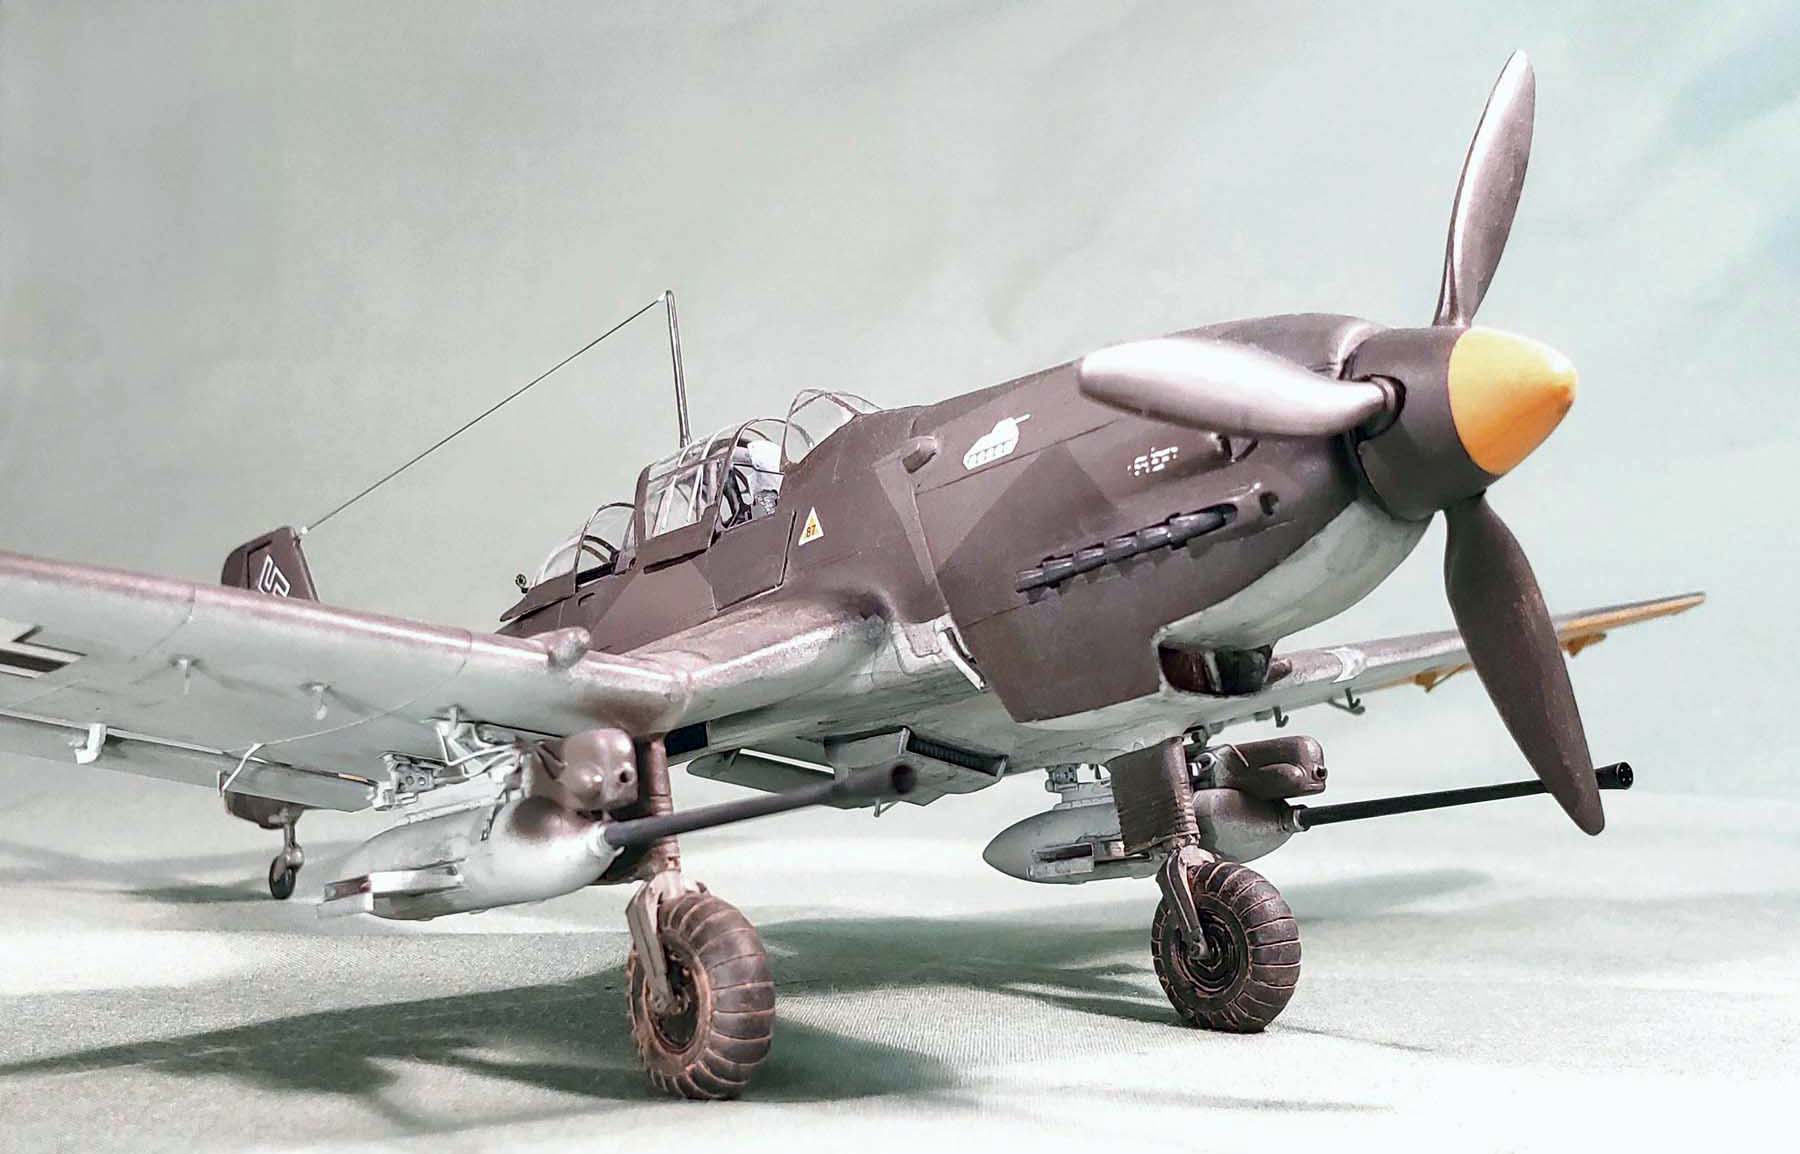
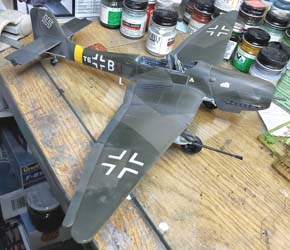
With the plane now painted in its basic camo pattern and decals, I turned my attention to the 37mm cannon pods. I used the pods from the Hasegawa kit and Master Brass Barrels and Eduard photoetch for the ammo bays. They look great and really help the look of the kit. Worth the effort. It was a bit difficult to get all the mounting plates lined up, so I used thin white glue to have working time and once it was exactly right, super thin superglue locked everything into place. The footstep bars got added to the fuselage and other odds and ends like the carburetor intake cover and engine radiator screen were replicated using mesh bow from an old Christmas gift. That mesh bow is a gift that keeps on giving! I didn’t like the Quickboost resin wheels that came with the spat-less landing gear. They looked undersized. But the True Detail wheels looked more like the rough field wheels used on the Eastern Front. So, I switched them out and painted them Vallejo black-grey with Tamiya semi-gloss black for the hubs.
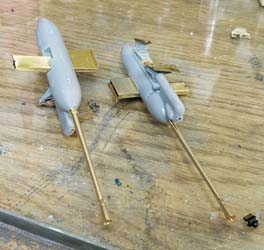
Next, I hung the cannon off the wings. Take your time and get the alignment right. Because of the long barrels, you can really notice if they are not aligned. I used white glue to be able to shimmy the cannon into place then hit the mount points with super thin superglue to lock them into place. The barrels got painted flat black then dusted with pencil lead graphite to give it a metallic look. I like the results of this technique. Oddly enough, the camera makes them look like they are not aligned but I jigged them up using scrap plastic and they are spot on.

The prop is molded to the spinner and just look toy like. So, I chopped off the blades and routed out the areas the blades would come out from the spinner. I took an old prop boss from some scrap three bladed prop I had and glued the Hasegawa prop blades to the hub. It took a bit of work to get the angles right. A prop jig is worth every penny when setting one of these up like this. A small disc of sheet plastic got the backside of the spinner finished it off and I painted the blades RLM 71 with the spinner being black and yellow per reference material.
More cockpit detail was added and then the worse of the kit began. The canopy. The vac-u-form canopy needed a lot of cutting and trimming. The best thing to do is stop thinking that you are almost finished with the build and treat the canopy as its own model. I had already glued and faired in the front windscreen, so it was from that point back that gave me so much trouble. I would under do it, taking off just a sliver of the area I was working on. Over and over until it was in shape to be installed. I could not figure out how to do the inner frame structure without a lot of work.
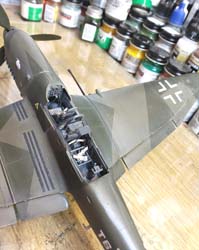
I found some old AeroMaster RLM 02 decal film and cut some thin strips to replicate the inner framing. I think the RLM 02 is too light but I didn’t have a better idea short of masking off all the areas inside the canopy only to have to mask off all the areas on the outside of the canopy later. I just was not up to it since the build was starting to become a grind. Ever been there? I eventually did get to the exterior of the canopy. Then I noticed the way the aft canopy has a unique way the machine guns mount to the fuselage and the canopy slides around it. The gun sights are photoetched and mount to two tubes that extend to the outsides of the machine guns. Lots of views from books was needed to get this to look right. All in all, I did not enjoy this part of the build.

The pitot tube got attached. I used some stainless-steel tube with a hypodermic needle inserted to mainly give it some rigidity knowing that it would be the focal point of getting broken off for the remainder of the model’s life. The large mast in the center of the canopy got glued into place and I used some EZ Line to finish off the antenna wire. My 1968 Junkers Ju-87G-1 is now complete.


I spent well over $60 in aftermarket parts and spent a huge amount of time on just this one build. It looks great sitting on the shelf but even with the nostalgia of the kit, I think I should have just built the Hasegawa and called it good. I pledged never to “super-build” another old kit again. Sometimes older is not always better and with the new run of super kits that have been coming out lately, the golden age of model building is now. Don’t believe me? Pick up and build a new Tamiya P-38, Bf-109 or Ki-61 and get back to me. Now where did I put my Monogram P-61?