


RPM 1/72 Mack AC 'Bulldog' Type EHC 1 Build Review
By Loren A. Pike
| Date of Review | June 2005 | Manufacturer | RPM |
|---|---|---|---|
| Subject | Mack AC 'Bulldog' Type EHC 1 | Scale | 1/72 |
| Kit Number | 72400 | Primary Media | Styrene |
| Pros | Nice detailing | Cons | |
| Skill Level | Basic | MSRP (USD) | $9.98 |
Background
Since everything on the box is in Polish (I think!), I don’t know too much about it. Needless to say, this is probably the “grandfather” of our modern Mack trucks here in the USA. Quoting from History of Mack Trucks by Tom Brownell (Motorbooks International, ISBN#: 0-87938-946-x) comes the following brief history of the Mack AC “Bulldog”:
“…I learned that my initial hunch has been partly correct, at least to the extent that the Mack AC’s design hailed from the mid-teens—1915 to be exact, with production models appearing in 1916. The unorthodox radiator-behind-engine location was actually quite fashionable in the mid-teens. The design had been introduced by Renault on both cars and truck and used in the U.S. The prevailing legend explaining the radiator’s location behind the engine has it that in their rage over being put out of business by trucks, teamsters would “accidentally” back their wagons into the front of a competitor’s truck, smashing the radiator, and putting the truck out of business. One look at the massive front cross-member on a Bulldog would quickly dissuade a horse and wagon handler from any such mischief on this truck. “
“Maybe such stories are more fiction than fact. Mack’s sales literature found tangible benefits to the aft-mounted radiator. These benefits included better engine accessibility, reduced shock and vibration (which would cause the solder joints to flex and break, causing water leakage), and better weight distribution due to the radiator’s position behind rather than in front of the wheels. Then, too, there was the advantage of improved forward visibility for the driver whose view ahead of the truck wasn’t obstructed by a massive radiator.”
“The second famous legend, how the Bulldog got its nickname, can also be traced to the unorthodox radiator location and sloping coal scuttle-shaped hood. In the spring of 1917, with World War I raging in Europe, the British government placed an order for 150 5 -1/2 ton Mack AC chassis for use by the military. These trucks distinguished themselves so well, even in the most rigorous testing conditions, that the British army engineers gave them the endearing nick-name “Bulldog”; which to an Englishman represents the epitome of toughness and fight. But the Bulldog nickname becomes even more meaningful when one remembers that the wrinkle-snouted dog is to an Englishman what Uncle Sam is to an American—a national symbol. Of course, the AC Mack’s blunt, determined-looking frontal styling surely suggested the comparison to an Englishman’s favorite dog, but the AC Mack certainly earned the endearing nickname by it reputation for performance, stamina, and longevity.”
The Kit

The box is the end opening Typee – not very great to stack “in the stash” as they are somewhat flimsy. I wish that manufacturers would stay with the solid two part, top opening box so as construction progressed, you could use the box for your assembled parts and subassemblies.
The box painting on the front and back are first class. The two figures and the FT-17 on the truck are NOT a part of the truck, but since this is a Polish company ( RPM), they don’t apparently get in as much trouble as some of our companies (because of “Truth in Packaging Laws) here in the USA. Needless to say, you get one (1) Mack AC “Bulldog” kit. The line painting/drawing on the back is a great aid to finishing the kit with Humbrol colors shown and called out. In addition, the decal sheet is also shown. This same decal sheet and sprues are in all the current releases of this kit as well. Only the box art and directions change from kit to kit and what parts to use or not use.
Assembly
The assembly is broken down into 37 steps. Since the sprues share parts with other kits, my recommendation is to first remove all the parts that you won’t use in this version and place them in a zip-lock bag. This eliminates confusion during (and especially at the end of) construction!

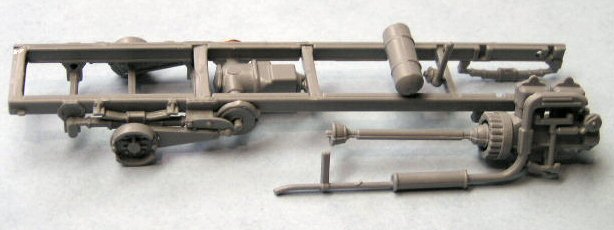
On step 11, I reversed part B12 and put the little “slot” over the hole for the steering wheel shaft. I’m not sure if that is correct, but seemed to look better to me. Steps 1 through 15 are fairly straightforward and simple. BUT, step 16 shows you to put the differential (not exactly what it’s called, but the part that translates the driveshaft revolutions to the chain-drive) on the leaf-springs. DON’T. Place it ahead of that unit and look ahead to step 19 & 20 to see how it will mate up with the chain-drive parts. On step 19, DON’T put the axle where they show in the directions either, but look ahead to step 20 to see where they’ve positioned it. Once you get beyond these steps, all the rest falls into place. Step 21 is as far as I went before I painted the chassis and some of the other subassemblies.
After the subassemblies had dried, I continued on with the assembly from step 22 through step 32, skipping step 33, then on with 35 through the final step 37. I’ve left the hood (step 33) loose so that you can see that little gem of an engine.
Painting
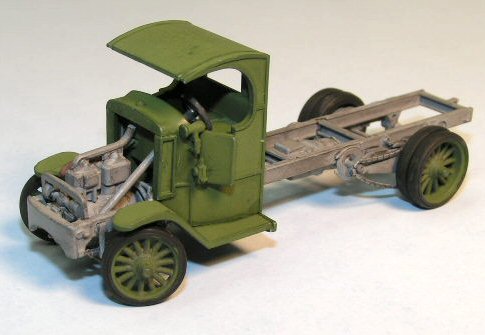
By step 21, you should have the following sub-assemblies to paint: 1) Chassis 2) Motor-Transmission-Exhaust 3) Cab and Engine cover and 4) Wheel & tires. If you jump ahead to step 30, you can also have the bed of the truck as an additional sub-assembly.
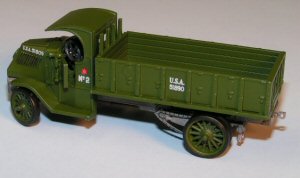
I followed some of the excellent artwork on the back of the box for my painting guide, as well as some research in the above mentioned book on Mack Trucks. Here is what I did, but you can do whatever: 1) Painted the engine Model Master #FS36270 Neutral Gray 2) Painted the chassis and associated extra parts to the chassis the same Neutral Gray 3) Painted the cab, engine cover, wheels, and bed using Model Master FS#34102 Medium Green. I know that the FS numbering scheme was not even invented in WWI, but used these colors as a “close match” to the given Humbrol numbers on the kit box. Those that have Humbrol paints available go ahead and use them. The only other painting was some Rust (Model Master #1785) on the exhaust and a light brushing of Polly Scale “Grimy Black” (#414137), thinned down quite a bit, on the chassis, motor, and running gear. A light coat of dull coat sealed the decals after they were applied.

After the dull coat, I put a little silver on the head lamps and tail lamp. When it was dry, I then put some red on the tail lamp (use either a bright red or a clear red for the rear lamp). Of course, those “advanced modelers” will probably use MV lens of the proper diameter. These can usually be found in a well stocked model railroad shop and will give your little kit a boost in realism.
Decals
The first page on the directions, as well as the box top and back indicate where the appropriate decals should go. All decals went on well, into a small puddle of Future clear gloss acrylic, with the excess blotted up. Be very patient, as the decals take a loooong time to separate from the backing paper. I didn’t time it, but each decal “seemed” to take five minutes to separate. I did not have any break up, but if you rush the process, I’m sure they would tear. Once on, they look fine. I “trap” my decals between layers of Future. After they are dry, I washed the excess glue off, dried the vehicle, and then gave a coat of flat to blend in everything.
Conclusions

This was a real fun kit to build. For a 1:72nd kit, it has an amazing amount of detail – especially in the engine area. The kit “could” have been “cheapened” considerably, and we would have still loved it because there is almost nothing from the WWI area in the “soft skin” realm. I’ve altered a couple of things such as leaving the driver’s door open and turning the front wheels. I would highly recommend this kit to all level of builders. I believe the retail price here in the USA is around $15.00.
Now, where did I put that FT-17 to load in the back…?

My sincere thanks to Squadron Mail Order for this review sample!