Tamiya 1/48 Crusader Mk.III A.A. Mk.III Build Review
By John Kelley
| Date of Review | December 2009 | Manufacturer | Tamiya |
|---|---|---|---|
| Subject | Crusader Mk.III A.A. Mk.III | Scale | 1/48 |
| Kit Number | 32546 | Primary Media | Styrene |
| Pros | Accurate shape, good detail and fit | Cons | Loose fitting road wheels |
| Skill Level | Basic | MSRP (USD) | $31.50 |
Background
In response to the strafing the British Army took in France of 1940, the Crusader Mk.III A.A. Mk.III was developed for Normandy. Comprising of two 20mm Oerlikons, the tank was never used in its intended role due to air supremacy by the allies. Instead, it served against ground targets with great effect. Most were withdrawn after August, but they are still mentioned in the 1945 T.O&E of the British Army. Very few photographs appear of the Normandy version. The Concord Book "D-Day Tank Warfare" is what I used to build this review.
The Build
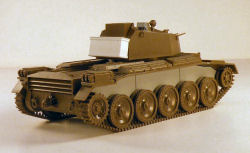
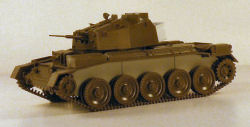
The only real issue I encountered was assembling the road wheels and idler. The road wheels did not fit the axles tightly. In fact, they are quite loose until the wheel is at the bottom of the axle. This posed a problem when I assembled the tracks first and tried to mount the upper hull and I found out that it interfered with the left-side track assembly because it was glued too close to the lower hull. I wound up removing the tracks and then re-gluing the wheels after I put the upper hull back on. When I build this kit again, I will follow the instructions except I will place the upper hull on top with tape and then glue the tracks and wheels so that the idlers and tracks do not interfere with the upper hull.
Once I had enough clearance between the tracks and the upper hull, it fit just fine. Unfortunately, I have not found a way to tighten up the loose fitting road wheels. The next issue I found was with the 20mm gun assembly.
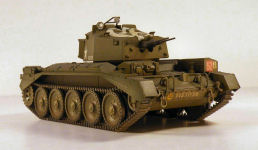
In doing a review, I like to build the kit without any paint. This posed a problem when I mounted the guns into the turret. It made painting possible, but more difficult. I would suggest assembling the guns and the rotor shield and painting them and applying the decal before adding to the turret. Once you have them mounted, make sure they are in the position you want because when you try to elevate the guns, the fit to the top of the turret is so close it will strip-off the paint and decals.
The last item is numerous sink marks on the turret bottom Part C14 and inside the turret basket Part C18. I used filler for the turret bottom and the basket, but I had a difficult time removing the sink marks from the basket because the area is so confined.
Tamiya gives you a nice amount of detailing on the inside of the turret, but you really need to add more if you are not putting any crew figures in it. Speaking of crew figures, while I didn't add mine, they are beautifully molded.
One thing I did not add was the tow rope. The instructions have you mount it to the front tow hook and glue it to the engine deck. Most photos I have seen of Crusader tanks show it mounted to the front hull. In any case, I decided to leave mine off.
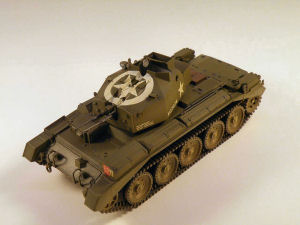
I added a box to the back of the turret using Evergreen .250 by .375 rectangular tubing. I then wrapped it in .020 sheet styrene. I added a top from .010 sheet and mounting strips from .010 by .040 strip stock. I then glued it to the turret. The only photo I have of a Crusader A.A. is in Polish service at Normandy and it has this box. I don't know if all Crusaders had this box, but I decided to add it anyway just because I liked it.
Painting & Finishing
Tamiya recommends that you use their spray TS-2 Dark Green. I feel this is too green and decided to use a formula by noted camouflage expert Mike Starmer. Using Tamiya paints, his formula is very simple to mix: 5 parts XF 61 plus 2 parts XF 62 and 2 parts XF 3. Mike suggests adding a little more XF 3 to lighten the mixture up. When I sprayed this on, I noticed it is very close to U.S. olive drab, but it definitely has a much more greener tint then U.S. olive drab. I had already base coated the model with German Gray so after spraying the SCC 15, I applied a gloss coat for the decals.
All the decals went on very easily, but I did have some issues with the large star that is mounted on the turret top. Tamiya has done an excellent job in trying to make this as easy as possible, however, I would suggest only applying a section at a time. I had to use my hobby knife to make cuts in the decal and used setting solution so it would lay down flat. I still wound up using some Tamiya flat white thinned to the consistency of milk to touch up places that the decal did not cover.
Next I applied a black oil wash and then applied a flat coat which allowed the decals to blend in with the paint.
I applied more weathering than I normally do. In this case, I used Mig Pigments European Dust on the model. I applied a heavy coat to the sides of the hull and then used turpentine to fix the dust. I then applied dust overall using a brush, concentrating mostly on the lower hull and on the top as well. Unfortunately, much of this fine weathering doesn't show up due to my photographic skills. Someday I'll learn how to take better pictures. The tracks were given a wash of Gun Metal and the road wheels were touched up with German Gray.
Conclusions
I highly recommend this kit for anyone interested in WWII armor. If you've never built link and length tracks before, this is a good kit to start on. There are no ejector pin marks on the track except for the pieces that wrap around the idler and drive sprocket and this cannot be seen once assembled. The tracks assemble easily, and you have enough spares if you need them.
One thing I didn't mention earlier was I had one track link too much on the left side. Part A21 probably could have been left off. Even then, the tracks went on quite easily. The detail is excellent as well as the overall assembly. My only problem now is trying to decide if my next Crusader A.A. will have deep wading gear or not or if it will be British or Polish again. Decisions, decisions.


