


Tamiya 1/35 Panther Reach-Around Build Review
By Jack Bruno
| Date of Review | March 2006 | Manufacturer | Tamiya |
|---|---|---|---|
| Subject | Panther Ausf.G Early | Scale | 1/35 |
| Kit Number | 35170 | Primary Media | Styrene |
| Pros | Great detailing throughout/outstanding | Cons | |
| Skill Level | Basic | MSRP (USD) | $41.00 |
Background
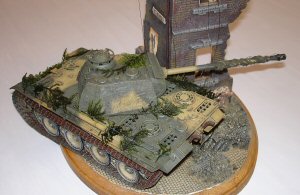
The setting is February, 1945 in the besieged German city of Goch, southeast of the Reichswald forest and near the border of Holland, a scant 20 miles from the city of Nijmegen. It has been five months since Operation Market Garden and the allies are making a push into the Ruhr, capitalizing on the miserable German Ardennes offensive of mid-December. The Canadian 1st Army is attacking and the Germans are making them pay for every inch of ground. The allies have broken through and more and more of the Fatherland is being swept up through the onslaught. The Siegfried Line has now been breached in the north and on the outskirts of Goch, a lone Panther falls back through the town. Exhausted, cold, battered and bruised the crew cranks the turret backwards to fire a defiant shot before it limps south. The men of the Panther know the end is near.
The Kit
The Tamiya Early Panther Ausf.G has been around for over ten years and still lives up to it's reputation of being a dream kit to build. I assembled the kit out of the box with the exception of Fruil tracks. I'm just a stickler for having hollow horned tracks on tanks that were supposed to have them.
My Panther also started out life with the addition of Eduard’s photo-etched zimmerit. I'm not saying that photo-etched zimmerit is the cats behind, but for me it did not have "the look". So, off it came and the Tamiya Putty and zimmerit tools got a one day workout. No matter what I've experimented with in the past, this system works time after time for me with above average results. A Panther without zimmerit is like a burger without the fries. There were no frills or chills during the build process.
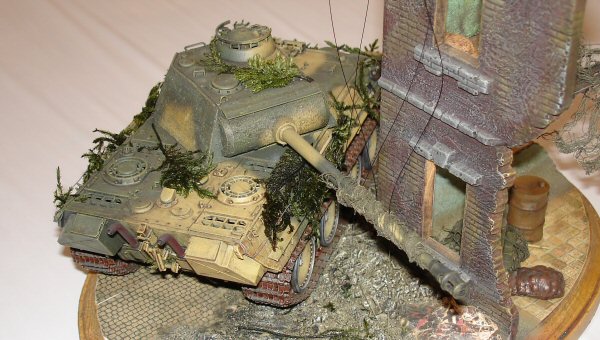
If you’re an experienced builder, you already know that it would be in your best interest to leave all of the tools/spare track off the tank until the end. Parts will not get broken and tend to be painted the right color that way. A little trick I learned years ago: I like to cover the exhaust with liquid glue and stipple it with a rough brush. This effect brings out a nice rusting simulation during the painting/washing/weathering process. Try it next time; I think you'll be satisfied with the results.
Painting

As I've done with most of my previous subjects, I painted the entire kit Tamiya Flat Black before adding two basecoats of Pollyscale Middlestone and Bugbear Fur. (ya gotta love those fantasy colors). I followed up by spraying a random pattern of Pollyscale Dark Green to the desired effect. Late in the war, the Germans went to a base of Dark Green with Dark Yellow used as an overspray. The diversity of German colors and directives intrigues modelers because no matter what subject or era you choose, no vehicle will be exactly alike.
For the wheels I used a circle template to spray the yellow colors and kept the tire black where it belonged, on the rubber. After all was dry for around a week (I worked on other projects) I sprayed a coat of Future over the tank and let that cure overnight. Then I had some fun. I used a couple of different washes of turpentine w/Windsor Newton Van Dyke Brown and a Burnt Umber in places I wanted it to go. After letting this dry I played around with it a bit and dry-brushed several progressive shades of greens/yellows over the base coats to bring out the details. I would like to add here that although it may not be seen, always give the same attention to painting and detail to the bottom of the Vehicle and the backsides of the wheels, and in between them. I've seen pictures of outstanding models that pay little attention to this and it glares out at you like a green finger in pictures. A final flat coat of Matt Clear, from Vallejo sealed it all in.

Some of the references I had for this area and time showed most units using foliage for cover and to break up the shape of the vehicle. I utilized the fine wire that Tamiya provided in the kit to wrap around the sides of the Panther thus securing the Hudson-Allen pine boroughs and providing some stability. The Fruil tracks were a since and also the earlier "crimp" type. I whacked these out in a few hours after some minor clean up.
I painted these with a base coat of flat black and covered that with a dark gray from Pollyscale. A Future coat again gave me the barrier for the oil wash of raw umber and rust. I sealed the deal using a Verlinden camouflage net on the gun barrel. All in all, the Panther came out extremely well and I'm looking forward to hitting the late version of the Ausf.G very soon.
The Building
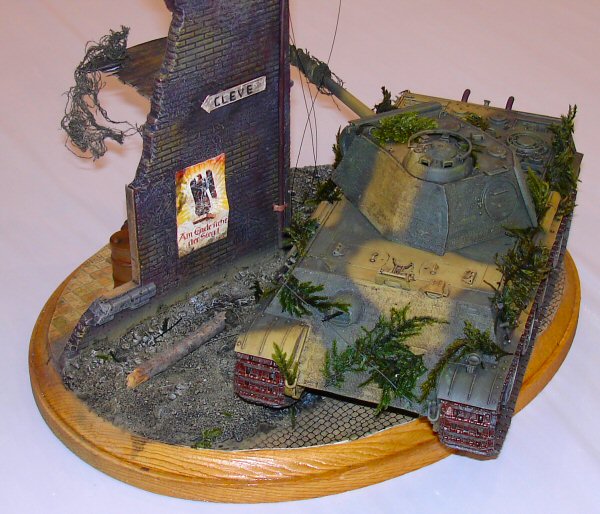
About 15 Years ago I received a call from the owner of a hobby shop asking me to take a couple of boxes of buildups off his hands from a customer that moved out of state and gave the stuff up. One of the boxes had some broken up buildings at the bottom. This two-piece House section was found in 5 different pieces and I could not even begin to tell you which manufacturer it came from. After perusing it for the longest time I decided to slap it together and made it the focal point of my diorama.
The two story section was given a middle floor and roof. I used plastic card and balsa-bass wood and built it like the real deal. Using a diorama book from Shep Paine, I used a European style of shingles and cut them out of plastic stock with my chopper.
The floor was an easy decision because for years I had a Verlinden tile floor section. It's amazing the things we have put away then discover it again when we need it! Plastic tubing was cut for the drain pipe with masking tape brackets. Balsa wood was used for the window frames and then it went to the paint shop. I went browns for the building and a terra cotta for the ceramic roof tiles. The inside rooms were painted a light blue and light green on the separate floors to, well, keep them separate. After a Future/oil wash/flat coat, the groundwork was put on using Celluclay mixed with white glue and adding some drive way rocks to give it some personality. All the groundwork was done in browns and given an oil wash of black, then dry-brushed so its feelings were not hurt.

After the building was on the base, the groundwork done and everything painted, .it needed a little something extra - phone lines. Tamiya has an old barricade/sign set that includes light poles/fences and two telephone poles. The section was easily modified to mount on the side of the building and given a bracket for bracing. The lines were rigging material for aircraft, but were just right for this project, and they were already black. It really came out well and set the building off just right. The cobblestone street section was also Verlinden, I found it the same time I found the floor.
Conclusions
I enjoyed this project very much and really look forward to my next which is already underway. I get a lot of grief sometimes by going against the grain, having subjects moving out of the scene, partly on-partly off the base and having rhyme without reason. Well, that’s what I call using your imagination and tools at hand rather than spending a fortune. We are modelers! It's allowed! I must say that completing this was/is a project itself. I've had one eye surgery for lens replacement and will have another in three weeks so I'm a bit off kilter and it makes concentrating hard at times. I can't wait to get both eyes back and be able to focus correctly without looking through a milky glass. It's really made me appreciate God's gift of sight and to be mindful of those without it.