


Tamiya 1/35 M4 Sherman Early Production Build Review
By Jack Bruno
Photos By Jim Jensen
| Date of Review | August 2006 | Manufacturer | Tamiya |
|---|---|---|---|
| Subject | M4 Sherman Early Production | Scale | 1/35 |
| Kit Number | 35190 | Primary Media | Styrene |
| Pros | Great detailing throughout/outstanding | Cons | |
| Skill Level | Basic | MSRP (USD) | $32.95 |
Background
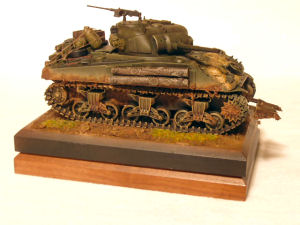
This Sherman represents a vehicle used during Operation Cobra, the Allied Breakout from Normandy during the summer of 1944. It is fitted with a Cullin Hedgerow device that was used to cut through the bocage that bordered the sunken roads and fields of the French Country-side. Bocage was a natural entanglement of tree's/shrubs/bushes and roots that made speedy cross country advances nearly impossible. It also provided the Germans with excellent defensive positions for ambush and anti-tank traps.
The Kit
Enough has been crammed down everyone's throat on the Sherman Tank. If you’re looking for history and corrections, don't look at me. This is my second Sherman build in a year and I don't know why I've never tackled one before.
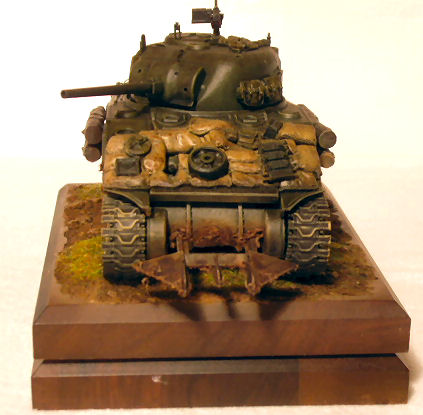
I started out by following the directions step by step but altering when it came to the wheels. I had a set of Formation solids around so I randomly put a couple on each side, preferably the front boogies. Nice touch that stands out a bit. The front hull was a blast with the one piece sandbag armor that Verlinden included in the set. This not only fit very well after some minor sanding, but assured me that I would not have to fiddle with all of the light guards that went into the spares box for future projects.
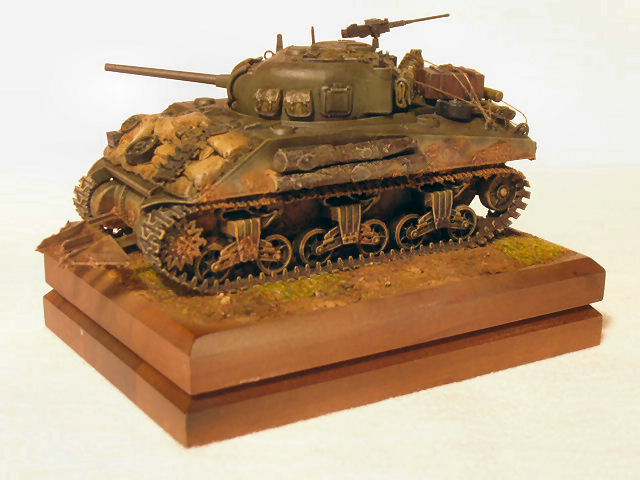
With all of the main assemblies built, I gave the entire kit a coat of Tamiya Flat Black. Progressive shades of green were sprayed to give it depth. Mind you, keep the turret off during this process or else you'll weld it to the hull during painting. Satisfied with the paint job, the real fun began as I started to scope out all the neat stuff in the Verlinden set. The Cullin Hedgerow Cutter was just fantastic and after test fitting it, decided to mount it at the very end - sort of like breaking a Champaign Bottle over the hull. It's different from the cutters I've seen in the past - very sinister looking. I like that.
I tracked down some scale rope and used it as tie downs for the stowage on the rear deck. Several cans and GI-issue equipment were well represented along with packs/bags/ammo. I had lots of stuff left over too. All of these add on accessories were hand painted. I also used different shades to show new/used equipment. The 50 caliber machine gun was then built, painted, and mounted in the appropriate position.
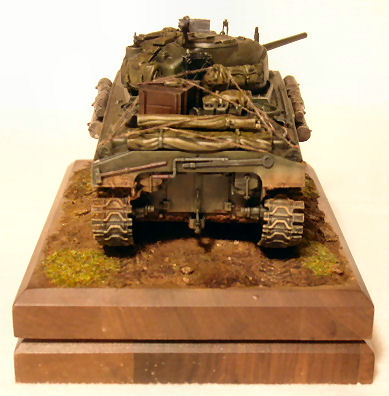
The wash is my favorite stage of modeling because it highlights and brings out all of the kits detail and your hard work. My Sherman was coated with Future and set aside for a few hours while I started work on another project. Next, I gave the kit three washes of Windsor-Newton Van Dyke Brown. On the under carriage I put down a black wash of the same brand. The tracks were washed in soapy water and after drying sprayed dark gray and given the Future treatment as well. Two liberal washes of burnt sienna brought out all of the fine detail.
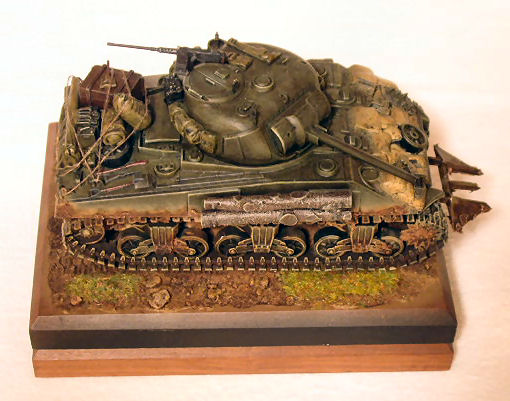
After sitting for about a day I took a clean (new) pair of cotton panties. Yes boys, don't be afraid to buy some regardless of the looks you get from the people at Meijer. They work and come in a variety of colors. Gently rub the surface of the tank and remove some of the excess oil film. Things will really start to come out at you now. Pleased with my handy panty work, I brought out the dry brush colors and decided to stick with a light yellow (zinc chromate works) and white. After a day’s work on the finish, it was done. When the tracks were mounted, my Sherman was given a flat coat with Testors Dullcote in the can. The 50 caliber and cutter was mounted and another tank was out the door.
Conclusions
The Tamiya kit gets high marks from me for being such a pleasure to build, but it was the Verlinden Set that made the effort more than worthwhile and unique. Cheers for IPMS/ Roscoe Turner for putting on such a GREAT EVENT each year. I'm saving some money now for next years bash!