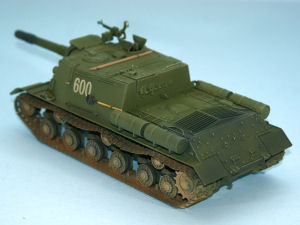
Tamiya 1/35 JSU-152 Heavy Self-Propelled Gun Build Review
By Michael Benolkin
| Date of Review | March 2010 | Manufacturer | Tamiya |
|---|---|---|---|
| Subject | JSU-152 Heavy Self-Propelled Gun | Scale | 1/35 |
| Kit Number | 35303 | Primary Media | Styrene, PE |
| Pros | Nice exterior detailing, distinctive subject | Cons | No interior details, defective vinyl track (see text) |
| Skill Level | Basic | MSRP (USD) | $59.95 |
Background
The ISU-152 was a Soviet Army self-propelled heavy gun developed during World War Two and continued service into the 1950s. Designed as a versatile mobile heavy gun system, the ISU-152 was a follow-on development of the SU-152. Where the SU-152 and ISU-152 shared a common main gun, the 152mm ML-20S howitzer, the SU-152 was based upon the KV-1 chassis and the ISU-152 was based upon the IS-2 tank chassis.
You might get confused by the ISU-152 versus JSU-152 designations. They are the same vehicle and actually the same designator, but in Cyrillic, the IS (or JS) in the designator is the abbreviation for then Soviet Leader Josef (Iosef) Stalin. The I and J are interchangeable depending into which language the Cyrillic is being transliterated into.
The ML-20S main gun is essentially a six-inch artillery piece that is mounted inside an armored shell to provide indirect fire support to Soviet infantry while protecting its crew. The vehicle could only carry 20 rounds before it needed resupply. Because the vehicle was well-armored, it could drive into the thick of a battle and use its gun in a direct-fire mode, which was great for pushing the assault into Berlin and blasting away the heaviest fortifications. Although the vehicle wasn't really designed as an anti-tank weapon, the ISU-152 was synonymous for 'big honking gun' and in Russian was nicknamed the 'animal killer' because no German tank could survive a direct hit, whether it was a Panther, Tiger, or Elefant.
The Kit
For a look at this kit in the box, click here.
Construction
After a long (too long) absence from my workbench, I decided to tackle a couple of Tamiya kits to warm up my modeling. This JSU-152 kit from Tamiya was the first on the bench and was supposed to be a quick build. Thanks to a few twists and turns, this quick build tool longer than planned, but I'm pleased with the results.
As with any good armor kit, construction starts with the lower hull and mounting of the all of the suspension arms as well as the return roller mounts to the lower hull half. Tamiya introduced a few innovations in this kit, first is part A14 which is an alignment tool to ensure that all of the suspension arm axles all align while the glue is drying. Given that the arms are keyed and there really isn't any play in the arms after installation, the tool is a nice bit of insurance but seems to be unnecessary here.
Next come the road wheels, drive sprockets, and return rollers, and these all use Tamiya's poly caps to mount them to the axles. I decided to wait on installing the track as I was going to use the vinyl 'rubber band' tracks that would go on at the very end.
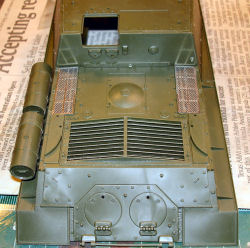
The upper hull assembly comes next and the armored crew enclosure gets some internal mounts for the optional crew figures, but no other details inside. Pay close attention to all of the drill-out points on the upper hull. The instructions spread the required 20+ 0.8mm and 1mm drill-outs across three steps and some are easy to overlook.
The engine deck louvers are really interestingly done and come together very nicely.
Step 13 - the gun assembly is where it all went horribly wrong. S1 and S3 are the gun cradle mounts that barrel halves S2 and S4 mount onto. I didn't notice that I'd assembled the gun backwards. There is an attachment point for the gun mantle that needs to be forward along with the gun barrel, but this error was all my doing. By the time I got into Step 14 to add the mantle, I'd realized my error but the glue had dried to well to undo my error. I quietly set the project aside, ordered a replacement kit, and started on another project.
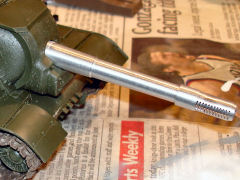
Step 13 Redux - when I ordered another JSU-152 kit, I noted that Eduard had produced a turned aluminum barrel for the DML kit. I took a chance and ordered this too. When they had arrived, I started the gun assembly again and this time substituted the Eduard barrel. The mounting section of the Eduard barrel was smaller in diameter than the Tamiya barrel (S2 and S4), but I simply used cyano to lay four strips of Evergreen plastic around the Eduard mounting. The thin strips I used made the diameter match up with the Tamiya gun mount and also allowed me to use liquid cement to mount the gun to the mount. The result is perfect.
In Step 14, part F4 must be modified to widen the gun port to allow the gun barrel to have some left and right side movement. I'm surprised this wasn't engineered in the part in the first place, but since I didn't plan to articulate my gun, I left this step alone.
The rest of the steps deal with the small details, and here is where I left off any details that weren't going to be painted the same color as the hull.
Just before gluing the upper and lower hull halves together, I decided to test-fit the vinyl track to see if there were going to be any challenges putting these on once the hull was assembled and painted. This is where I discovered a serious flaw in Tamiya's kit. I used cyano to assemble the track ends together and clamped them to dry. The first track went onto the tank with no problem. The second one broke. No problem, I have a spare kit! I assembled another - and it broke. I assembled the last one and it broke too! They all snapped where Tamiya folds the track in half to fit in the box. I don't know why, but they all broke at the same place.
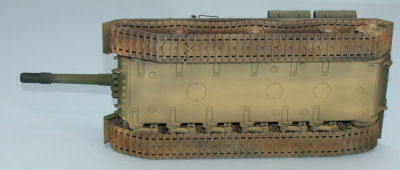
Considering that I had this much extra time in the project than originally planned, I guess it was time to try out Tamiya's other innovation - the track jig. In addition to the vinyl track, Tamiya also provided styrene track links (sort of). The lengths of track along the bottom and the two short stretches where the track pulls up to the return roller and drive sprockets are all provided as one part each. These save some time and effort gluing up the flat sections. The innovation comes with a jig (D5) that takes the individual track links and builds them into a shape to replicate the sagging track between each of the upper rollers. This process turned out to be easier that expected and I had the styrene tracks installed on the wheels in short order and the upper hull glued into place as well.
Painting
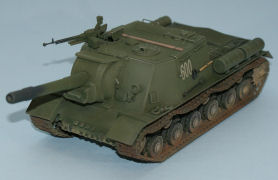
I started off painting an overall coat of Tamiya NATO Black to act as the base coat. I've seen some Soviet armor with an almost Tractor Green color whilst others have a darker overall green. I opted for the latter. Next, I used Tamiya Desert Yellow on the lower hull, suspension and tracks. I only applied it to areas that would accumulate dirt and dust from rolling across dry dirt roads and fields. The upper surfaces were painted with Tamiya Field Gray (which is an interesting gray-green color) and then oversprayed this with a light coat of Tamiya Olive Green. Finally, I sprayed Tamiya Red Brown around the tracks to add a touch of rust to the appearance.
When the paints had dried, it was time to apply a clear coat for the decals. I had received a test sample of Alclad's new Klear that is supposed to be an alternative for Future. I loaded the airbrush and sprayed the upper hull areas that would receive the tactical numbers. A couple of coats rendered a semi-gloss surface that was different from the glossy clear Future. Since I had two sets of decals (thanks to my earlier error), I could afford to test this new clear and use the other set if it didn't work out. I applied the Tamiya decals directly to the Klear surface, added a touch of Gunze's Mr. Mark Setter to each decal, and set the hull aside.
By the time I'd finished painting up the pioneering tools, I looked at the hull numbers and they'd laid down perfectly with no silvering. This Alclad Klear works great over flat paints! I applied an overspray of Field Gray and Olive Green to the Klear-coated areas to remove the semi-gloss sheen and to dull the white tactical numbers. The Alclad Klear worked flawlessly.
I took a wide brush and Testors Aggressor Grey enamel and loaded the brush with the grey, then brushed out the grey again across the newspaper on my bench. When I couldn't see any more grey streaks, I started dry-brushing the road wheels and then worked my way up the hull to the top to bring out some of the molded-in detailing. Once I was satisfied with the results, I added the pioneering tools and the project is finished!
Conclusions
Despite the self-induced gun error that led to a nice Eduard gun barrel and the issues with the vinyl tracks, this was a fun build and let be do a little experimenting at the same time. I did leave the loader's hatch movable and will add the crew figures at a later date. If you want a pleasant project that features a big honking gun, this JSU-152 is just what the doctor ordered.
My sincere thanks to HobbyLink Japan for this review sample!


