


Tamiya 1/16 Kuebelwagen Type 82 Build Review
By Michael Benolkin
| Date of Review | August 2016 | Manufacturer | Tamiya |
|---|---|---|---|
| Subject | Kuebelwagen Type 82 | Scale | 1/16 |
| Kit Number | 36205 | Primary Media | Styrene, vinyl (tires) |
| Pros | Beautiful details | Cons | See text |
| Skill Level | Experienced | MSRP (USD) | Out of production ($94.00) |
Build Review
Many years ago, I used to own a Kuebelwagen. To be accurate, it was a 1974 Volkswagen Thing, but rather than a Type 82, the owner's manual identified it as a Type 181. I enjoyed that unique vehicle for the several years I owned it, but when I was to be stationed overseas, I sold the Thing because I wasn't going to need a car in Berlin. To make matters stranger, when I did arrive in Berlin, the US Army military police were driving Kuebelwagens. Okay, they were Things, but it was interesting to see militarized Things (Kubels) on active duty (again). About that same time, the US Army was transitioning to a new Kevlar helmet that was shaped like the WWII German helmets, but I digress...
I thought about buying another Thing after I left active duty, but by then I had enough of the Volkswagen brand and bought a Jeep Wrangler instead. When Verlinden developed a kit of the Kubel in 1/16 scale, I added that to my collection but at that time, my skills were not up for kits made of resin and photo-etch. Several years later, Tamiya released their 1/16 Kubels in two variants: European and North Africa. They even released another North Africa kit with a Rommel figure in the box. One of the main differences between the two versions is the type of tire. The European has road tires while the North African Kubel had the low-pressure 'balloon' tires for driving on sand. I opted for the European version.
As I was preparing to write this review, I was curious to see what the current retail price of this kit was given that the retail price was $94.00 USD from a hobby shop nearby that ceased to exist nearly ten years ago. It seems that Tamiya has discontinued all of their 1/16 Kubels and the if you want to faint, look at the current prices on eBay. I almost feel guilty building this kit - almost. After many years of procrastinating and seeing yet another Thing recently, it was time to dust off this kit.
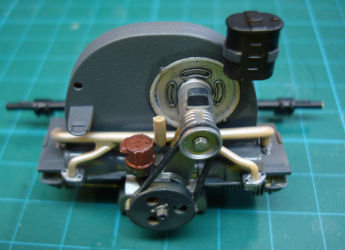
Out of the box, this kit looks like a simple build but there are some hidden problems that could cause problems during assembly or worse, after you're finished. The model does have lots of detail molded into the parts, so you will want to spend a little extra time bringing out those details with careful painting. The star of this kit is the air-cooled flat-four-cylinder engine which looks nearly identical to the engine found in many subsequent Volkswagen vehicles from the 1950s through the 1970s. That is where construction begins.
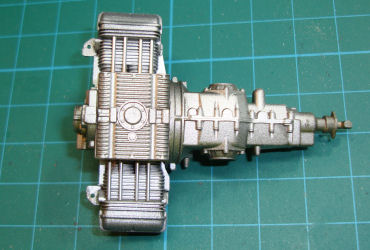
In steps one and two, you assemble the two twin-cylinder banks and the engine/transaxle block. I know armor modeler usually don't paint their models until construction is nearly complete, but I'm not one of those. I painted the engine/transaxle and cylinder head assemblies aluminum and the push rod tubes chrome silver.
The kit's distributor had no provisions for wires (typical with most kits) so I grabbed the pin vise and drilled out the four holes for the spark plug wires and the center hole to the ignition coil.
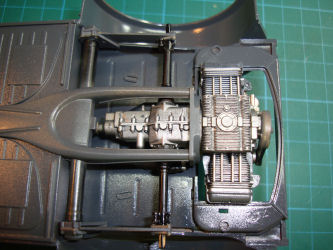
Steps three and four add the intake manifold, generator, cooling fan shroud, and the fan belt (left image). The distributor is installed along with the rear axles in the right image. The fan shroud and the various shields are all Tamiya German Gray. I'll be painting all of the underside, under-hood, and interior areas Panzer Gray as the vehicle would have been prepared during production in 1941 or 1942. This model will represent a Kubel operating on the eastern front in 1943, after the Wehrmacht had formally shifted the base color for tactical vehicles from Panzer Gray to Desert Yellow. The model will be depicted after its hasty repaint in the field.

Here are the ignition wires installed and routed. It was at this point that I had two unusual failures that I had not encountered before. First was the Tamiya German Gray - it had an odd consistency and it didn't want to adhere to the parts. Even thinning the paint with Tamiya thinner made no difference, but at that moment, I didn't have an alternative for the color and applied it anyway. I found that if I apply Future over the gray, I no longer had a problem with the paint coming off. A little later I had a blinding flash of the obvious as I gazed upon a bottle of Vallejo Panzer Gray primer in my paint rack and that problem is solved.
The other problem was with the gap-filling cyano that I was using to install the ignition wires. I used simple fishing line to simulate the wires and dipped the ends in cyano to install them in the distributor cap. Instead of curing almost instantly, the cyano had gone bad and took hours to cure. It even ignored Zip Kicker. That bottle of cyano joined the Tamiya paint in the trash can.
Here is the engine and lower chassis mount being test-fit onto the underside of the body. I know it looks unrealistically clean under there, but we'll be adding lots of Russian mileage later.
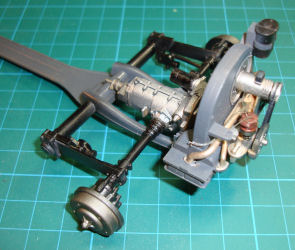
The brake drums are mounted and we're about ready to permanently install this assembly into the body. Here is one of the problems that will potentially haunt you later (as it did me). The brake drum mounts to the brake backing using a small screw and this assembly is glued to the gearbox that mounts to each rear axle. When I mount the wheels/tires later, they glue onto the brake drum and that tiny screw won't hold the mass of the wheel assembly for very long. My right rear wheel assembly fell off the brake drum back and there is no way to reset that screw. The only solution was to use cyano to re-mount the wheel assembly and move on.

The engine/transaxle/lower chassis mount are now installed onto the body. The image on the right shows the heater hoses running from the rear of the vehicle interior to the heat exchangers on the exhaust manifolds. There's nothing like an air-cooled VW on a cold winter's morning before the engine has warmed up...
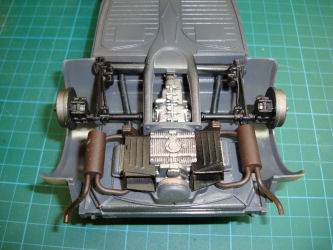

On the underside, the air plenums are added over (under) the cylinder heads while in the engine compartment, the last of the details including the carburetor and oil-bath air cleaner are installed. The last step in this area comes a little later with the skid plate that protects the engine, but for now, on to the front-end of the Kubel.

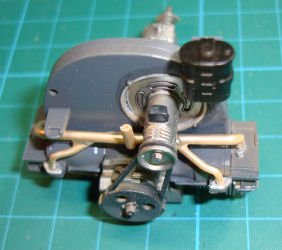
Here is the front rack assembly with the steering column and the steering mechanism. At this point I had not experienced the rear axle failure with the wheel assembly coming loose, but this assembly begins to concern me that the model may be more delicate that I thought.

The completed front-end assembly is installed onto the chassis. Now it is time to turn the model over and start on the body shell.

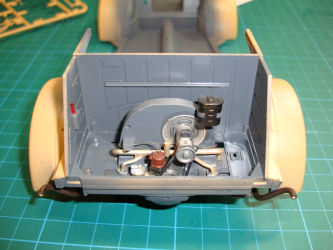
This is the Kubel's fuel tank mounted to the underside of the front dash frame/front storage compartment cover. When they turned the Kubel into the Thing, this tank moved from over the right passenger's knees forward about a foot and inside a slightly larger storage compartment.


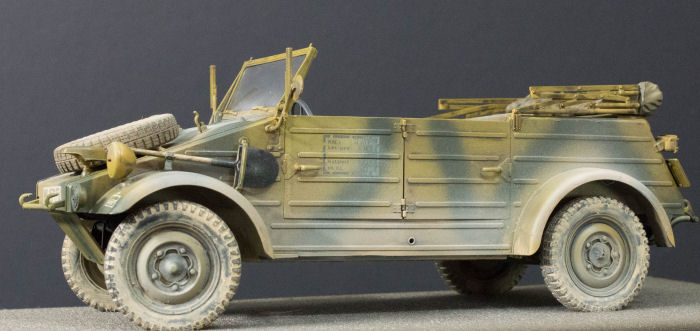
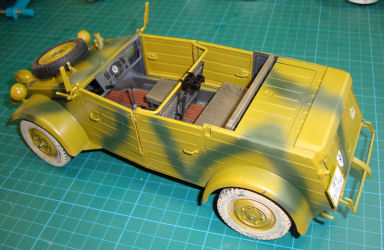
The basic shell is assembled and I'm trying out the German Desert Yellow on the front. As I mentioned earlier, I'm building this as a 1941/42 production Kubel that would have been painted Panzer Gray at the factory and set in 1943 near Kursk so it would have received an improvised camouflage scheme in the field along with the tanks and StuG's in the unit.
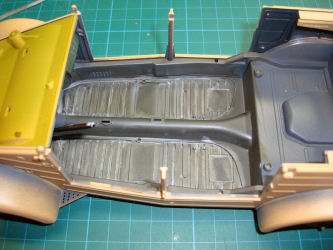

Since I'm painting the Kubel with acrylics from several sources, I opt to apply a protective coat of Future after every color because I need the protection from the enamel washes that will be used for weathering. For example, here is the interior with several washes in the floor pans because I won't have clear access once the wood grating is installed. The rear storage compartment behind the back seat is not being weathered since it will be blocked off after assembly.


The front and rear seats are assembled, painted, and test-fit in the interior. They'll get glued into place after weathering. The body shell has received its base color of Vallejo German Desert Yellow, the instrument panel is installed, and the stowed canvas top sans frame is painted.
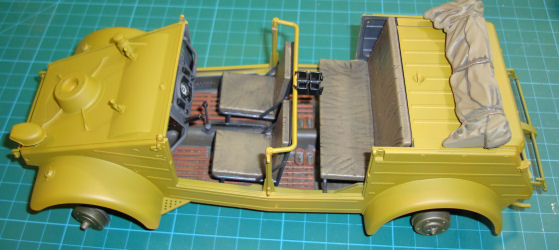
The front and rear seats are weathered and glued into the interior. Notice how the washes have highlighted the molded-in details in the seats that are not very visible in the previous images.

Back to the underside, the wheels are mounted as is the engine skid plate. That shiny Panzer Gray underside is now being weathered, this being Ammo by Mig Splashes Dry Kursk. The splashes are applied like other washes (only thicker) and then rub away the excess. That worked well with the tire treads and the underside though I still need to do the wheel rims and a few other details.
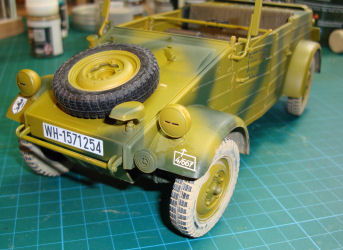
The Panzer Green is applied, then the body shell is given a coat of Future so decals can be applied. Here the second coat of Future is applied and we can begin the process of weathering the rest of the Kubel to add battle mileage to the appearance.
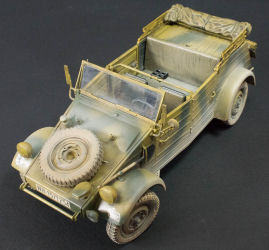
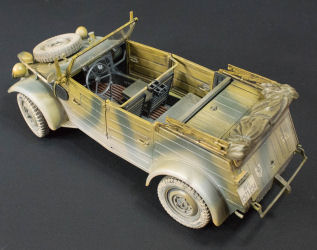
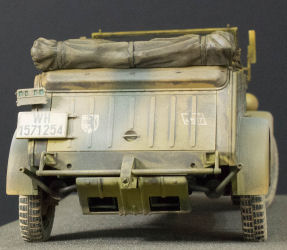
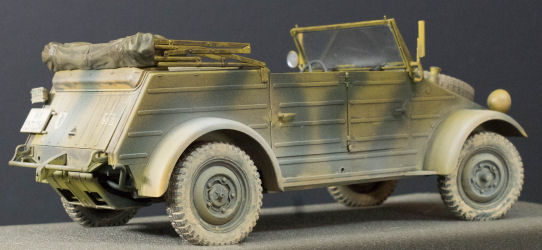
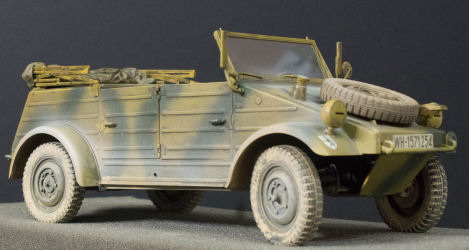


Here is the Kubel with the weathering applied to the exterior and interior. I finished using the Splashes on the wheels and underside, then used AK Interactive's wash for German desert camouflage all over the exterior and interior followed by an overspray of Mig Dust with heavier applications in the appropriate places.
It was during the weathering session that one of the rear wheels came off the screw that mounted it. Since there is no way to disassemble those modules now that they've been glued together, the only option was to use cyano which worked fine. Be careful when you handle the model as those wheels are almost too heavy for those tiny screws. Another word of caution is with the retaining screws that mount the windshield. At least here the kit designers knew the screws wouldn't stay in place and used those side-mounted wind deflectors to cover the screw holes and keep them in place. Nevertheless, one of the screw mounts split, so this plastic is a bit delicate for a model with such 'working' features.
Believe it or not, I'm still not finished as there are a number of details that are included in the kit plus some aftermarket items to help this model tell a story.