


Trumpeter 1/35 M1A1/A2 Abrams
by Thomas Hutchins
| Date of Review | August 2010 | Manufacturer | Trumpeter |
|---|---|---|---|
| Subject | M1A1/A2 Abrams | Scale | 1/35 |
| Kit Number | 1535 | Primary Media | Styrene |
| Pros | Excellent exterior detail; easy to follow instructions and assembly straightforward transparency; plastic quite foolproof big choice of variants | Cons | Lack of interior; one side of sprues messy; part fit sometimes poor |
| Skill Level | Basic | MSRP (USD) | $39.95 |
Introduction
The M1 Abrams entered service in with the US Army in 1980 replacing the M60 Patton. It has since been gradually improved in an ongoing process aimed at keeping it in service until around 2050. The M1A1 saw action in the Gulf War of 1991 where it proved far superior to the ageing Soviet designs in use by the Iraqi Army; in particular the M1 had better night fighting capability, better armour and employed the M829 armour piercing fin-stabilised depleted uranium discarded sabot round (APFSDS) which was effective at ranges beyond 2500m. M1s were deployed in NATO peacekeeping operations in the former Yugoslavia during the 1990s and were heavily used during the invasion of Iraq during 2003 as well as the subsequent counter insurgency operations. The tank is powered by a 1500HP gas turbine engine with a regulated top speed of 72km/h. The M1 is in service with the US Army and Marine Corps, Australia, Egypt, Kuwait, Saudi Arabia and Iraq.
The original M1 was equipped with a 105mm rifled cannon, which was replaced by the M256 120mm smoothbore cannon in the M1A1. The M1A1HA was a subsequent upgrade which placed a layer of depleted uranium inside the already effective Cobham-derived armour. The M1A2 added an independent IR camera for the commander along with some improved navigation systems which in turn has been updated in the M1A2 SEP and TUSK (Tank Urban Survival Kit). There are also several extra capabilities which have been placed on an M1 hull, including remote controlled mine clearing vehicles and bridgelayers.
The Kit
I bought this kit in the gift shop of the Saumur tank museum; I was competing in an archery competition nearby the next day and I couldn’t pass it up. I had wanted to build a tank for some time and having built mostly aviation kits I especially wanted to try my hand at serious weathering. I fancied an OIF kit and the options were this or Tamiya’s M1, which while likely to be impressive was twice the price and I was wary of paying that much when I didn’t really know what I was doing. Therefore I resolved to put up with whatever was in the box and make the best kit I could out of it. Good plan!
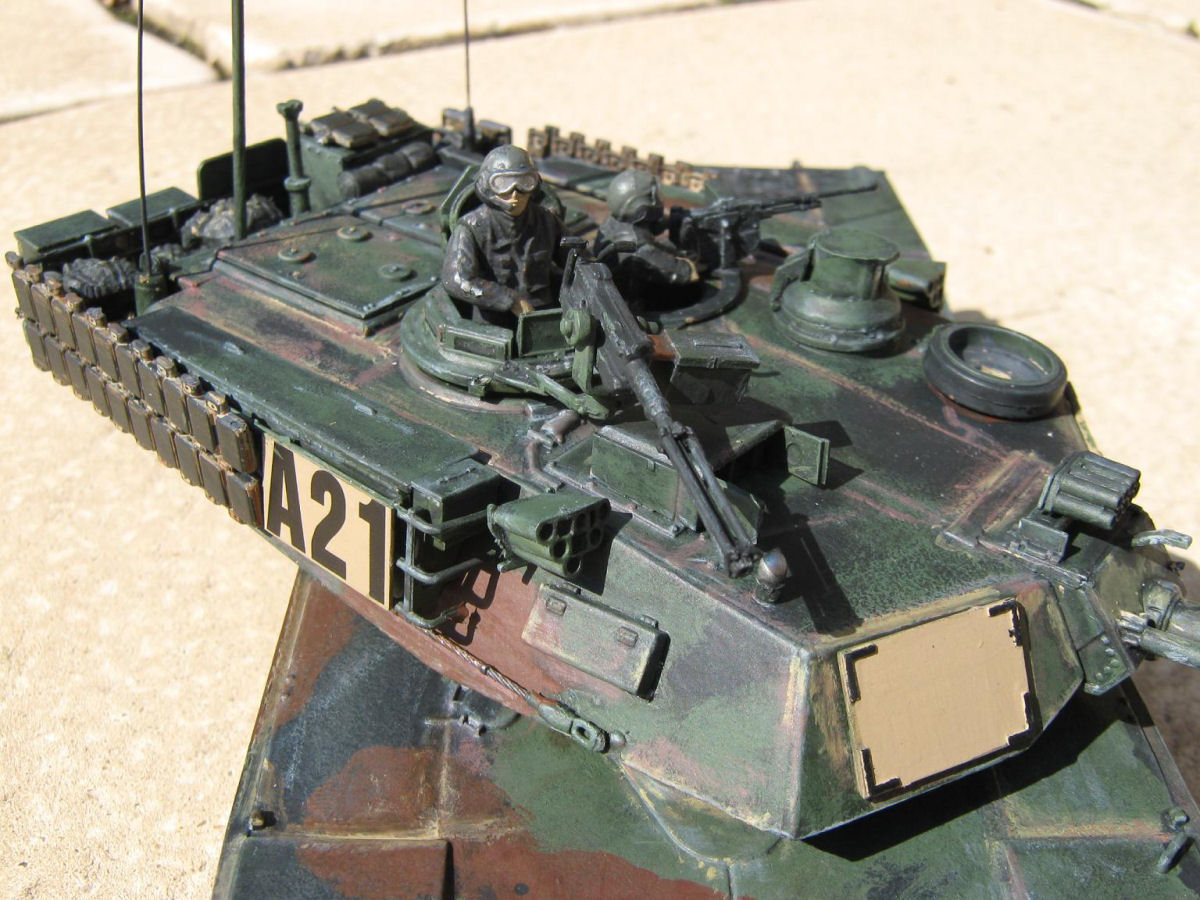
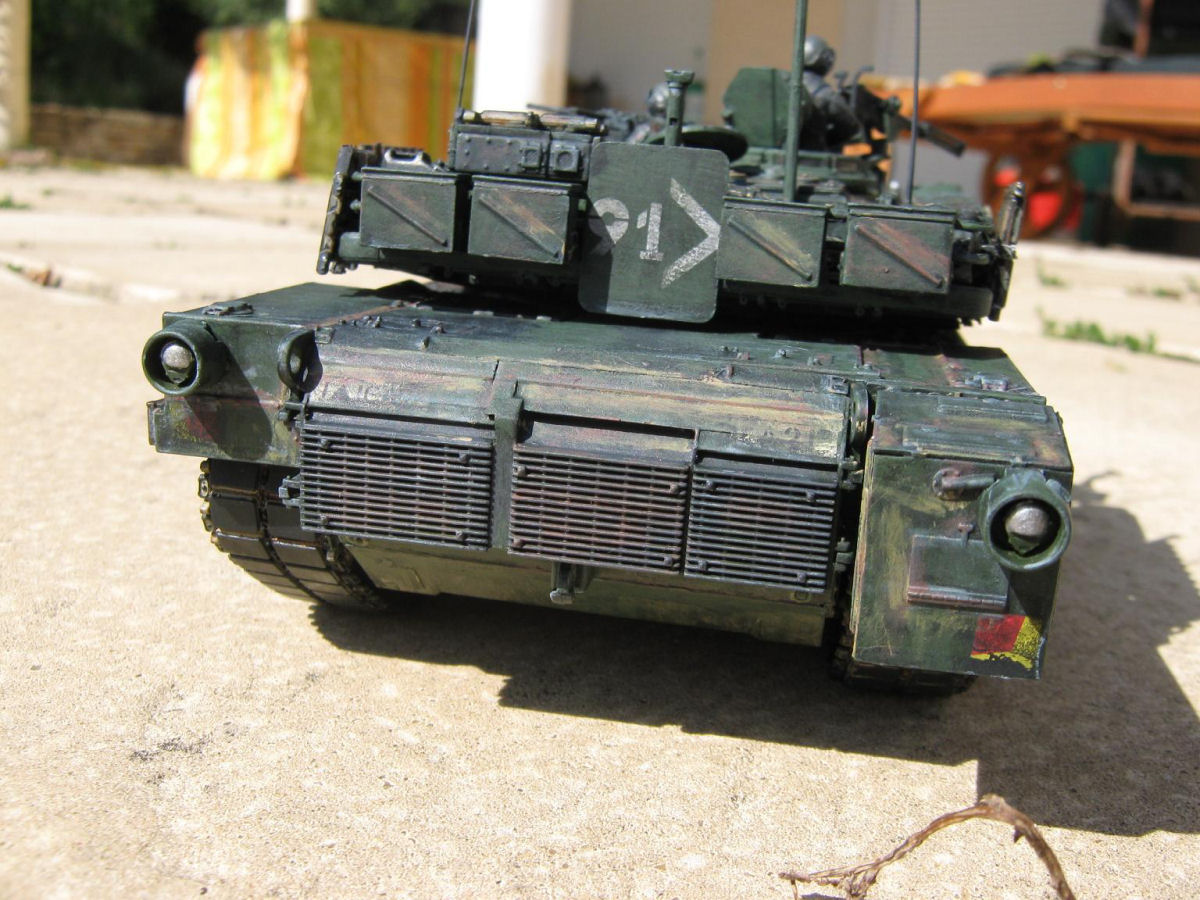
Trumpeter’s M1A1/A2 kit allows the builder to choose between five different variants, with painting instructions and decals for each: an M1A1HA “Abbadon” participating in the 1996 IFOR peacekeeping mission in Bosnia (NATO camo, “IFOR” and “91>” decals in white); an M1A2 “Another Bad Creation” (desert yellow/green camo); M1A1HA and a mine roller (desert yellow/black/brown camo); M1A1HA “Crater Magnet” with a mine plow (desert yellow, apparently a Desert Storm tank) and an M1 Panther II remote controlled mine clearer, with a mine roller (all over green).

The kit is moulded in light grey styrene on thirteen sprues, there are some basic sprues for the hull and turret, then individual ones for each variant, so for example the mine plow and roller each have their own sprue. Also included are two transparent plastic sheets from which the windows are cut (one for the M1A1, the other for the M1A2; I don’t recognise the plastic material but it doesn’t fog in contact with model glue), two rubber tracks (multi part plastic ones are optional), a length of chain, some brass wire, a length of string, a vinyl hose and a plastic mesh. Looking at the finished kit I am just slightly disappointed that clear plastic lights were not provided. The instructions deal with each variant separately, they are clear and easy to follow. The kit so far is drawn in quite good detail, with the new parts being drawn at the right angle with arrows showing exactly where it goes.
Surface detail on the kit is excellent, with raised weld lines, non-slip material, nice vents and deep panel gaps. The insides of the panels retain many circular holes and stalks from the moulding and the part fit often required sanding and occasional putty. There is no interior and no detail in many places which you will never normally see (under the track covers for instance) but if you leave the turret on and have the kit sitting on a shelf it will look great and no one will ever know.
Construction
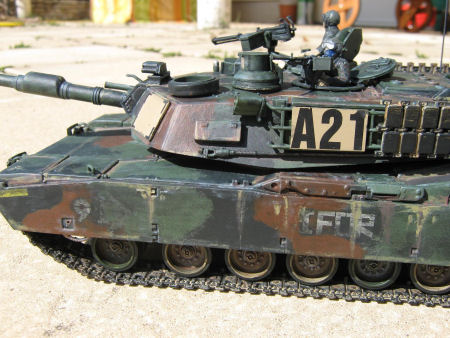
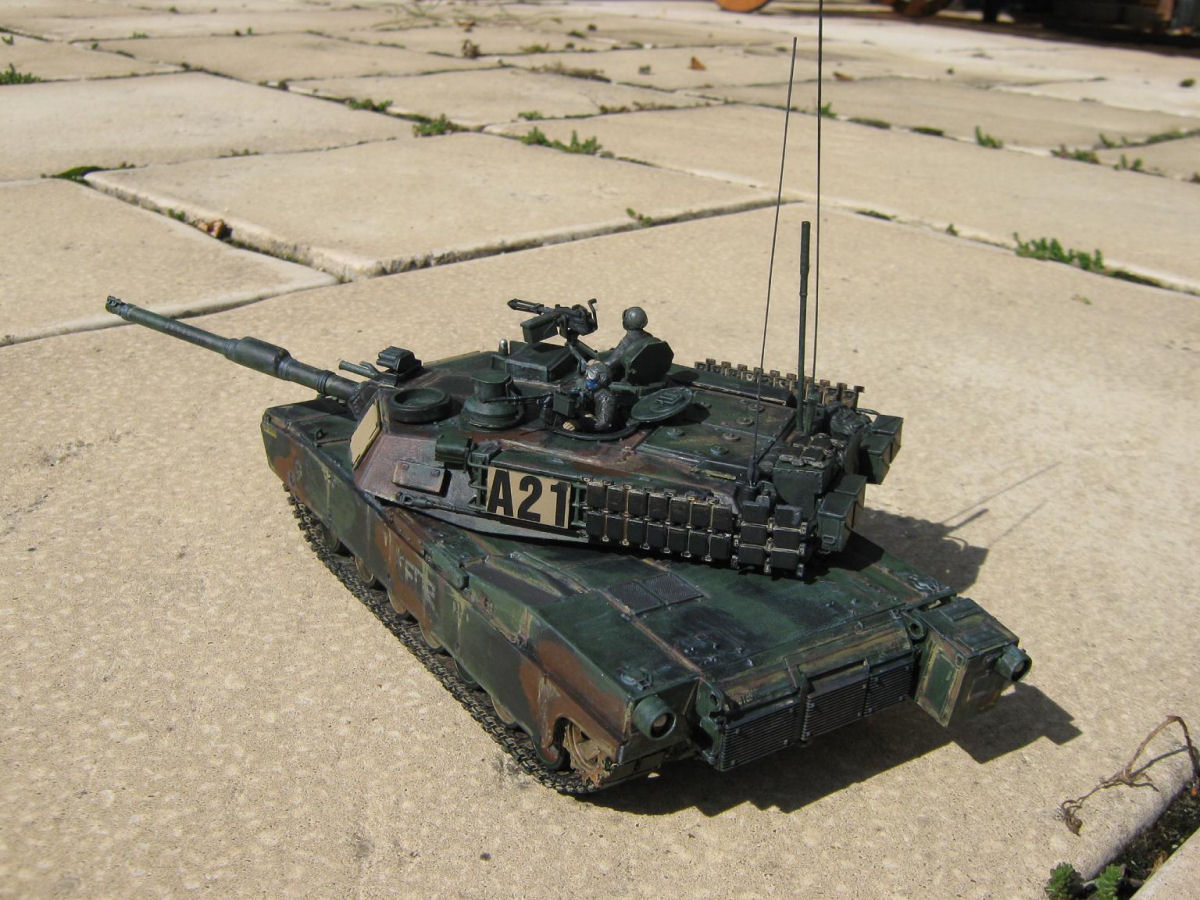
I wanted to build an unusual kit so I did some research into how to make an OIF Abrams which would fit the bill. Thus started the most fun build I have ever done as many of the tanks in photos were still wearing NATO camouflage in the desert. It turns out that they were deployed too fast for them to be properly resprayed, so were either hastily painted or never repainted at all. Also, replacement wheels were often not the same colour. Perfect; I not only had a reference to build the kit I’d wanted in the first place while making it look a bit creative. I used the M1A2 instructions, painted it as “Abbadon” from IFOR (and added decals), then weathered it and stuck some “A21” identification on the side of the turret.
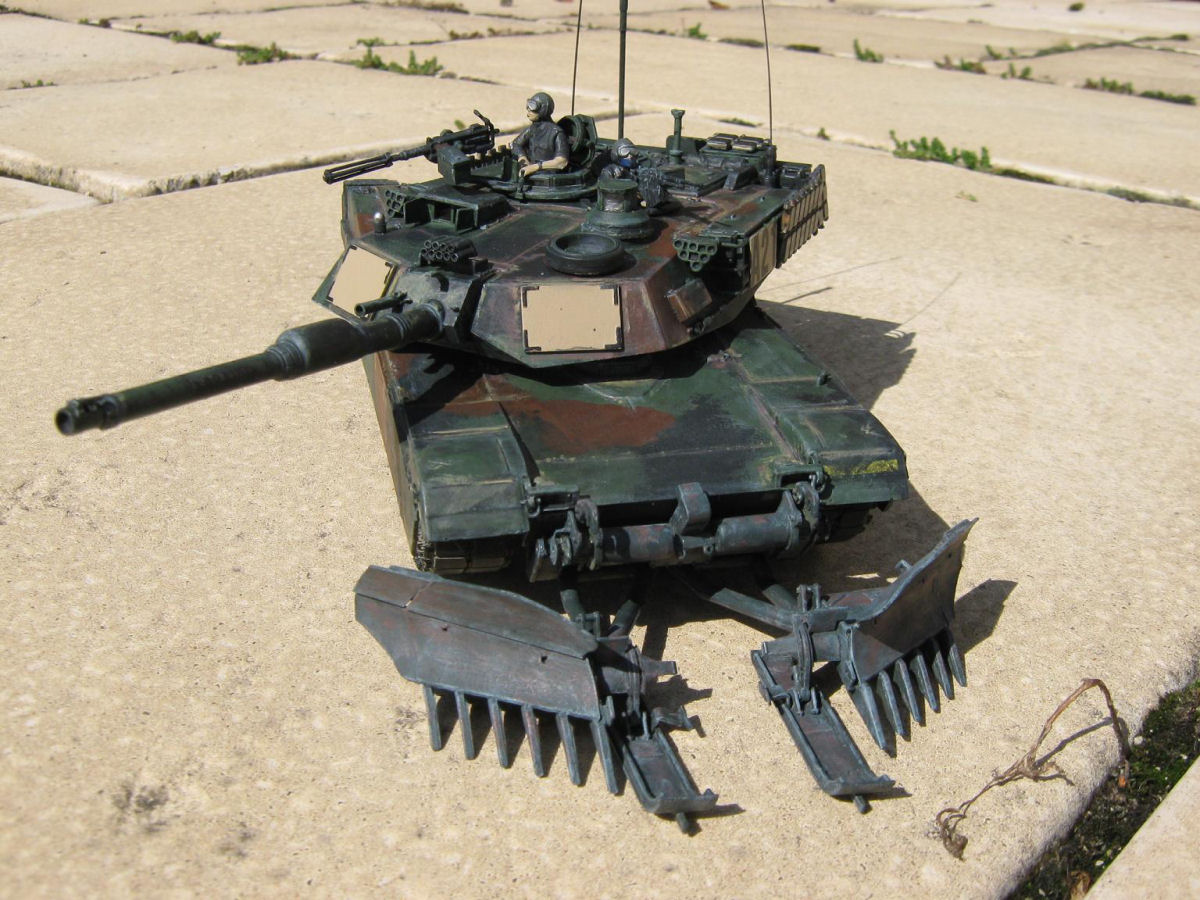
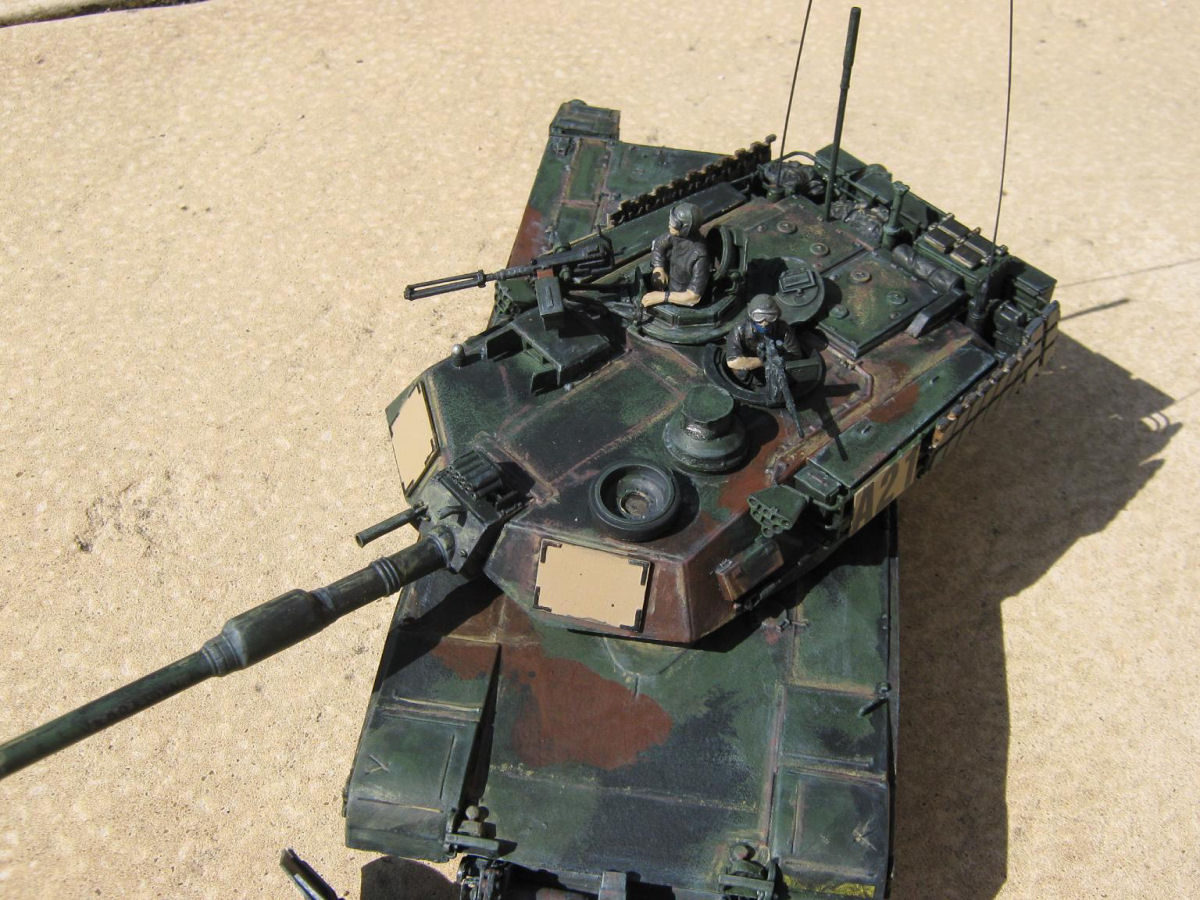
The kit went together easily, the parts were easy to align, simple to find on the sprues as they were grouped by section and variant and the instructions were simple to follow. I did especially have fun with the aerials, as rather than providing moulded ones which would probably be too thick the instructions show how to make your own by stretching a sprue over heat. I had a pleasant afternoon and now have far more aerials than needed, as this method is tricky until you get used to it but looks great on the kit. I personalised my kit with the two figures of commander and loader, then added a few backpacks which are provided to the bustle rack. I had seen M1s in action with a large amount of track segments hung around the turret so I chopped up the track I hadn’t used and stuck some on. I completed it with the square identification panels in desert yellow to look like they’d been added in theatre.
I have normally used Revell or Humbrol enamel paints, but for this kit I picked up some Tamiya acrylics as they produce actual NATO colours. These acrylics went on amazingly, perfectly smooth and showed no brush marks. On the other hand they dried too fast to be able to safely rebrush even a minute after they’d gone on, so be careful! They may work better with an airbrush. Now came the bit I’d bought the kit for: the weathering. I knew two methods of shading a model, washing and drybrushing, which were going to be the most obvious and important part of the build. I made up a black wash out of NATO Black and thinner, about 1:10 and prepared to try it out. To make sure the thinner wouldn’t strip my careful paint job I put a coat of enamel Revell matt varnish over everything. Enamel and acrylic use different thinners, so the wash shouldn’t affect the varnish. Cunning!
The wash looked very dark when it went on but dried much lighter having collected in the deep panel lines, so it was time to dry brush the high points with the original colour. I then drybrushed the very highest edges with light grey (Revell 57) and repeated the process with matt rust especially on the weld lines. Now, it’s a desert tank so I further drybrushed some desert yellow onto areas where photos showed dust collecting on the real thing, et voila! One M1A2, deployed to Iraq in a hurry, and which has been busy “getting some” every since, as evidenced by the mismatched wheels, wrong paint job, heavy rust and dusty finish. I overdid the dust in places so I drybrushed some more rust over the top. I also made up the mine plow, which I painted a dark grey/green and used the same weathering techniques on this, sans dust.
I am very happy with how this tank kit came out, but there are a few things I’d do differently in the future. I would make a lighter black wash and do less drybrushing of the original colour, as I feel this might have improved the look of the kit, also my attempt at adding a “dusty” look didn’t really work so I would do some experiments before repeating this on a build. Actual weathering kits might not be a bad idea too! Now I really want to do a proper desert camo tank though...
Conclusion
This kit may not be the most perfect in every detail, but if you want to build a highly customisable armour kit that’ll look great in your collection without breaking the bank it is highly recommended. I enjoyed researching and building this kit and to top it all it looks nice too – nice enough that for the first time I feel confident writing a review of the kit and build!