Warmplastic Models 1/570 Light The Titanic First Look
By Michael Benolkin
| Date of Review | January 2006 | Manufacturer | Warmplastic Models |
|---|---|---|---|
| Subject | Light The Titanic | Scale | 1/570 |
| Kit Number | N/A | Primary Media | Electronics, drawings, photo-etch parts |
| Pros | Outstanding way to bring the Titanic to life | Cons | Must have basic electronics skills |
| Skill Level | Advanced | MSRP (USD) | $89.00 |
First Look
I was rather pleasantly surprised to see this show up in the mail! The folks at Warmplastic.com Models have been busy again. These are the same folks who developed the Kingston Vacuumworks vacuform machines of various sizes for the more serious modelers.
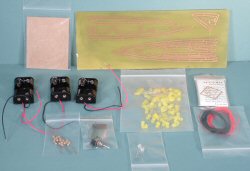
This time, they've come up with a very intriguing detail set for the Revell 1/570 scale Titanic kit. This set lights up the model! This set is comprised of:
- printed circuit card
- bag of nine resistors
- bag containing 30 feet of wire
- bag containing 40 inches of fiber optic strands
- bag of 65 yellow LEDs
- bag w/one red & one green LED
- three twin AA 3 volt battery holders
- bag of two power switches
- full color assembly manual
- port hole sizing/placement diagram
First, let me say that these are the best instructions I've seen to date. It's laid out more like a Fine Scale Modeler article with a very usable format. The booklet is only eight pages long, so we're not talking about a huge project. In fact, the center of the booklet provides a huge diagram of the Titanic with nomenclatures and locations of many of the key features of the ship.
So what is the scope of the project? If you're building the Revell kit, first step is to use the enclosed sidelight diagrams to drill out all of the various port holes to the diameters required. A table in the instructions lists out the size drill bit required for each size port hole. This will be the most time-consuming task.
The next step is to cut the circuit card into three parts. What they've etched onto the included circuit card are power trace patterns for three different parts of the ship. One large card goes into the bottom of the hull to light up the forward lower decks, the other covers the aft lower decks. The small circuit card mounts atop the aft card to light up the poop deck.
Each of the three cards must be trimmed as close to the traces as possible so that they'll fit inside the narrow confines of the Revell hull. Next, each of the pads on each of the three circuit cards must be drilled out with a #72 bit to allow installation of the electronics parts leads for soldering.
While I recommend that this set is best left to those with basic soldering and wiring skills, I must say that the writers have done an excellent job showing you how to do the project through the narrative and illustrations.
The set includes two types of power switches - a conventional on-off switch and a magnetically activated reed switch. The magnet is also included. These provide you with two ways to control the lighting in your project, but you're not constrained to these two options, a quick trip to Radio Shack will add other options should you not wish to use these components.
Likewise, power is provided by three AA battery holders to feed three volt power to your lighting system. Each of the three battery holders is wired in parallel to share the power load on all three circuit cards. If you'd rather not mess with the logistics of swapping batteries, you can also wire the power leads through a hole in the hull where you might have a display stand post and run the wires to a power jack at the rear of the stand. You can get a 3 volt DC power supply from Radio Shack and never worry about batteries.
As I mentioned above, the set also includes photo-etched parts for the Grand Staircase Dome Covers so you have the visual detail when observing the lit model from above.
While this lighting system was engineered to fit within the tight constraints of the Revell 1/570 kit, that means that it can be adapted to work with the Academy 1/400 scale or 1/350 scale kits, though you'll have some gap-filling in the lighting to do. Whichever is your favorite kit of the Titanic, here is an interesting way to bring that project to life!
Recommended to the Titanic modeler with basic soldering skills!
My sincere thanks to >Warmplastic.com Models for this review sample!


