


HobbyZone AJ01m Aircraft Building Jig Modification
By Michael Benolkin
| Date of Review | September 2020 | Manufacturer | HobbyZone |
|---|---|---|---|
| Subject | Aircraft Building Jig | Part Number | AJ01m |
| Pros | Even more flexibility | Cons | Nothing noted |
| MSRP (USD) | $49.95 |
Review
Time flies when you're having fun, and it is hard for me to grasp that I've had the HobbyZone AJ01 Aircraft Jig (formerly known as the PS01) for almost three years. You can see our build review here. This was a design that I collaborated with the HobbyZone folks in Poland for months before it finally was ready for commercial release. The factory is supposed to be releasing for global distribution any time now, but they were gracious enough to make this an exclusive product of HobbyZone USA since its release.
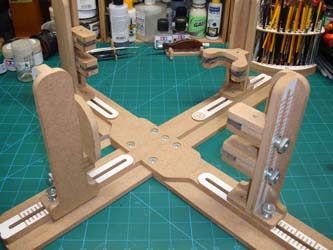
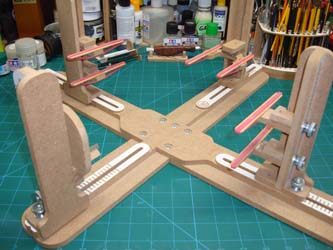
The image above shows what the jig looked like assembled out of the box other than my replacing the wing nuts with thumb nuts, which are more comfortable for me to use (these are also available as the AJ01x). Since this jig arrived on my bench, a variety of projects have been in the jig, and over the last year or so, I also discovered that by removing one of the four base arms (attached by two screws), the AJ01 is great for applying decals as you can position the model as needed without endangering the landing gear or other external parts, and with one base arm out of the way, the jig can be positioned close to the edge of the bench to get my eyes close to the task at hand.
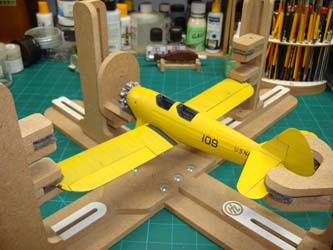
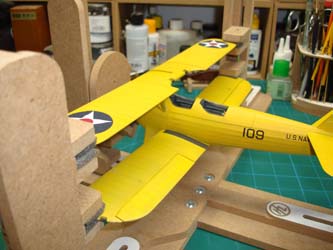
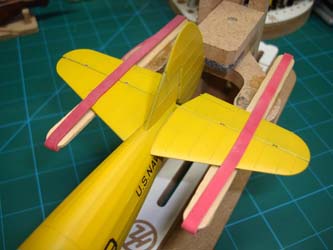
With each project, I'd note what I might have done differently with this jig, but no project was more revealing that the Roden(t) 1/32 PT-17 build. Based upon the two photos above, I realized that there are a few things that could be done better:
- The tail clamp isn't deep enough to reach the horizontal stabilizers when the rudder is installed. That's easy enough to work around, but...
- The upper wing clamps don't hold a heavy wing when it needs to be moved ahead of the lower wing. Since foam is used to gently hold the model parts, I've never had damage to a model in these clamps, but since they're foam pads on the wood clamp surfaces and the upper clamp halves are held in place with magnets, sometimes you can't get a firm enough grip on a problem assembly like the PT-17's wing.
- The front holder has a foam-lined cradle to hold a radial engine, cowling or radome, which is fine in most applications.
The realization that engineering changes were needed came in two parts. Part one was mounting the lower wings on a really poorly designed wing root. Even with copious amounts of liquid cement, the jig was having trouble holding the model square while trying to set the lower wing dihedral. The model fell out of the clamps several times and I think I've refreshed my profanity in both Russian and German as a result. Once the lower wing was set and the model was solid enough, the second part of my realization came when I found the cabane and interplane struts were not properly designed and it was going to take some precision to set position, angle of incidence, etc., while keeping everything solidly in place while adjusting and reworking the struts. The AJ01 was not up to the task as-is. It was clear that some updates were needed.
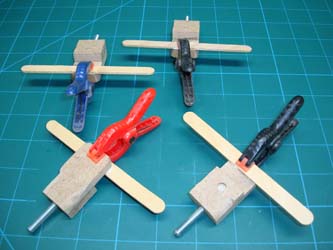
Step one was to disassemble all of the clamps and remove the foam off the lower half of each clamp. When the clamp is installed on its vertical riser, the clamp is set at horizontal by default. I grabbed a handful of 'craft sticks' (popsicle sticks) and used wood glue to fix them to each wing clamp lower half. On the claps for the upper wing, I rounded the corners that hold the clamp at horizontal so I can adjust the angle for those times when the upper wing needs some fine-tuning.
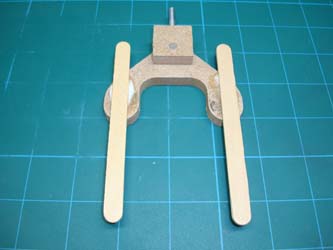
The tail clamp was also modified with a pair of craft sticks to create a 'forklift' that will provide ample clearance around most tails whether the control surfaces are installed or not.
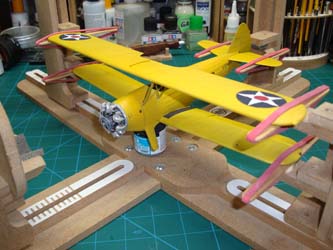
Here is the problematic PT-17 in the updated jig, and I have the option now of using the foam-padded upper clamps or rubber bands to hold the model in place. The rubber bands allow for lateral adjustments and I can rotate the upper wing as needed to get the angle of incidence to match the lower wing. Note that the nose cradle is out of the way and the front of the model is resting on a paint bottle.
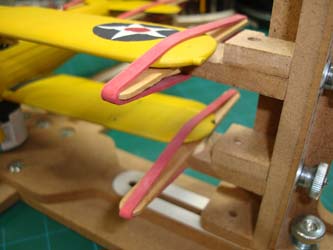
A closer look at the wing clamps, and now i have a solid surface to work with even when the upper wing is mounted significantly forward of the lower wing, and the same is true should I build a Beech Staggerwing where the upper wing is positioned slightly aft of the lower wing.
The combination of craft sticks and rubber bands have taken this jig to a new level and I'm quite pleased with the updates. I may notch the ends of the craft sticks to keep the rubber bands from sliding off the ends and creating a new projectile launcher. Maybe.
So here is the updated AJ01 ready for its next project, which may be another go at the Roden(t) 1/32 PT-17 once I've had a few more adult beverages. I still have the flexibility I previously had in my earlier model builds as well as using this as a decal placement jig (removing one arm), but now I have the ability to firmly mount the subassemblies and make the fine adjustments before the glue sets.
You can find AJ01 at here!