Iwata Triple-Action Handle First Look
By Michael Benolkin
| Date of First Look | January 2011 | Manufacturer | Iwata |
|---|---|---|---|
| Subject | Triple-Action Handle | Pros | Great way to clean/clear your needle without dismantling your airbrush |
| Cons | Nothing noted | MSRP (USD) | $29.95 |
First Look
 |
 |
 |
 |
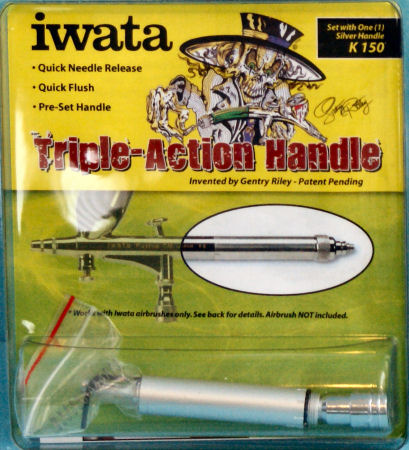
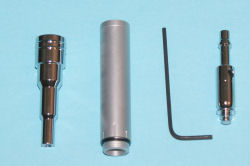
Iwata sent over this interesting new enhancement that will work with most of their airbrushes. This 'Triple-Action' Handle conversion simply replaces the rear handle of your airbrush with a new aluminum cylinder that has some interesting enhancements inside.
Many airbrushes have a hollow metal handle on the rear of the airbrush to balance the airbrush in your hand. To clean or even unclog the needle, you must remove the handle to access the needle. Some newer airbrushes have slots in the rear handles to allow you to grab the chucking nut that locks the needle into place with the trigger. Pulling the nut rearwards will usually clear the needle, but in my experience, most of the time, the grasp of the nut isn't strong enough to unseat a stuck needle. This isn't a weakness of any one brand of airbrush as this happens with just about any double action airbrush I've used to date.
What's different about this Triple Action conversion from Iwata is the method of grabbing the needle. Instead of the friction hold of the chucking nut, this new system uses and Allen set screw to hold the needle.
The conversion is simple, and I used my trusty Iwata HP-AH for the conversion. The steps are:
- Remove the old handle and chucking nut
- Re-seat the needle
- Add the new aluminum handle
- Loosen the Allen screw on the new Needle Knob, then slide it over the needle. With the Allen wrench still in place, slide the Needle Knob down the needle until the Allen wrench is in contact with the handle. Tighten the Needle Knob Allen Screw
- Remove the needle and Needle Knob
- Put the Needle Chucking Knob into the handle and screw it into place. When tight, loosen the knob with one full turn
- Add the Needle Knob spring (not shown here but included in the set) over the Needle Knob, then insert the needle back into the airbrush
- Tighten the Needle Chucking Knob, check for freedom of movement, then go airbrush something
This new enhancement will allow you to clear blockages by pulling the knob at the rear of the new handle, you can control the paint flow by pulling the knob back as well. My favorite aspect of this change is much more subtle - you can remove the needle now without removing the handle AND there is a machined channel in the Needle Chucking Knob to safely align the needle back into the airbrush without getting the needle caught in the older chuck inside the airbrush.
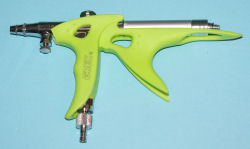
This is definitely a nicely engineered enhancement to my Iwata HP-AH and best of all, it works perfectly with the Grex handle installed as well. I won't have to dismantle the airbrush to clean/clear the brush now as before. Very nice indeed.
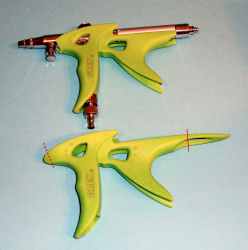
Update: After retrofitting my other Iwata airbrushes with this Triple Action handle, I quickly discovered that a minor modification was required to the Grex handle to make this all work nicely together. In the third image, you can see the green Grex handle attached to my HP-AH. The standard handle (shown in the bottom image) wouldn't fit over the Micro Air Controller (MAC) valve on the bottom of the airbrush so I trimmed back the front of that handle accordingly (shown with the red dotted line in the bottom image).
With the Triple Action Handle in place as shown in the third image, the rear of the Grex handle extends under the Triple Action Handle. After a few pulls on the Triple Action Handle, it was clear that the Grex was in the way here too, so I've trimmed away the rear of the Grex handle as shown in the bottom image so that the Triple Action Handle can be easily grasped when needed. Even with these modifications, the Grex handle still makes it easy to grip and aim the airbrush for extended periods, but now the Triple Action Handle can be easily pulled to reset the needle when needed.
Definitely recommended for the more demanding user!
My sincere thanks to Tom Grossman and Iwata Media for this review sample!


